Results 1 to 15 of 15

Thread: Having some issues disassembling my Work CR01's

  1. #1
    3,000 rpm - starting to feel the power Airbrush1's Avatar
    Drives
    04 mazdaspeed
    Location
    Baltimore, MD
    Join Date
    Nov 2014
    Posts
    636
    Thanks Given
    66
    Thanked 590 Times in 270 Posts

    Having some issues disassembling my Work CR01's

    I finally pulled the trigger on a set of Works for my MSM, and since it's winter, and I happen to have a gift certificate for some hydrodipping work (I love raffles), I have commenced the disassembly of the wheels in prep for dipping the centers only.

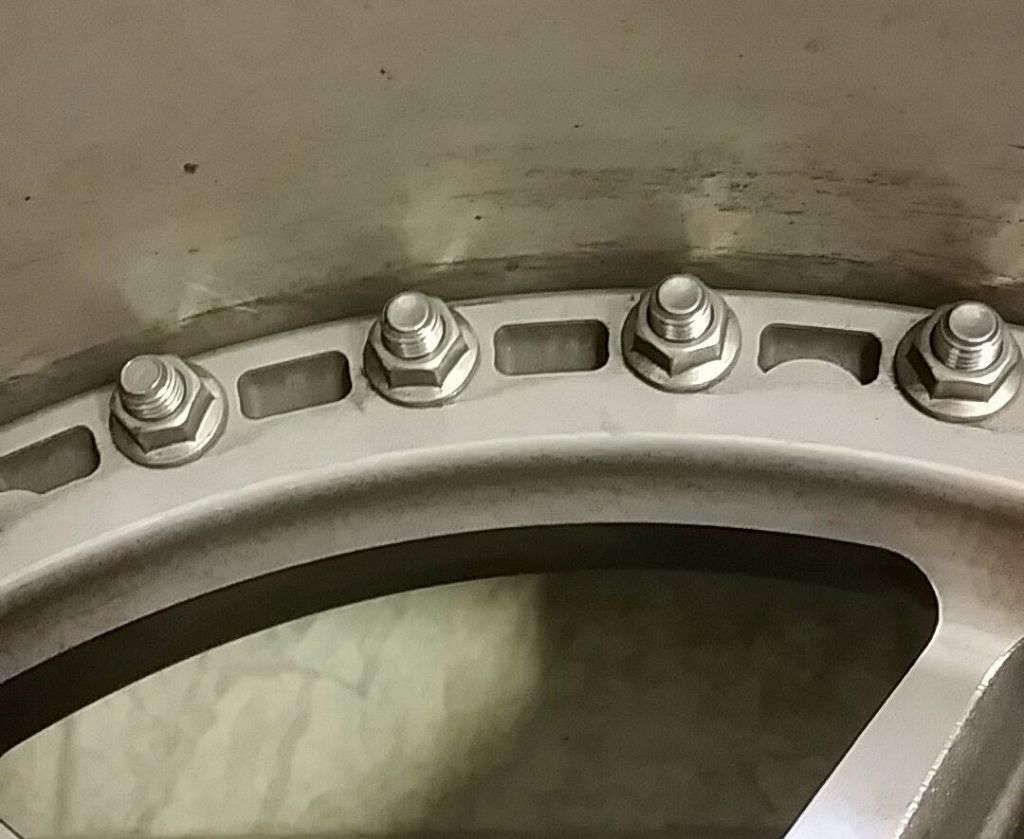
    First off, the damn bolts are on so tightly (with some sort of loctite as well) I nearly punched myself in the face a few times trying to remove them... All the bolts are out of one wheel now, but the wheel face wont budge! It's my understanding that the barrels on these are welded, and that I shouldnt have to cut the silicone to remove the faces ( they aren't sandwiched between the barrel and lip as some wheels are) I only beat on the center with a rubber mallet as I don't want to damage the face of the wheel, but I'm at a loss as to how to remove the centers at this point

    Has anyone successfully taken these wheels apart? (FYI, they are a 2011 manufacture date)

  2. #2
    Admin / Pit Boss / Miataholic Phatmiata's Avatar
    Drives
    Kirin the '93LE Roadster #1073
    Location
    NEW Tampa > OLD Tampa
    Join Date
    Apr 1994
    Posts
    33,607
    Thanks Given
    13,679
    Thanked 9,521 Times in 4,642 Posts
    There is a wheel shop near me that uses GE Ultraglaze SSG 4000 Structural silicone, it is NOT the stuff you can by at the box stores either, this is sold via construction supply houses only. Most of the structural grade silicone sealants are generally rated at a Tensile Strength of 300 to 340 psi, that is pretty strong!! Remember that this same silicone is used to hold in heavy glass windows on skyscrapers where they have to take high wind loads, and lots of movement from the building swaying.

    I know all this info because we sell these products in my industry

    The standard silicone you find at the home stores is a joke and my 6 year old can rip that stuff apart, but for the structural silicone that they probably used on your wheels its a whole new ballgame, and you will need something like DSR-5 silicone remover to go behind the bond line of the silicone and re-emulsify the sealant making it a little easier to remove.

  3. The Following 2 Users Say Thank You to Phatmiata For This Useful Post:

    tsingson (01-29-2015),WASABI (01-29-2015)

  4. #3
    Mod Squad
    Drives
    2016 Ceramic GT
    Location
    Bentonville, Arkansas
    Join Date
    Dec 2011
    Posts
    9,295
    Thanks Given
    2,075
    Thanked 2,452 Times in 1,353 Posts
    I was totally gonna say what Phat just said but he beat me to it


  5. The Following 2 Users Say Thank You to Martin For This Useful Post:

    Phatmiata (01-29-2015),tsingson (01-29-2015)

  6. #4
    Super Moderator atank's Avatar
    Drives
    1994 LB / 2014 MX5CE / 91 SD Italia
    Location
    Chatsworth, Georgia
    Join Date
    Dec 2011
    Posts
    9,988
    Thanks Given
    3,788
    Thanked 2,712 Times in 1,646 Posts

  7. #5
    3,000 rpm - starting to feel the power Airbrush1's Avatar
    Drives
    04 mazdaspeed
    Location
    Baltimore, MD
    Join Date
    Nov 2014
    Posts
    636
    Thanks Given
    66
    Thanked 590 Times in 270 Posts


    The faces are not sandwiched between the lip and barrel, nor are they welded to either of them, there seems to be no evidence of silicone on the mounting face between the centers and the welded barrel. I'm assuming that just the right amount of heat will get things moving, but I may be wrong.

  8. #6
    Admin / Pit Boss / Miataholic Phatmiata's Avatar
    Drives
    Kirin the '93LE Roadster #1073
    Location
    NEW Tampa > OLD Tampa
    Join Date
    Apr 1994
    Posts
    33,607
    Thanks Given
    13,679
    Thanked 9,521 Times in 4,642 Posts
    might help if you take the nuts off

  9. #7
    3,000 rpm - starting to feel the power Airbrush1's Avatar
    Drives
    04 mazdaspeed
    Location
    Baltimore, MD
    Join Date
    Nov 2014
    Posts
    636
    Thanks Given
    66
    Thanked 590 Times in 270 Posts
    You're on to something there!!!! After I remove the bolts, the center slid right out without issue!!!!


    Actually it took a 260 degree oven and trying to break a rubber mallet off on the face (with an oven mitt for cushioning), but the verdict is that the faces DO IN FACT COME OUT!

  10. #8
    Mod Squad
    Drives
    2016 Ceramic GT
    Location
    Bentonville, Arkansas
    Join Date
    Dec 2011
    Posts
    9,295
    Thanks Given
    2,075
    Thanked 2,452 Times in 1,353 Posts
    I'm anxious to see them after they're dipped

  11. #9
    3,000 rpm - starting to feel the power Tkblazer's Avatar
    Drives
    Black 94
    Location
    Garden Grove,Ca
    Join Date
    Jan 2012
    Posts
    520
    Thanks Given
    132
    Thanked 270 Times in 150 Posts
    Lol did you really not try to unbolt the faces off first? I knew you can take it about because there is that guy with the red na with the ugly repainted cr01s

  12. #10
    Super Moderator atank's Avatar
    Drives
    1994 LB / 2014 MX5CE / 91 SD Italia
    Location
    Chatsworth, Georgia
    Join Date
    Dec 2011
    Posts
    9,988
    Thanks Given
    3,788
    Thanked 2,712 Times in 1,646 Posts
    After you got the lips, and wheel face off did you notice and silicone or glaze??

  13. #11
    3,000 rpm - starting to feel the power Airbrush1's Avatar
    Drives
    04 mazdaspeed
    Location
    Baltimore, MD
    Join Date
    Nov 2014
    Posts
    636
    Thanks Given
    66
    Thanked 590 Times in 270 Posts
    Quote Originally Posted by Tkblazer View Post
    Lol did you really not try to unbolt the faces off first? I knew you can take it about because there is that guy with the red na with the ugly repainted cr01s
    Lol of course I unbolted them! I was just being a smartass

    Sweet spot in the oven seems to be around 290 degrees or so, then just beat the hell out of them with a rubber mallet . No sealant of any kind on the face to barrel interface, it's just a very very tight fit!

    When I go to reassemble I will leave the faces out on the porch in the cold for a few hours, and heat the barrels in the oven again so the faces are easier to insert.

  14. The Following 3 Users Say Thank You to Airbrush1 For This Useful Post:

    Martin (01-30-2015),Tkblazer (01-30-2015),tsingson (01-30-2015)

  15. #12
    Super Moderator tsingson's Avatar
    Drives
    99 Silver NB
    Join Date
    May 2005
    Posts
    18,501
    Thanks Given
    12,135
    Thanked 2,066 Times in 1,332 Posts
    Good job man! I anxiously await the final product.

  16. #13
    3,000 rpm - starting to feel the power Tkblazer's Avatar
    Drives
    Black 94
    Location
    Garden Grove,Ca
    Join Date
    Jan 2012
    Posts
    520
    Thanks Given
    132
    Thanked 270 Times in 150 Posts
    I think.I remember seeing a video at the factory where they torch the barrels before slipping the faces in so your technique makes sense

  17. #14
    3,000 rpm - starting to feel the power freedomgli's Avatar
    Drives
    1991 Miata
    Location
    Oak Hill, VA
    Join Date
    Nov 2012
    Posts
    2,065
    Thanks Given
    346
    Thanked 1,068 Times in 433 Posts
    Slight interference fit. Nice.

  18. #15
    2,000 rpm - light wheelspin, no bog here! iamdallas's Avatar
    Location
    North Georgia
    Join Date
    Dec 2011
    Posts
    430
    Thanks Given
    0
    Thanked 4 Times in 3 Posts
    I am excited to see. I have considered doing my CR-01s another color, or polished.

Posting Permissions

  • You may not post new threads
  • You may not post replies
  • You may not post attachments
  • You may not edit your posts
  •