Results 1 to 15 of 15

Thread: DIY "Suspension Bushing" Replacement for NA

  1. #1
    3,000 rpm - starting to feel the power mx54life's Avatar
    Drives
    1999 10th AE
    Location
    Northern Cali
    Join Date
    Feb 2013
    Posts
    938
    Thanks Given
    65
    Thanked 438 Times in 226 Posts

    DIY "Suspension Bushing" Replacement for NA

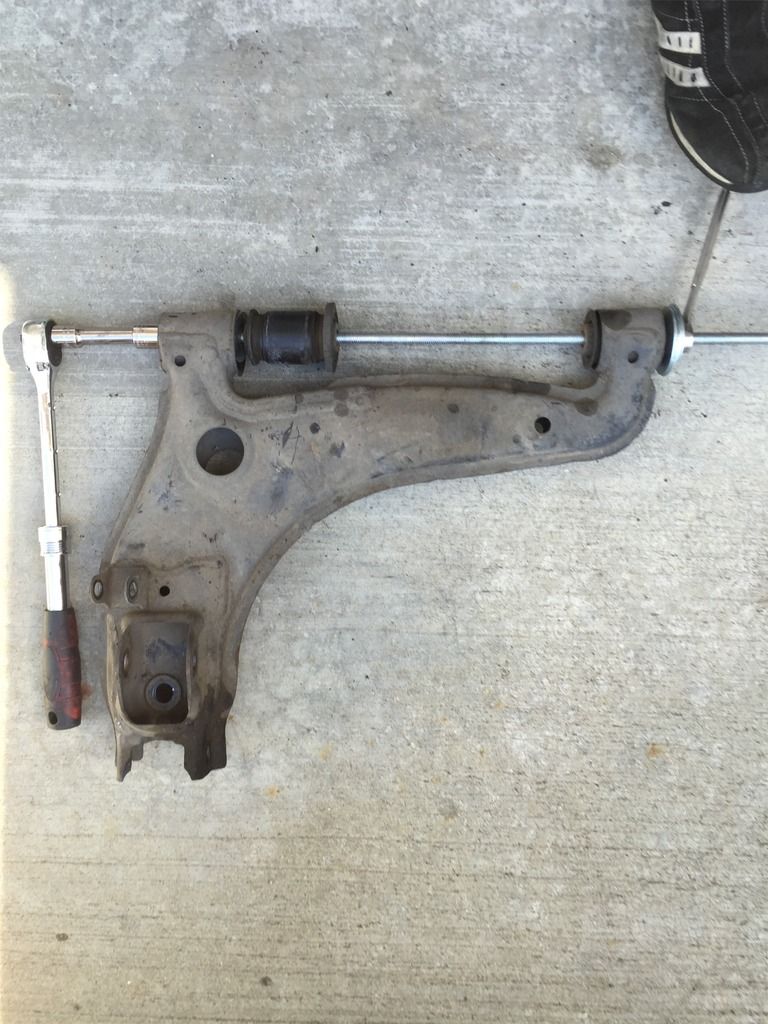
    In conjunction to Andy's post titled "How to: Suspension Bushing" please allow me to add some input and insights on the materials and tools over specific suspension components. I would also like to say that this is a compilation of what I have gathered from other postings in several sites so this will hopefully simplify the search for the next DIY"ers. Sorry for the huge pics for some reason photobucket is not allowing me to save images that I cropped.

    Warning these materials are extremely cheap lol.....I lost the receipt so I will do my best to name the parts.

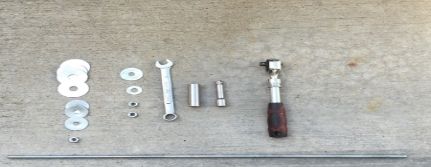
    Materials and Tools:

    1 - 24" threaded rod (this will cover all front and rear suspension components)
    4 - 1/2" 2 inch diameter washers
    4 - 3/8" 1.5 inch diameter washers
    1 - 3/8" 1 inch diameter washer
    3 - 3/8" nuts

    1 - 14 mm wrench
    1 - 14 mm deep socket
    1 - 3/8" extension
    1 - 3/8" ratchet (length adjustable helps)

    1 - DW40 bottle optional (to help the bushing slide out faster)


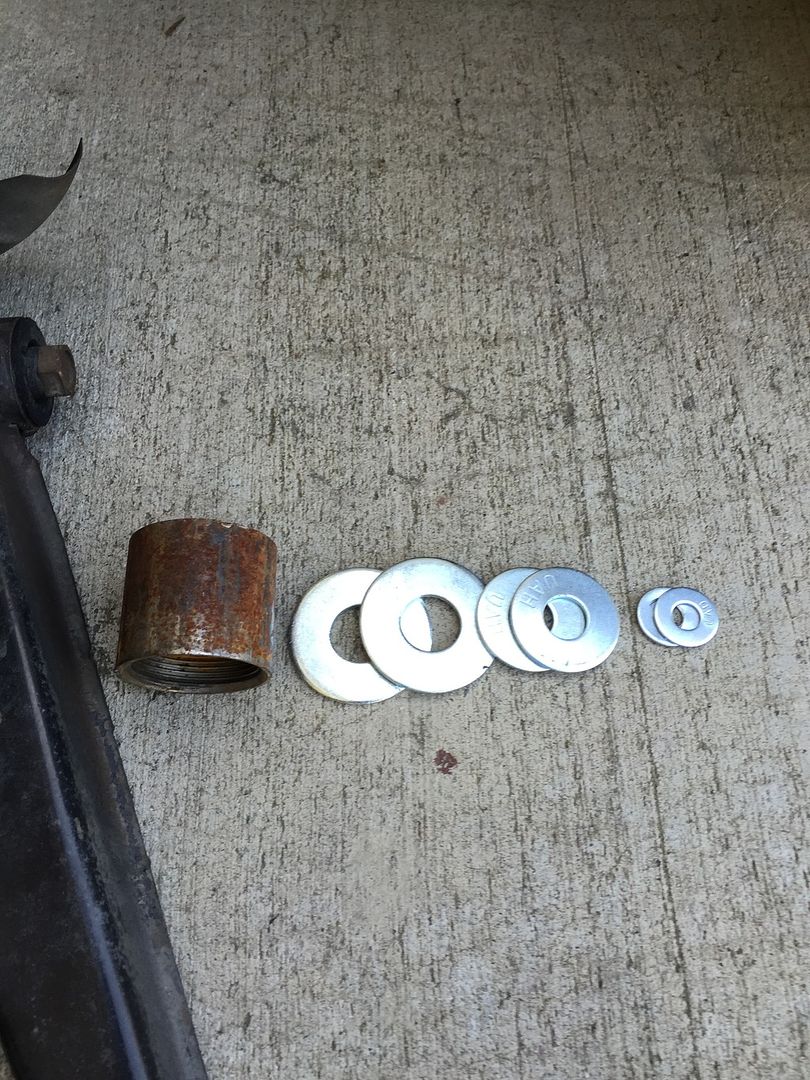
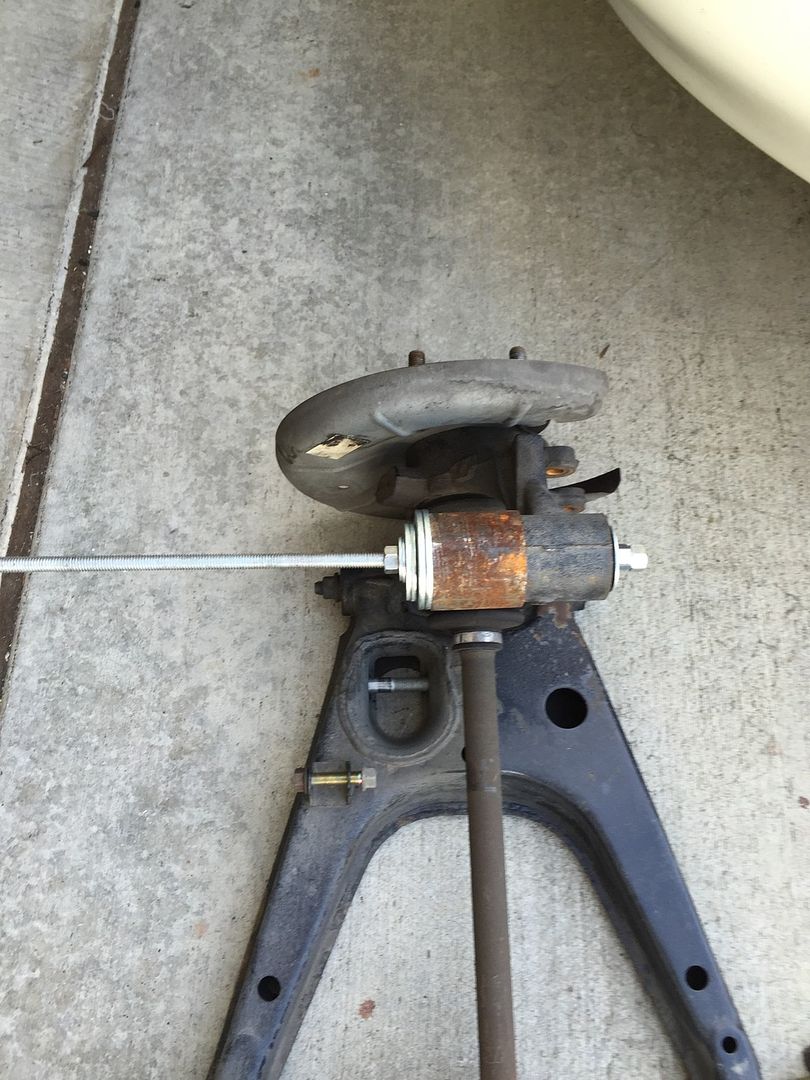
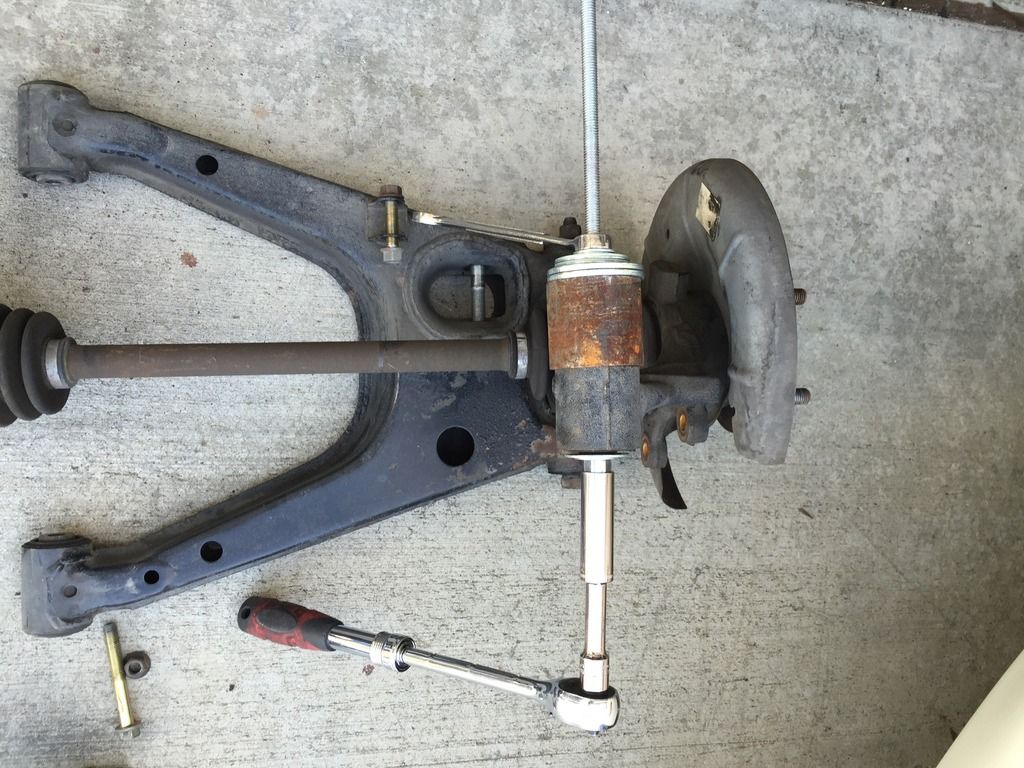
    Additional materials for the rear upper arm outer bushing. This is the only bushing that is bigger than the rest.

    1 - 1.5" FEMALE Iron Pipe Fitting/Connector (located in the plumbing section, mine is free)
    2 - 3/4" 2.25 inch diameter (really thick) washers
    2 - 1/2" 1.5 inch diameter washers
    2 - 3/8" 1 inch diameter washers


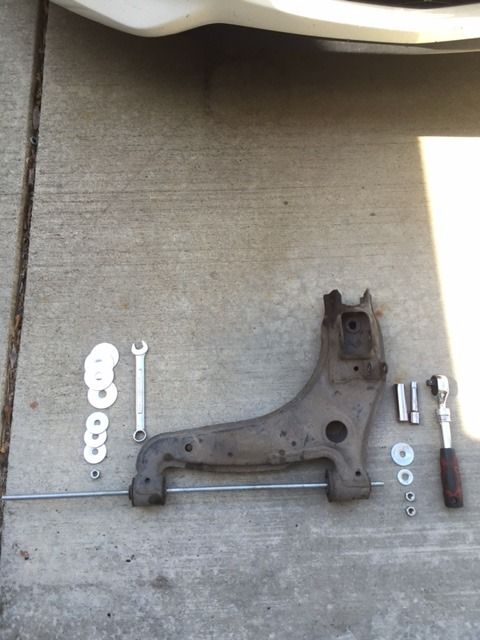
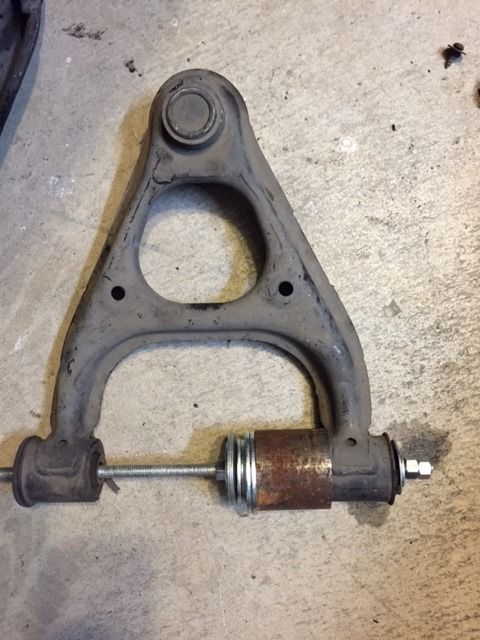
    Front Lower Control Arm:


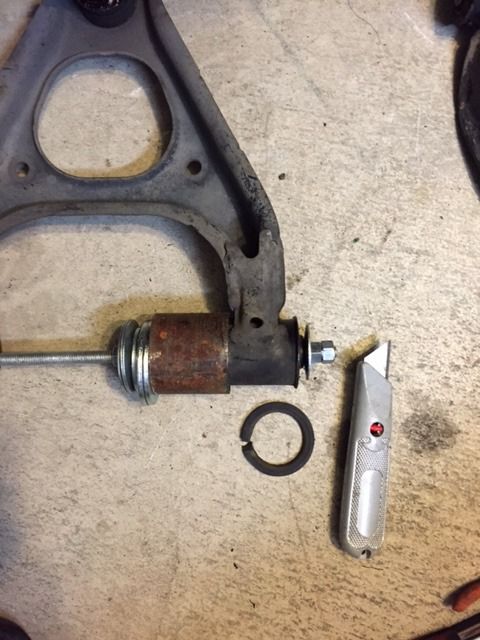
    Rear Lower Control Arm (Shown is the rear upper arm outer bushing, the biggest one)


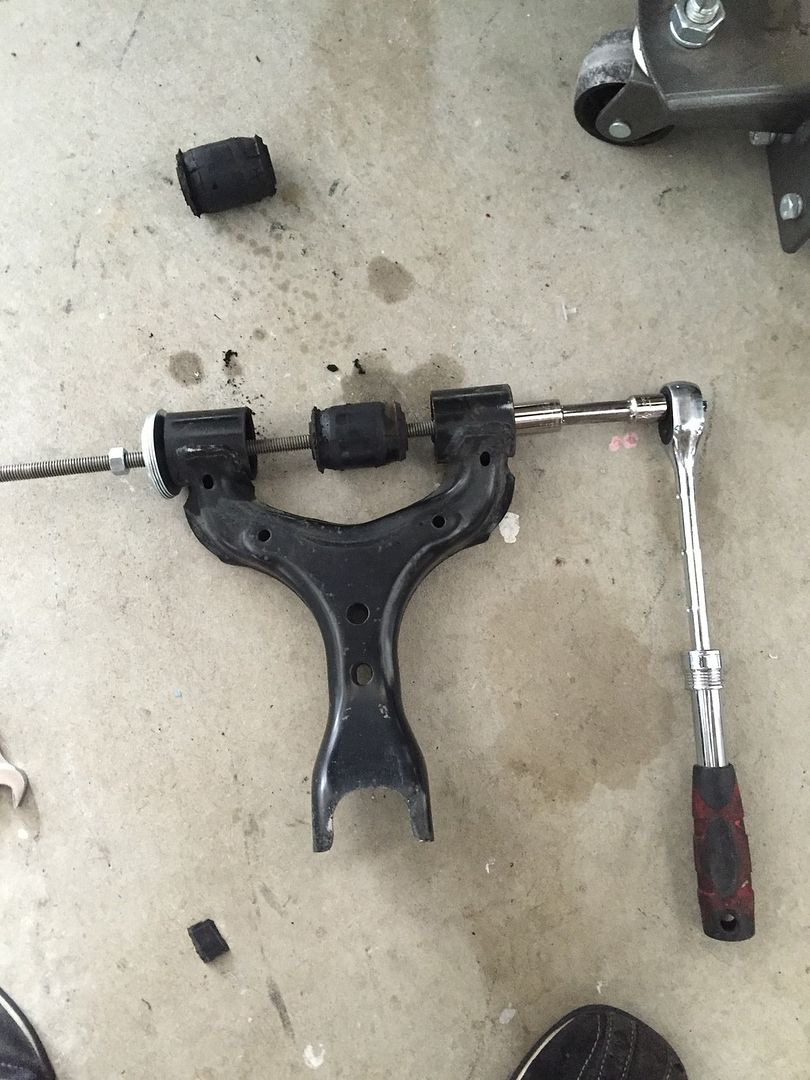
    Rear Upper Arm:


    Although I have not shown all the suspension components but you got the idea. Only one rod needed.
    Likewise same materials to be used to place a new OEM/Stock Bushings back in.


    Tip: assemble the rod, washers and nuts by hand to line them up better before you start wrenching.
    Take your take it only takes less than 10 minutes to remove both bushings per arm, that quick lol.
    Last edited by mx54life; 03-12-2015 at 05:56 PM.

  2. The Following 7 Users Say Thank You to mx54life For This Useful Post:

    Agent☣Orange (03-22-2015),Dave737 (03-24-2015),fwdtamiya (03-21-2015),Hammerhead (03-23-2015),OBD1 kenobi (03-23-2015),Slampen (04-11-2016),tsingson (03-23-2015)

  3. #2
    Supporting Member fwdtamiya's Avatar
    Drives
    1991 BRG
    Location
    USA
    Join Date
    Dec 2011
    Posts
    8,365
    Thanks Given
    3,878
    Thanked 3,435 Times in 1,506 Posts
    Thanks for this! I'd like to do my suspension bushings...one day

  4. #3
    2,000 rpm - light wheelspin, no bog here! OBD1 kenobi's Avatar
    Drives
    1994 black miata
    Location
    Florida
    Join Date
    Dec 2014
    Posts
    250
    Thanks Given
    446
    Thanked 169 Times in 97 Posts
    Awesome. Love these DIY threads. It seems like I need to do them all. Lol. This one is on my list.

  5. #4
    2,000 rpm - light wheelspin, no bog here! Satisaii's Avatar
    Drives
    2020 Polymetal GT
    Location
    Laguna Niguel
    Join Date
    Jan 2012
    Posts
    328
    Thanks Given
    75
    Thanked 378 Times in 161 Posts
    You can bend NA upper front control arms using this method. NB uppers are stouter. I have trashed a couple NA arms, but never have a problem with NB arms.

  6. The Following User Says Thank You to Satisaii For This Useful Post:

    Phatmiata (03-24-2015)

  7. #5
    3,000 rpm - starting to feel the power mx54life's Avatar
    Drives
    1999 10th AE
    Location
    Northern Cali
    Join Date
    Feb 2013
    Posts
    938
    Thanks Given
    65
    Thanked 438 Times in 226 Posts
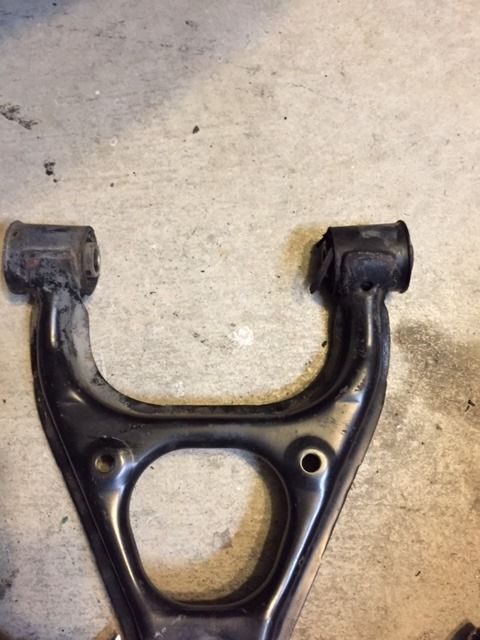
    Update: Thank you Satisaii for bringing this issue up, I meant to post this but got caught up with several stuff as you may not know I am approaching this project from different angles so thus I am not focusing one aspect alone which keeps me going and motivated lol. But yes here is what Satisaii is referring to......

    Notice the left bushing housing being slightly bent.....


    Therefore you MUST use the 1.5" Female Pipe fitting/connector, trim the excess rubber lip on the outside of the housing and spray DW40....

    "This is also a good precautionary approach with the rear upper control arm. I did used plenty of DW40 so the bushings just slide out easily without bending the arm. But if you fear that you may bend it go ahead and use the 1.5" female pipe adaptor"


    Then you can wrench away without the problem of bending.....


  8. #6
    Ninja Messiah kung fu jesus's Avatar
    Drives
    1999 White
    Location
    Atlanta, GA
    Join Date
    Dec 2011
    Posts
    15,852
    Thanks Given
    2,791
    Thanked 7,202 Times in 3,433 Posts
    The easiest way to do this DIY job, and minimize downtime for your Miata, is to buy another set of straight arms. You can recoup most of the cost doing that be either selling your old ones afterward, OR buying two sets of bushings and selling the second set as refurbished. A LOT of people want to do this, and the car feels AMAZING, but they don't want their car to be down for too long.

  9. #7
    Admin / Pit Boss / Miataholic Phatmiata's Avatar
    Drives
    Kirin the '93LE Roadster #1073
    Location
    NEW Tampa > OLD Tampa
    Join Date
    Apr 1994
    Posts
    33,607
    Thanks Given
    13,679
    Thanked 9,521 Times in 4,642 Posts
    I like the idea of buying a spare set, then you can take your time, or send them to a shop and have them done on a press.

    it would really suck to bend the only set you have so the spare would be the way to go.

  10. #8
    3,000 rpm - starting to feel the power mx54life's Avatar
    Drives
    1999 10th AE
    Location
    Northern Cali
    Join Date
    Feb 2013
    Posts
    938
    Thanks Given
    65
    Thanked 438 Times in 226 Posts
    Quote Originally Posted by kung fu jesus View Post
    The easiest way to do this DIY job, and minimize downtime for your Miata, is to buy another set of straight arms. You can recoup most of the cost doing that be either selling your old ones afterward, OR buying two sets of bushings and selling the second set as refurbished. A LOT of people want to do this, and the car feels AMAZING, but they don't want their car to be down for too long.
    Great option but that would be close to just buying another miata for a purpose other than DD; why I got two lol. This is a more precise DIY and get the labor savings to put into more upgrades, learn the car, burn some calories, feel the glory of DIY and oh discover american ingenuity. To be quite frank if you can take the suspension parts out of the car (which is probably the hardest) you can do this over the weekend. I am a 133 lbs and I can wrestle with the bolts lol.

    Again the bending of suspension parts can be 100% eliminated with the use of the 1.5" female fitting.

    But then again there is always that don't DIY. I just feel that young people including my son lol now a days use their brains more than their hands. He is waiting for this car to be finish so he can drive it.

  11. #9
    Ninja Messiah kung fu jesus's Avatar
    Drives
    1999 White
    Location
    Atlanta, GA
    Join Date
    Dec 2011
    Posts
    15,852
    Thanks Given
    2,791
    Thanked 7,202 Times in 3,433 Posts
    You can buy used control arms for about $200 give or take.

  12. #10
    3,000 rpm - starting to feel the power mx54life's Avatar
    Drives
    1999 10th AE
    Location
    Northern Cali
    Join Date
    Feb 2013
    Posts
    938
    Thanks Given
    65
    Thanked 438 Times in 226 Posts
    Quote Originally Posted by kung fu jesus View Post
    You can buy used control arms for about $200 give or take.
    Quite close with the ES Polyurethane Master Kit $216 shipped from Amazon and lifetime warranty. Used control arms will have no warranty and the bushing condition can't be judge from the outside. As Mazdaspeed says "rubber bushings are part of the wear and tear" so you will be at the mercy of the owner's accuracy in mileage and the bushings condition after such usage. But yet again you have a ready to plug-and-play parts.

    Again it is an available option. It all comes down to preference. I've rode on one with the Mazdaspeed bushings + FCM Bilstein and the other with ES Polyurethane bushings + Stance Coilers, my inexperience bottoms can tell the difference on same road travelled.

  13. #11
    Admin / Pit Boss / Miataholic Phatmiata's Avatar
    Drives
    Kirin the '93LE Roadster #1073
    Location
    NEW Tampa > OLD Tampa
    Join Date
    Apr 1994
    Posts
    33,607
    Thanks Given
    13,679
    Thanked 9,521 Times in 4,642 Posts
    Quote Originally Posted by kung fu jesus View Post
    You can buy used control arms for about $200 give or take.
    I did a quick search and found some local for $50

  14. #12
    Ninja Messiah kung fu jesus's Avatar
    Drives
    1999 White
    Location
    Atlanta, GA
    Join Date
    Dec 2011
    Posts
    15,852
    Thanks Given
    2,791
    Thanked 7,202 Times in 3,433 Posts
    That's a good find. . Even if one of two are bent.

    For you resto-mod guys, the control arm project is a good one to do with a spare set. You can get them cleaned, powdercoated, reinforced, zerked, add the bushings, etc. Add straight mounting hardware and camber bolts, the car is good to go for whatever you want to do. If you're detail-oriented, it's a neat job. If you're performance oriented, you don't have to go that extreme.

  15. #13
    Ninja Messiah kung fu jesus's Avatar
    Drives
    1999 White
    Location
    Atlanta, GA
    Join Date
    Dec 2011
    Posts
    15,852
    Thanks Given
    2,791
    Thanked 7,202 Times in 3,433 Posts
    OH! I almost forgot...

    Our sponsor, V8 Roadster also sells upper balljoints. I would LOVE to see someone do a detailed writeup about replacing those on a stock upper control arm. I have a good feeling for what it entails, and I know it is a for a little more advanced shadetrees, but nevertheless, it would be a killer DIY!

  16. #14
    3,000 rpm - starting to feel the power Andy's Avatar
    Drives
    Crystal White 1992
    Location
    Miami, FL
    Join Date
    Jan 2012
    Posts
    917
    Thanks Given
    5
    Thanked 221 Times in 134 Posts
    That is a good continuation from my thread. My only comment is that it is wd40, not dw40. LOL.

  17. #15
    3,000 rpm - starting to feel the power mx54life's Avatar
    Drives
    1999 10th AE
    Location
    Northern Cali
    Join Date
    Feb 2013
    Posts
    938
    Thanks Given
    65
    Thanked 438 Times in 226 Posts
    Quote Originally Posted by kung fu jesus View Post
    OH! I almost forgot...

    Our sponsor, V8 Roadster also sells upper balljoints. I would LOVE to see someone do a detailed writeup about replacing those on a stock upper control arm. I have a good feeling for what it entails, and I know it is a for a little more advanced shadetrees, but nevertheless, it would be a killer DIY!
    Oh no I did a google search on this front upper ball joint replacement as I needed to replace mine and this V8 Roadster did not show up but the MOOG K500210 did which I just ordered 2 days ago. Anyways I will do a DIY on the MOOG with the use of the rented AutoZone "ball joint remover". It should be the same process. The ones I have seen for the MOOG used a Ton Press which is not available to regular garage people like me.

    Andy thanks for the correction yes until this time I still call it DW40 and I don't know why LOL. But thanks for posting this method.

  18. The Following User Says Thank You to mx54life For This Useful Post:

    Slampen (10-09-2017)

Posting Permissions

  • You may not post new threads
  • You may not post replies
  • You may not post attachments
  • You may not edit your posts
  •