Page 3 of 23 FirstFirst 1234567891013 ... LastLast
Results 31 to 45 of 332

Thread: Kirin the '93LE Roadster

Hybrid View

Previous Post Previous Post   Next Post Next Post
  1. #1
    Admin / Pit Boss / Miataholic Phatmiata's Avatar
    Drives
    Kirin the '93LE Roadster #1073
    Location
    NEW Tampa > OLD Tampa
    Join Date
    Apr 1994
    Posts
    33,608
    Thanks Given
    13,680
    Thanked 9,521 Times in 4,642 Posts
    Spread out some of my ArtWorks Dewa parts on the table last night....

    ... and after the kids, and wife went to sleep I started to go to work (around Midnight)


    Prying open the OEM Gauge Cluster

    To separate the gauge cover panel from the assembly, push in the black plastic tabs on top and the bottom of the housing using a flat blade screw driver.

    Next step is to separate the clear acrylic cover from the base. The clear cover is glued to the base and must be cut away using an inexpensive acrylic cutter (available at home improvement centers). Using gentle pressure, score the acrylic cover several times until the scoring line is quite deep. Gently twist the cover from the base to separate. The resulting cut should be smooth and clean. If there are minor cracks or irregularities, do not worry since the dash pod will hide them once reinstalled.

    Prying open the OEM Gauge Cluster by Randy George, on Flickr


    Peeling Back the cover to remove the hardtop heater indicator light, I will put it back on once im finished.

    Peeling Back the cover to remove the hardtop heater light, I will put it back on once im finished. by Randy George, on Flickr

    Be careful when pulling this back, you just need a little room so that you can move the wires over a tad and then remove the light. Not all Miatas had this upgrade, mostly just the power option models in the USA. Most people mistake it for a gas light, but if you run your gas that low youll find out the hard way its not,

    Careful !! by Randy George, on Flickr

    Detaching the cluster face from the Speedometer

    Detaching the cluster face from the Speedometer by Randy George, on Flickr

    Removing the OEM Gauge Needles

    Removing the OEM Gauge Needles by Randy George, on Flickr

    Removing the Warning Light Covers
    You'll be taking these off when using the Art Works Dewa Cluster Cover

    Removing the Warning Light Covers by Randy George, on Flickr

    OEM Warning Light Template

    OEM Warning Light Template by Randy George, on Flickr


    Remove partitions around indicators.

    When your Needle position is vertical (6-o'clock)
    When the needle start position is vertical like my version, you should remove the small plastic partitions around the indicators at the bottom of the tachometer (headlights, hold sign for AT, air-bag). It you do not, the bottom of the tachometer will not be lighted. Use a small nipper to clip and remove the partition material. If your new gauge needle start position is at the stock location, you do not need to remove any of the partition material.

    Remove partitions around indicators. by Randy George, on Flickr

    Replacing the bulbs
    Changing the bulbs out for the Gauge Faces swap

    Replacing the bulbs by Randy George, on Flickr

    OEM Green Bulb Covers
    Stock lights are removed, now to change the covers out

    OEM Green Bulb Covers by Randy George, on Flickr

    AWD Bulb Covers
    Replace all four green light bulb covers with the orange ones provided. Remove the bulbs from the back of the instrument assembly by twisting them and pulling out

    AWD Bulb Covers by Randy George, on Flickr

    Art Works Dewa Orange Bulb Covers

    Removed the OEM Green Bulb Covers and Replaced with the orange covers.

    Side Note: Later I ended up swapping these out for some RED Colored LED Lights as these are not very bright at night

    Art Works Dewa Orange Bulb Covers by Randy George, on Flickr

    ArtWorks Dewa Premium G-Series Metal Overlay
    Here is the Art Works Dewa metal overlay that sits on top of the 1013 ArtWorks Dewa Gauge Faces.

    ArtWorks Dewa 1013 Overlay by Randy George, on Flickr

    Art Works Dewa Faces and Overlays
    Coming together now! Here is the Art Works Dewa Faces with the Overlays installed

    Art Works Dewa Faces and Overlays by Randy George, on Flickr

    Art Works Dewa Cluster Cover
    Mounted the ArtWorks Dewa Cluster Cover to the OEM Mazda Miata Cluster, next step is to add the Art Works Dewa Rings.

    Although the double sided tape should be strong enough to hold the AWD panel cover, the use of additional screws (included in the package) is recommended. You will have to drill pilot holes before attaching the screws. Once the panel cover is installed, remove any OEM rings before installing AWD rings.

    Art Works Dewa Cluster by Randy George, on Flickr


    Those ArtWorks Dewa THICK rings though......

    AWD rings with lens NA by Randy George, on Flickr

    Gluing the Rings in place
    Here I used a CLEAR Polyether Sealant / Adhesive by Chemlink - called "Clear", there is ZERO VOC, and ZERO Isocyanates so no worries about fumes attacking the metal, plastic, or lenses. Best part is no odor and cleans up perfectly with rubbing alcohol. Some guys use silicone which is fine too, however this polyether will grab faster, cures faster, bonds to anything, and has a much higher and longer lasting bond strength than silicone does.

    Untitled by Randy George, on Flickr


    You only need a few dabs of this material as it is a very sticky (messy) paste that grabs really well.

    Untitled by Randy George, on Flickr

    ArtWorks Dewa THICK Gauge Rings

    Props to @Vote4Pedro for trading these with me for these AWD Thick Rings. Here I am just using a wire hanger that I cut and used to poke the nozzle of the glue seal and push a little adhesive out. Again very little is needed, this adhesive sealant is amazingly strong.

    ArtWorks Dewa Gauge Rings by Randy George, on Flickr

    The first 2 rings are now in place and you can see the dramatic effect those diamond tooled ArtWorks Dewa rings make, they are really just stunning in person, pictures can never do these justice, seeing is believing.

    Added the Diamond Tooled ArtWorks Dewa Rings by Randy George, on Flickr


    One thing about the ArtWorks Dewa Gauge panels I was not liking was that white bulb dead center that Dewa used for some of the High Beam indicator, so I had ordered some Purple and this Blue indicator bulb from KG Works https://www.kgworks.co.jp/ and swapped that bulb out on this panel and a few others I have. All the rest is ArtWorks Dewa's parts though.

    Untitled by Randy George, on Flickr

    awd gauge cover by Randy George, on Flickr

    OEM Needles and ArtWorks Dewa Needle Caps
    The ArtWorks Caps fit very snug over the OEM needles however I would still recommend a small dab of adhesive, remember never use solvent based adhesives or super glues because they constantly "out gas" the solvents and isocyanates and will stain and ruin your gauges and fog up everything with the fumes!

    OEM Needles and ArtWorks Dewa Needle Caps by Randy George, on Flickr

    And mounted, the effect this simple upgrade makes is just incredible, especially at night when you are driving top down. The street pole lights with race around the needle caps an guage rings as you drive past them, its just outstanding to see in person.

    ArtWorks Dewa Needle Caps by Randy George, on Flickr


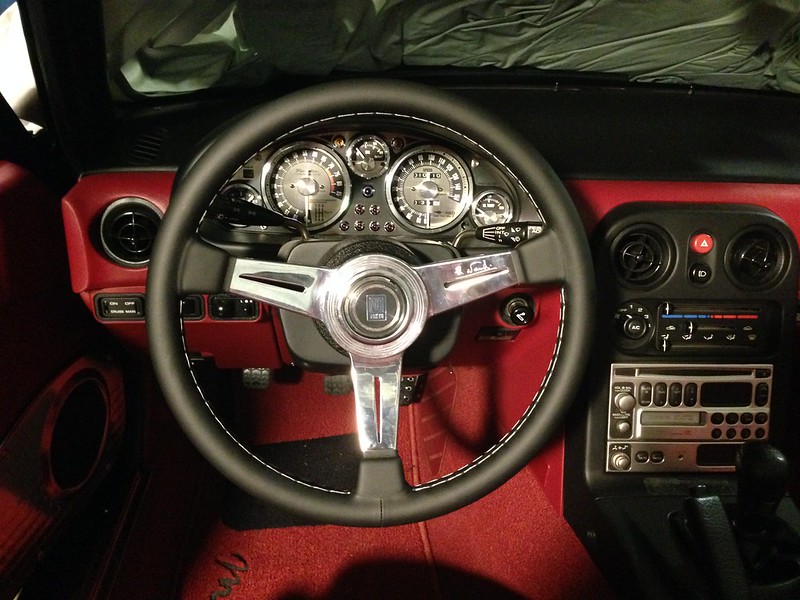
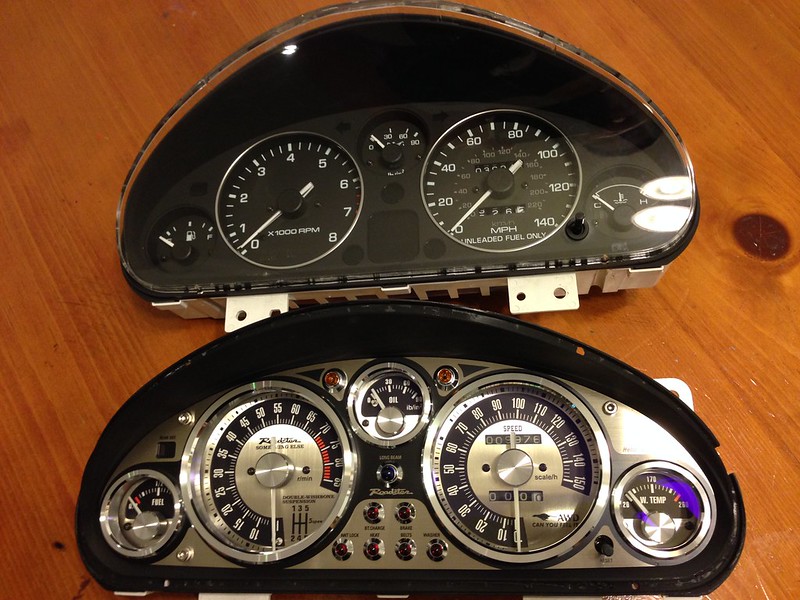
    ...... and then by about 3.5 hours later, I finally finished the job, here is a stock NA cluster vs my new ArtWorks Dewa setup, what do you think?


    much thanks goes to our sponsors and friends on the forum!

    Bill @ http://www.MiataRoadster.com (Bill) for the ArtWorks Dewa Gauge faces
    Joe @ http://www.Rspeed.net (Joe) for the ArtWorks Dewa Needle Caps, and G-Series Metal overlays
    Rod @ http://www.TetsuyaGarage.com (Rod) for the ArtWorks Dewa Cluster Cover overlay
    and our forum member Vote4Pedro (Joel) for the ArtWorks Dewa Thick Gauge rings


    I will edit this post to make it a proper write up on all the work involved to customize your cluster later, I took plenty of photos

    Re-install the instrument assembly in the car without the clear plastic gauge cover and reconnect the connectors and speedometer cable. Run the engine with no accessories, lights, or air conditioner until normal operating temperature is reached.
    While engine is running, gently set the needles at the same positions as indicated in your photograph or diagram. Note that the tachometer and speedometer needles are different. See below for typical locations of the needles. Do not firmly set the needles at this time.

    Reinstall the instrument assembly and set needles. by Randy George, on Flickr

    Filler Up!

    Easiest way to set the gas gauge needle to to go fill up the gas tank, then you can set it to the "full" position

    Filler Up! by Randy George, on Flickr

  2. The Following 9 Users Say Thank You to Phatmiata For This Useful Post:

    Dandy (03-31-2015),edizluv (02-09-2019),fwdtamiya (03-23-2015),Hammerhead (04-22-2015),Imontalto (03-23-2015),JamieH (03-23-2015),RustRat (03-23-2015),theothersawyer (03-23-2015),tsingson (03-27-2015)

  3. #2
    4,000 rpm - entering the fun zone RustRat's Avatar
    Drives
    Red NA8C 1.6L
    Location
    Mediterranean Sea
    Join Date
    Sep 2014
    Posts
    1,234
    Thanks Given
    1,588
    Thanked 944 Times in 465 Posts
    Holy shit this is beautiful! Literally drooling here.

  4. The Following User Says Thank You to RustRat For This Useful Post:

    Phatmiata (03-23-2015)

  5. #3
    6,000 rpm - mere mortals would shift theothersawyer's Avatar
    Drives
    1994 Classic Red
    Location
    Newnan, Ga
    Join Date
    Dec 2011
    Posts
    4,854
    Thanks Given
    1,167
    Thanked 1,498 Times in 734 Posts
    That is gorgeous!

  6. The Following User Says Thank You to theothersawyer For This Useful Post:

    Phatmiata (03-23-2015)

  7. #4
    Admin / Pit Boss / Miataholic Phatmiata's Avatar
    Drives
    Kirin the '93LE Roadster #1073
    Location
    NEW Tampa > OLD Tampa
    Join Date
    Apr 1994
    Posts
    33,608
    Thanks Given
    13,680
    Thanked 9,521 Times in 4,642 Posts
    And so here is the first hiccup with the Miata, apparently this was a common problem? The strange thing is I owned a 91 Miata, and a 92 Miata, and never had this problem, now I go to install my gauges on my 93 Miata this week and guess what?


    “Miata Sticky Dash Syndrome”

    what a sticky nasty mess, all this black paint is coming off the gauge hood? And it took some elbow grease to get this stuff off my fingers too!! grrrrrrrrr


    I went online to one of our forum sponsors and ordered a new Miata Gauge Hood as I just dont have time (or patience) to mess with this sticky mess at the moment and really want to drive the car

    Price: was the cheapest online at $100.21

  8. #5
    Admin / Pit Boss / Miataholic Phatmiata's Avatar
    Drives
    Kirin the '93LE Roadster #1073
    Location
    NEW Tampa > OLD Tampa
    Join Date
    Apr 1994
    Posts
    33,608
    Thanks Given
    13,680
    Thanked 9,521 Times in 4,642 Posts
    Pulled out some of my favorite steering wheels, and then set each one up in the miata to see which one I wanted to install.


    My son comes out to the garage while I am working and instantly grabs the Nardi Classico........


    "I like this one Dad !!!"


    Then after its installed he says;

    "That looks cool Dad!! Let's go take the car for a spin now!!"

    hahhahaha how can I say no to this guy???

  9. The Following 12 Users Say Thank You to Phatmiata For This Useful Post:

    atank (03-27-2015),Dandy (03-31-2015),fwdtamiya (03-27-2015),Hyper (06-09-2015),Malibu Q (05-17-2015),MightyM (04-06-2015),RustRat (03-25-2015),Slampen (03-26-2015),Tkblazer (03-25-2015),TNRooster3 (05-16-2015),tsingson (03-27-2015),wannafbody (04-03-2015)

  10. #6
    4,000 rpm - entering the fun zone TNRooster3's Avatar
    Drives
    chaste White, 1996 R2-Limited Eunos Roadster
    Location
    Old Hickory, TN
    Join Date
    May 2014
    Posts
    1,556
    Thanks Given
    854
    Thanked 561 Times in 301 Posts
    Really like the steering wheel collection, cool stuff.

  11. The Following User Says Thank You to TNRooster3 For This Useful Post:

    Phatmiata (05-16-2015)

  12. #7
    4,000 rpm - entering the fun zone RustRat's Avatar
    Drives
    Red NA8C 1.6L
    Location
    Mediterranean Sea
    Join Date
    Sep 2014
    Posts
    1,234
    Thanks Given
    1,588
    Thanked 944 Times in 465 Posts
    Your son has a good taste in cars then, as it seems.

    Nice wheel collection, btw. What are the two wooden ones?

  13. The Following User Says Thank You to RustRat For This Useful Post:

    Phatmiata (03-25-2015)

  14. #8
    2,000 rpm - light wheelspin, no bog here! Imontalto's Avatar
    Drives
    93 Brilliant Black Miata
    Location
    Charlotte, NC
    Join Date
    May 2014
    Posts
    283
    Thanks Given
    91
    Thanked 148 Times in 81 Posts
    The lighter one looks like a Momo Super Indy that I was looking at at one point. Such sexiness!

  15. The Following User Says Thank You to Imontalto For This Useful Post:

    Phatmiata (03-25-2015)

  16. #9
    Admin / Pit Boss / Miataholic Phatmiata's Avatar
    Drives
    Kirin the '93LE Roadster #1073
    Location
    NEW Tampa > OLD Tampa
    Join Date
    Apr 1994
    Posts
    33,608
    Thanks Given
    13,680
    Thanked 9,521 Times in 4,642 Posts
    Quote Originally Posted by Imontalto View Post
    The lighter one looks like a Momo Super Indy that I was looking at at one point. Such sexiness!
    Yes good eyes, they are both vintage MOMO Super Indy wheels


    I got these from another forum member that was parting out some of his collection of old steering wheels. Saving these in case I ever come across a nice 91 BRG, or 97 M Edition

  17. The Following 3 Users Say Thank You to Phatmiata For This Useful Post:

    91BRG (03-28-2015),fwdtamiya (03-27-2015),Imontalto (03-26-2015)

  18. #10
    Admin / Pit Boss / Miataholic Phatmiata's Avatar
    Drives
    Kirin the '93LE Roadster #1073
    Location
    NEW Tampa > OLD Tampa
    Join Date
    Apr 1994
    Posts
    33,608
    Thanks Given
    13,680
    Thanked 9,521 Times in 4,642 Posts
    new Gauge hood for my Miata came in from http://www.RealMazdaParts.com


    Cheaper than Rosenthal, and Fast shipping too !


  19. The Following 3 Users Say Thank You to Phatmiata For This Useful Post:

    fwdtamiya (03-29-2015),Shibby (06-20-2015),tsingson (03-31-2015)

  20. #11
    Admin / Pit Boss / Miataholic Phatmiata's Avatar
    Drives
    Kirin the '93LE Roadster #1073
    Location
    NEW Tampa > OLD Tampa
    Join Date
    Apr 1994
    Posts
    33,608
    Thanks Given
    13,680
    Thanked 9,521 Times in 4,642 Posts
    Took my son for a ride in the Miata to pick up this Montego Blue hardtop. It was an hour long ride one way but I really wanted a hardtop and most either get sold too fast or are beat to crap.

    The guy I bought this from is a member from my local club and was kind enough to hold it for me. Thanks Gerry !!

    So Kirin the Roadster now has a hardtop !!

    And BTW the Red interior against that Montego Blue looks wonderful !!! That would make a killer interior swap, just saying !!


    My son told me this is just the coolest car, and he loves the pop up headlights;

    "the pop up headlights is the coolest part Dad!" and he really like how low to the ground the car is. I was going to get into the whole center of gravity talk, but I was just happy that he was with me for the ride in the Miata.

    "...... this car gets a thumbs up Dad, please don't ever sell it."

    I remember how upset he was when I sold the White 96 Miata so I promised him I will not sell this car

  21. The Following 11 Users Say Thank You to Phatmiata For This Useful Post:

    91BRG (03-31-2015),Dandy (03-31-2015),Dave737 (03-31-2015),edizluv (02-09-2019),fwdtamiya (03-31-2015),MightyM (03-31-2015),Oldekamp (04-22-2015),RustRat (03-31-2015),theothersawyer (04-04-2015),Tkblazer (03-31-2015),tsingson (03-31-2015)

  22. #12
    2,000 rpm - light wheelspin, no bog here! MightyM's Avatar
    Drives
    a Black 94 Miata
    Location
    Vancouver USA
    Join Date
    Nov 2014
    Posts
    131
    Thanks Given
    58
    Thanked 68 Times in 44 Posts
    That's some good stuff there Randy! Quality time with the son is the best time!
    I can't wait to take my son on his first ride in my Miata but that'll be a while since he's just over 11 weeks old,or new... Whatever... Props to you my friend!��

  23. The Following User Says Thank You to MightyM For This Useful Post:

    Phatmiata (03-31-2015)

  24. #13
    Idling - Listen to it purr... The Thaw's Avatar
    Drives
    2000 SE mahogony mica
    Location
    Tampa Bay
    Join Date
    Feb 2015
    Posts
    16
    Thanks Given
    23
    Thanked 17 Times in 12 Posts
    your car looks very special Randy...

  25. The Following User Says Thank You to The Thaw For This Useful Post:

    Phatmiata (04-10-2015)

  26. #14
    2,000 rpm - light wheelspin, no bog here! Dave737's Avatar
    Drives
    '91 Miata
    Location
    Mesa AZ
    Join Date
    Nov 2012
    Posts
    303
    Thanks Given
    291
    Thanked 348 Times in 149 Posts
    So cool that your son is into the car. I remember being that age and being very into my dads TR-3, hoping he would give it to me some day. Unfortunately he sold it. Scarred me for life
    I have an eleven year old daughter who loves riding in the Miata. She'll be one of the only girls (or anybody for that matter) in her high school who will know how to drive a manual transmission.
    I was at a Chrysler dealership a couple of years ago and every last one of the Jeeps on the lot were automatic. What is this country coming to.

  27. The Following User Says Thank You to Dave737 For This Useful Post:

    Phatmiata (04-02-2015)

  28. #15
    Admin / Pit Boss / Miataholic Phatmiata's Avatar
    Drives
    Kirin the '93LE Roadster #1073
    Location
    NEW Tampa > OLD Tampa
    Join Date
    Apr 1994
    Posts
    33,608
    Thanks Given
    13,680
    Thanked 9,521 Times in 4,642 Posts
    Decided that I will put the M2-1001 Steering wheel away for safe keeping


    The Nardi Classico will see most of the driving duty as it flows better with my retro interior theme. And maybe I will just bring out the M2-1001 for Miata only events or some such. But then only 5% of the Miata owners would even know what this wheel is about anyhow.

    So Nardi Classico for now............


    Thanks Given:

    http://www.REV9Autosport.com for the NARDI Classico Wheel

    http://www.ProjectGLA.com for the AirBag version Daikei Hub Adapter US version

  29. The Following 3 Users Say Thank You to Phatmiata For This Useful Post:

    Dandy (03-31-2015),fwdtamiya (03-31-2015),OBD1 kenobi (03-31-2015)

Page 3 of 23 FirstFirst 1234567891013 ... LastLast

Tags for this Thread

Posting Permissions

  • You may not post new threads
  • You may not post replies
  • You may not post attachments
  • You may not edit your posts
  •