-
3,000 rpm - starting to feel the power


NC gas cap release relocation!
I usually keep the cubby where the release is located locked, so every time I go to get gas, I dig the AKE fob out of my pocket,. and remove the key from it to unlock and reach the release. A bit more involved than I like, so I decided to relocate the release to the door jamb as at least one other person has done.
To remove the rear finish panel you start removing pieces at the door sill, then the door jamb, and seat belt mounting area. Then remove the wind blocker ( it pretty much just pulls straight up, you can use the trim removal pieces to help if you want) Then remove the covers to the style hoops/roll bar hoops. You can then either remove or at least loosen the center console, as the rear edge of that covers a lip of the rear trim piece. At the very least you should remove the 5 screws, and shift knob so you can have some play to move the console forward enough to get the lip out from underneath. There are 2 more trim fasteners (one on each side) affixing the trim piece to the car. These were covered by the door jamb trim piece.
Once all those are done, you can pry the top apart from the rear trim, and remove the entire rear trim piece. It's much easier to do with a second person, but can be done by one.
At this point you should be looking at this:

and this 

close up of the release:

Taken after removal of nut holding the bracket on:

We had a steel L bracket lying around:

-
-
3,000 rpm - starting to feel the power
After a some drilling, and a little of this:

and a little application of brute force (hammer  ), we were left with:

a little more massaging and drilling, for the cable release, and it went right in on top of a bracket already in place. the bolt was already there , we just needed to remove a nut and put the new bracket in.


We then took the trim piece, drilled a starter hole, then filed away the plastic so we could fit the release through.
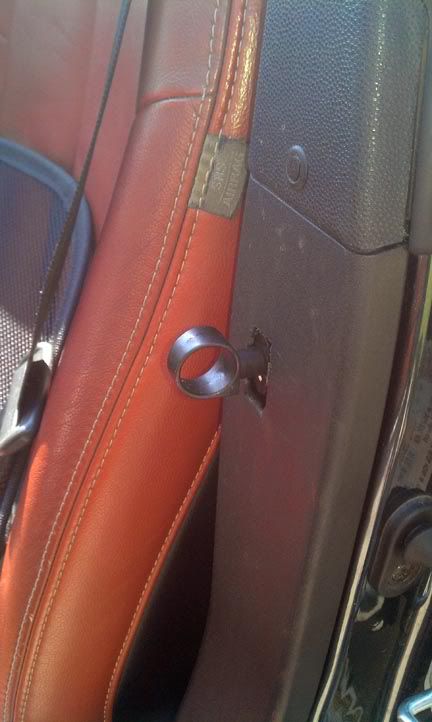
For those of you with the seat all the way back, you would probably want it mounted recessed, with perhaps a fabric pull loop out through the trim piece, but my seat is always forward as I'm only 5'3"

It is inside far enough that the door itself does not contact it.

Total time was about 2 hours from the start of pulling off trim pieces to the last trim piece being put in.
-
-
Looks like a great functional improvement but the panel sure looks hacked up.
-
-
2,000 rpm - light wheelspin, no bog here!

2010 NCII TR

-
-
3,000 rpm - starting to feel the power
Thanks, and yes it looks rough. I've got to get around to finding a rubber or foam piece for the edge of the trim. It will look much better that way.
-
-
Idling - Listen to it purr...


You might be able to find conduit trim for a desk that fits it. I know that several desks I've had have had removable plastic liners for the wiring holes.
Check out the rectangular grommet here.
-
-
3,000 rpm - starting to feel the power
Thanks phinz, it's an idea... I'm looking for a rubber or foam gasket type as opposed to hard plastic. will have to search a bit harder I guess, I haven't spent much time looking, as there are other things going on.
Edit. after thinking, i discovered the molding/gasket used for case modding pcs with a window should work. now to find a local supplier as opposed to online!
Last edited by Grumpy; 02-29-2012 at 06:18 PM.
-
 Posting Permissions
- You may not post new threads
- You may not post replies
- You may not post attachments
- You may not edit your posts
-
Forum Rules


 Reply With Quote
