Page 8 of 74 FirstFirst 1234567891011121314151858 ... LastLast
Results 106 to 120 of 1107

Thread: This ain't no build thread!

  1. #106
    Nukuler banned! chiefmg's Avatar
    Location
    N KY
    Join Date
    Jan 2012
    Posts
    1,422
    Thanks Given
    184
    Thanked 1,226 Times in 527 Posts
    I guess a three month hiatus is long enough. I'm back to work with not much to do, now that our Internet is working more reliably I'll dive back in. I'll be posting shorter entries just in case the signal dies (that way I won't get as annoyed).

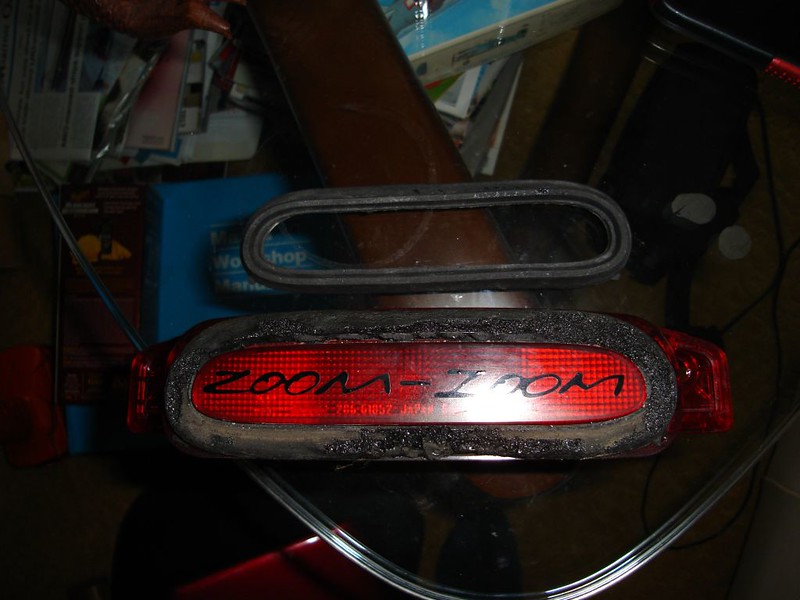
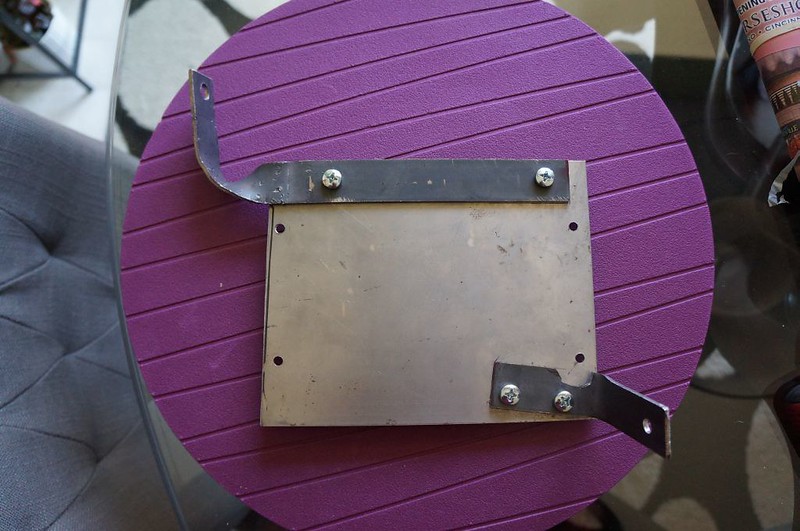
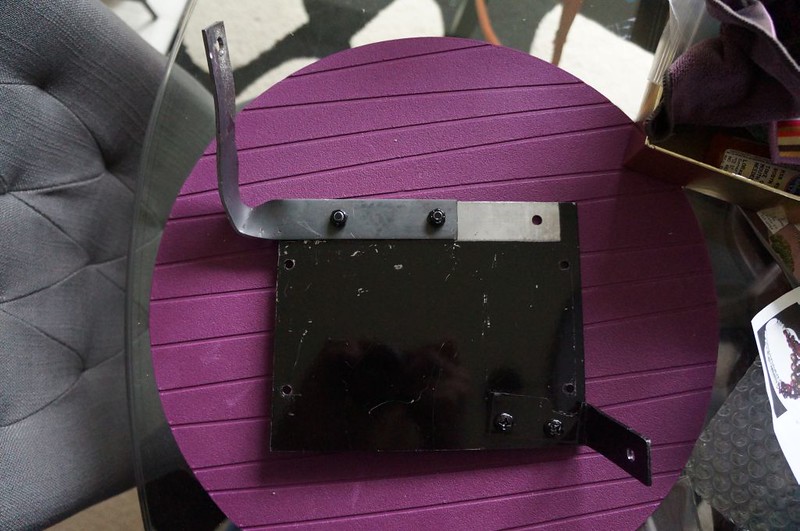
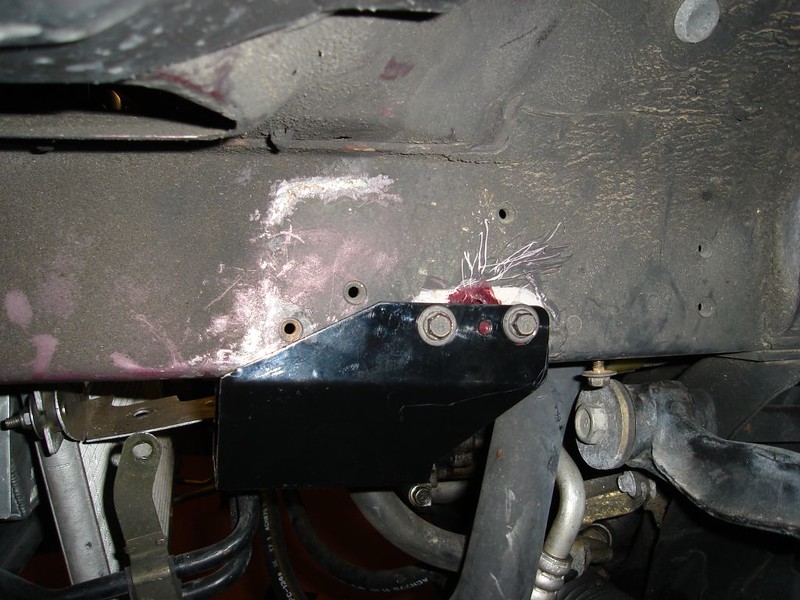
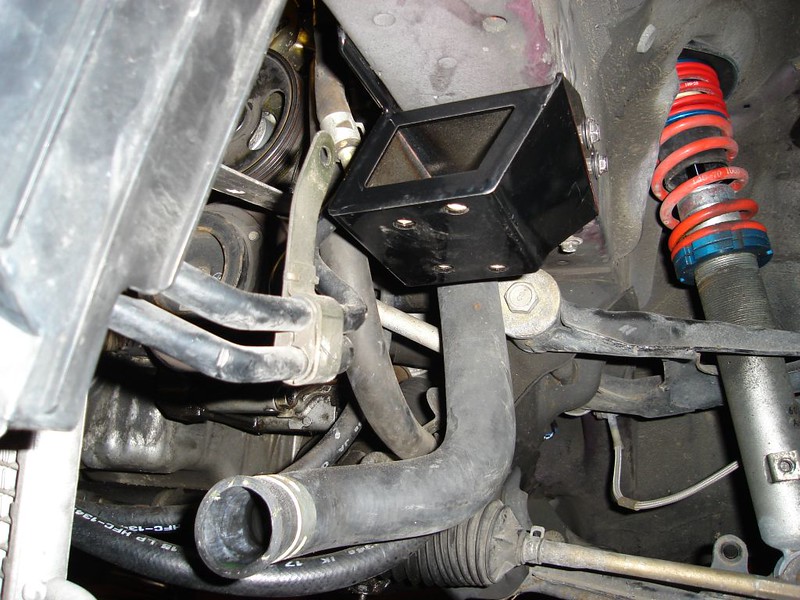
    When I was installing the MSM rear spoiler I had the third brake light out and the gasket looked ratty. I finally thought to check and it is sold as a separate piece, so ordered one of those from Mazda. Finished up the painting I had started a few days before. Decided to tackle the sway bar brackets. Everything I read said you had to drill out the spot welds to get the stockers off. Initial inspection only showed me four bolts, I thought I'm golden. Upon closer inspection I found where they were hidden in between the bolts on either side. Supposedly if you have a larger than stock front bar and drive hard the stock mounts can rip off. I'm not shy about diving into corners and mine didn't show any signs of distress. I can see where they would have flexed though, so in that regard the AWRs are worth it. I was interested to see if I noticed any difference once I get her all back together (also have adjustable endlinks for the front now). As it turns out it's a moot point for me. The AWR brackets angle inward at the bottom, with my relocated radiator brackets there is interference between the two. I know how it could be fixed but I don't have the parts to do it. Back off they came and back on went the stockers. Mostly pissed because now I don't have the spot welds (no welder for me yet). Might have been able to figure this out beforehand if there were any installed pictures of those brackets. Oh well. Here's how they look without the radiator brackets in place:


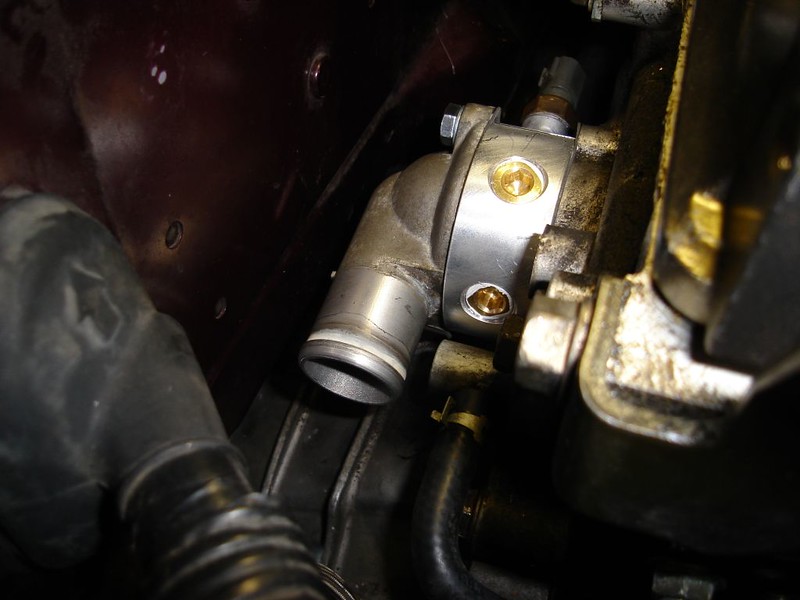
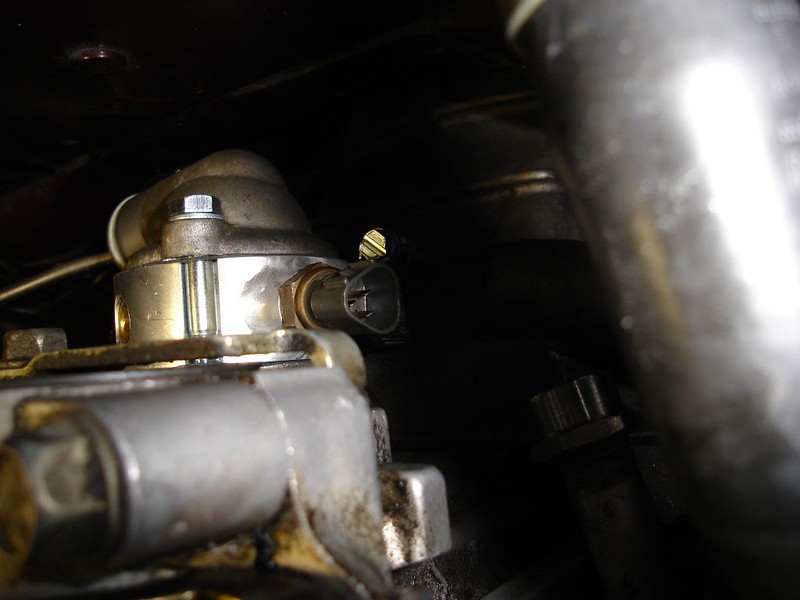
    Did the timing belt/water pump/front seals and that's all buttoned back up. Reroute stuff showed up from BEGi but I had to call it a day as my driving services were required. Plan was to hit it hard the next day and try to get everything done. We'll see how that goes...
    Last edited by chiefmg; 05-18-2013 at 02:03 PM.

  2. #107
    Nukuler banned! chiefmg's Avatar
    Location
    N KY
    Join Date
    Jan 2012
    Posts
    1,422
    Thanks Given
    184
    Thanked 1,226 Times in 527 Posts
    That was the main part of the coolant reroute done (spacer/thermostat/cover on back of head installed). Tight access does not even begin to describe trying to do this job (see pictures). I had to use a worm hose clamp instead of the stocker for the heater connection to the spacer as I couldn't get a set of pliers back there. Hardest part of getting things in place is making sure the thermostat stays in place. The longer bolt (needed because the Sephia cover has one raised attachment point) is way too tight, you have to really work on getting it started without it hitting the firewall. If you are thinking of doing this I highly recommend coordinating with a clutch replacement or something else that will give you access, had I had the pieces while the tranny was off it would have been a lot easier. At the very least you will want to remove the intake manifold. I know it will all be worth it.

    After a short break I got the intake mani, injectors/fuel rail, valve cover all installed. Alternator was back in and belt tensioned, I had to go to town tomorrow to find some sort of locking nut for the PS pump mounting bolt before I can do it. Sway bar is in place. Tranny is finally filled and shifter back in place so it's all buttoned up.

    FYI the square top intake mani has fewer vacuum taps than the US version (at least the one I have, not 100% if it's JDM or EUDM). I had to figure out exactly what I still needed (beyond the boost gauge, MS and cruise) and then get some splitters to make it work.


    '00 SE, intercooled BRP MP62, Reverant MS2, Ohlins DFV, Konig Flatout (now X 2)
    __________________________________________________ ____________
    This ain't no build thread!

  3. #108
    Nukuler banned! chiefmg's Avatar
    Location
    N KY
    Join Date
    Jan 2012
    Posts
    1,422
    Thanks Given
    184
    Thanked 1,226 Times in 527 Posts
    Was cooling my heels (literally as it was cold, plus I had to watch the grandson for a bit) so decided to tackle the third brake light gasket. Got the old one scraped off, cleaned the surfaces, polished the lens with the headlight kit I have (note that Barry's sticker was unharmed) and sealed it. Going to put the gasket on as soon as it all dries and then put it back in. You can see the gasket literally looked like something had chewed on it.

    '00 SE, intercooled BRP MP62, Reverant MS2, Ohlins DFV, Konig Flatout (now X 2)
    __________________________________________________ ____________
    This ain't no build thread!

  4. #109
    Nukuler banned! chiefmg's Avatar
    Location
    N KY
    Join Date
    Jan 2012
    Posts
    1,422
    Thanks Given
    184
    Thanked 1,226 Times in 527 Posts
    Had to extend the temp sensor connector due to its relocation with the reroute, the spare wiring harness I have wasn't the one with that connector but I was able to find the same color code wires so it's all the same. Put the wires on, soldered the connections and put heat shrink tubing over it all. Got the PS belt back on and tensioned. Put another washer on the front bracket of the supercharger to shim it out a little more, put the bracket on the 'charger and tightened down the moving pieces then took it back off again. Cleaned up and painted the whole bracket. Went to put the new battery in place and found some corrosion underneath the battery tray (plus it doesn't look stock) so got that all cleaned up and put a couple of coats of gray primer/paint on it. Also cleaned up the battery hold down and painted it.

    Once the paint was dry the supercharger was completely back in, radiator in and filled, sway bar torqued down and the new adjustable end links installed. Unfortunately I had a slight weep from the thermo cover on the back of the head, so it had to be pulled back off so I could put me some silicone gasket on things. Here I thought I'd be able to do the little finishing touches (like adjusting the clutch pedal), I know it's going to be a fight getting at it with everything else in place. Might end up pulling the upper intake manifold.

  5. #110
    Nukuler banned! chiefmg's Avatar
    Location
    N KY
    Join Date
    Jan 2012
    Posts
    1,422
    Thanks Given
    184
    Thanked 1,226 Times in 527 Posts
    Got the thermo unit out without too much hassle. At some point when I put it in the thermostat apparently slipped out of position (based on the impression on the gasket), I did make sure it was in place before bolting it down by reaching through the outlet port but maybe I was wrong. Oh no, whatever will you do? Glad you asked that Skippy. Silicone gasket maker is your friend, a couple of spots on the outside of the thermostat should keep it where it belongs. Had to get two new gaskets, first AutoZone I went to only had one but he told me another store had two. The guy actually said I could buy one there and then buy the other one from the other store. Um, no! I'll make one transaction thank-you-very-much. I gooped it all up and bolted it together to dry for a while before I went to put it back in.

    Unfortunately things didn't quite work out the way I wanted. After letting things set up for 5-6 hours I took it back out to install. Got it in place reasonably easy, bolted down and while making the last few turns on one bolts I heard a snap. Broke the damn thermo cover in way of one of the bolt holes. So, took it back off, didn't really see any reason for it unless I had weakened it during my previous attempt. So it was off to the junkyard to get another couple of covers (just in case).

  6. #111
    Nukuler banned! chiefmg's Avatar
    Location
    N KY
    Join Date
    Jan 2012
    Posts
    1,422
    Thanks Given
    184
    Thanked 1,226 Times in 527 Posts
    New thermo cover sourced from the junkyard (they only had one car with it) along with two new gaskets, turned out the place I normally go had the ones with adhesive on them. Cleaned everything up and put it back on the car. Filled the system and didn't hear any leakage. I had to research what the various solenoids on the passenger fender do to see if I needed to have them connected to vacuum or not, if not then I only need to hook up the line to the cruise and boost gauge. Got everything taken care of. She's alive! Took about a 10 mile shakedown drive. No abnormal noises, nothing fell off, drove normally. Almost anyway, I adjusted the clutch per FM instructions and it took up within an inch off the floor. Can you say abrupt? Dove in to the factory manual to get that figured out (which way to go with the adjustment). 490 miles to go before I could romp on it...

  7. #112
    Nukuler banned! chiefmg's Avatar
    Location
    N KY
    Join Date
    Jan 2012
    Posts
    1,422
    Thanks Given
    184
    Thanked 1,226 Times in 527 Posts
    Finally got the clutch broken in! First full throttle take-off was great. Forgot earlier but I did get some little plastic pins from Ace and drilled the holes in my gauge pillar to fix it firmly in place (I had tried using 3M double sided tape but the top kept falling away from the A pillar trim). Looked through the garage but never found the pins it came with. Also replaced the radio with one I got off eBay as the CD player sometimes acts up on the first CD, but the new one won't even accept any discs. Time for some mix and match I think (note: for anyone not reading all the way through, I found a double DIN radio/6 CD changer from a 626 that is a direct fit, including the wire connectors. Tributes had them too).

    Fiddled with the radio, the new one I put in was having CD problems. The little rubber isolator at the rear got hung up somehow and gave me fits trying to get it out (like, it took over an hour once the locks were released). Swapped the faceplates out and put the old one back in, it now didn't work. Thinking the temperature difference between inside and outside had something to do with it (remembering I was doing this in February) I left it for a few hours and tried again. This time it worked.

  8. #113
    Nukuler banned! chiefmg's Avatar
    Location
    N KY
    Join Date
    Jan 2012
    Posts
    1,422
    Thanks Given
    184
    Thanked 1,226 Times in 527 Posts
    Did some research on my cold start problem, made a few changes to the MS settings. First attempt was worse but after I changed one setting back to what it was it fired right up. Have to do some more attempts to see if I took care of that particular issue. There are so many things to set/change with a MS it's easy to get lost. If you want to have an idea why it costs so much for ECUs get a MS and play around with the settings. It will give you an appreciation for those who develop any ECU.

    Adjusted the supercharger bypass valve, seemed to be a little better. With the lighter flywheel the engine responds so much differently it's hard to compare if I made an improvement. Right now it doesn't feel as fast as it was but I am sure that is due to the engine being able to spin up faster.

    Washed her in prep for cars and coffee on a Saturday. Went to that and on the way home picked up a 6" vise from Harbor Freight so I could start bending metal. Pulled the radio and swapped out faceplates again, all is right with the world and the new one is much cleaner (never could get what looked like Georgia clay residue cleaned from around all the buttons etc on the other one). Also bought some fender washers at Ace to put under the anti-theft fasteners on my hard top brackets, the ones I had on there were just a little too small for my liking. Nice day today so got to terrorize the area a little, people apparently put their brains in neutral (not used to the sun?) so I had to do some evasive maneuvers.

    It's amazing how much easier jobs are with a workbench and vise to use. Here is what I have finally gotten around to fabbing in the past couple of days:


    This bracket will mount in the same location as the stock ECU. I won't have to worry about interference with my right foot any longer. Going to shoot it with a couple of coats of Rustoleum black before installing. Wish I had a welder, then the arms wouldn't be held on with fasteners.

    The visor blanking plates finally showed up. I sent them an e-mail a few days before since it had been over a week and I hadn't heard anything. Turned out they had sent them on that Friday. Not sure what the delay was. They did do a nice job of packing them and included another sticker for my tool cabinet.

  9. #114
    Nukuler banned! chiefmg's Avatar
    Location
    N KY
    Join Date
    Jan 2012
    Posts
    1,422
    Thanks Given
    184
    Thanked 1,226 Times in 527 Posts
    And the bracket was a no-go. The longer arm didn't allow the plate to mount where it needed to with the MS installed, so I had to work on V2. I did it with the plate in place but the MS removed so nothing would get damaged. I knew where it had to locate so it's was a matter of bending the long arm, putting it in the stud and then seeing how it all lined up. Had to take a break as kneeling on the cold hard garage floor was a little tough on the knees.

    A little while later, version 2 of the MS bracket was a winner:


    If you look at the previous one you will see the new longer arm is longer where it comes off the main plate. This just goes to show you can't always use an old mount to fab up a new one. The plate is angled slightly while in place but there is no contact with either the clutch or brake pedal arms. Some more paint and it was installed.

    Received my Xpel kit from Amazon. It was wrong, wrong, wrong. The kit I ordered was in it, but it didn't look proper so I did some research. According to Summit Racing, I received the kit for a third gen Miata. I had checked before ordering and the Amazon site said it fit my car. They also put three additional kits for three different cars in the package. I put a return in progress and ordered the correct kit from Summit.

  10. #115
    Nukuler banned! chiefmg's Avatar
    Location
    N KY
    Join Date
    Jan 2012
    Posts
    1,422
    Thanks Given
    184
    Thanked 1,226 Times in 527 Posts
    MS installed.


    Took her out to pick up one of the kids after school and get some gas. There was some slight interference with my left toe so once I got home I pulled the bracket back out and cut off about 3/8" on the bottom edge (making it even with the MS box). Paint to come once everything warms up and then it'll go back in. If that didn't do it I had maybe another 1/4" I could raise the whole thing but I was hopeful it would do the trick.

    I liked the extra view out the windshield with the visor delete. It is subtle but very noticeable. Received my new passenger foglight and the fog/cruise switch I bought off CR. Now I just have to compare the two I have with the stock one to see which has the best lettering. I'll wait to put the new fog in for the new X-pel film kit.

    It was official, MS bracket version 2.1 is a success. Bolted it back in place and even wearing my slip-ons that I work in (which have a larger toe) I got absolutely no contact. Pretty happy as it is a royal PITA getting that upper nut in place and tightened down with the MS in place. No test drives that day as the weather sucked.

    It appears my internal ruler is off a bit. I measured the piece I cut off the main plate when I picked it up from outside, turns out counting the width of the cutoff wheel I removed very close to 3/4". Thought about getting my new glasses checked!

  11. #116
    Nukuler banned! chiefmg's Avatar
    Location
    N KY
    Join Date
    Jan 2012
    Posts
    1,422
    Thanks Given
    184
    Thanked 1,226 Times in 527 Posts
    Well screw me sideways. Miata developed a miss when I was out doing some tuning, thought it was something to do with the tune. Restored to a previous point and drove it to lunch a few days later. Miss was still there, in fact was terrible leaving the restaurant so I went home. Pulled the plugs and I had coolant in cylinder #3. Just what I wanted to do my last 10 days home, pull the head off. There wasn't enough in the cylinder for the MityVac to suck out, so I turned the engine over with the plug out to purge it then sprayed some WD-40 in (we all remember what the WD stands for, right?).

    Got the required gaskets ordered from the local dealer. Did four hours of work, everything was stripped off except for the head. I had to check the service manual to see if I needed to do anything special removing the bolts (the answer was no). I am extremely tempted to do the spacerless reroute, it would mean a little more space to work on the thermostat in the back as well as eliminating a joint for a possible leak. All it will take is drilling/tapping a hole in the head for the heater spigot.

    Finally pulled the head off. There was no visible defect with the head gasket. All fasteners were tight. I'm at a loss to explain the problem, unless the head somehow has a crack in it. After some deliberation over several days, I decided that instead of beating myself up trying to get it all done (correctly) in a relatively short period of time, I'm going to leave her sit while I'm gone and dive in once I get back. That will give me some time to find a place that can pressure test the head for me and do a proper job skimming the gasket surface. My wife first accused me of doing it on purpose so she couldn't drive the car while I was gone, and then asked if I couldn't put the "old parts" back on and get it running. She is not a gearhead.

    Just before I left home I bought a JR 4-2-1 header (one of the few that will fit underneath a SC). So I'll have a couple of other exhausts to sell when I get back.

    And that will be it until I get home sometime in August. I did buy a set of used Corbeau brackets with sliders recently for my planned seat upgrade (I'm not telling which model I'm getting just yet).

  12. #117
    Ninja Messiah kung fu jesus's Avatar
    Drives
    1999 White
    Location
    Atlanta, GA
    Join Date
    Dec 2011
    Posts
    15,852
    Thanks Given
    2,791
    Thanked 7,202 Times in 3,433 Posts
    Awesome read. F/I is a love-hate. Love the power, hate the nagging problems. The coolant in the cylinder...maybe the head lifted from the head bolts stretching? If it isn't too late, use ARP head studs in place of the torque to yield OEM head bolts.

  13. #118
    Nukuler banned! chiefmg's Avatar
    Location
    N KY
    Join Date
    Jan 2012
    Posts
    1,422
    Thanks Given
    184
    Thanked 1,226 Times in 527 Posts
    Thanks for that, I wasn't sure too many people would want to read it through.

    I'm finding that out about boost. This is my second boosted car (first is my Speed6) and I've been diving right in. I have my suspicions about the head bolts since nothing else looks amiss, ARP studs are in the cards. Just to be sure I'll have the head tested for leakage and skimmed for a good gasket mating surface (some say it's a must for the type of gasket Mazda uses, others say no). I'll also be replacing the valve seals, have to decide if new aftermarket springs will be worth it or not.

  14. #119
    Ninja Messiah kung fu jesus's Avatar
    Drives
    1999 White
    Location
    Atlanta, GA
    Join Date
    Dec 2011
    Posts
    15,852
    Thanks Given
    2,791
    Thanked 7,202 Times in 3,433 Posts
    Springs no, unless you are using hot cams. Since you are taking the head apart, maybe have the springs tested to make sure their rates are within spec?

  15. #120
    Nukuler banned! chiefmg's Avatar
    Location
    N KY
    Join Date
    Jan 2012
    Posts
    1,422
    Thanks Given
    184
    Thanked 1,226 Times in 527 Posts
    I will at least be checking the springs' free length. I've never heard about having their rate checked, I'll have to look into it with the place I plan on having test/skim it.

Page 8 of 74 FirstFirst 1234567891011121314151858 ... LastLast

Posting Permissions

  • You may not post new threads
  • You may not post replies
  • You may not post attachments
  • You may not edit your posts
  •