"Your welcome" for the idea! LOLOriginally Posted by Paul B

I'm not good with names, either!


"Your welcome" for the idea! LOL
I'm not good with names, either!
... Rick
For the thread on Noir click below
http://mazdaroadster.net/showthread....e-light-Slowly
Paul B (05-02-2017)

I knew it was one of the Greasemonkeys lol i went back a few pages and couldn't find it so I gave up.
Thank you NCGreasemonkey for the riv-nut recommendation. My center console and window switches are now secure and solid thanks to you.
Sent from my iPhone using Tapatalk
NCGreasemonkey (05-02-2017)
That is why we lean on one another fellow nut!
You still have me
I need to get off my lazy arse and install some things.
Peace!
... Rick
For the thread on Noir click below
http://mazdaroadster.net/showthread....e-light-Slowly
Paul B (05-02-2017)
Get it done!!
Ive been trying to uninstall my GV rep lip and reinstall my R package lip for over a week now. Just no time for that job recently.
Then to figure out my no head unit music setup when the amp and cord arrives.
Sent from my iPhone using Tapatalk
I want these under Noir.
But it is a timing thing for install. Free time on the rack to set/align. And not have Engine swaps, head jobs and other in my bay.
But those pay the parts bills and household expenses.
Last edited by NCGreasemonkey; 05-02-2017 at 10:15 PM. Reason: Whoops!
... Rick
For the thread on Noir click below
http://mazdaroadster.net/showthread....e-light-Slowly
Paul B (05-02-2017)
Ohhh very nice! Youll figure it out!
Im just glad its still the beginning of May and Ive made a lot of progress on the car so far.
Sent from my iPhone using Tapatalk
OEM Mazda chrome hand brake button arrived today and installed within minutes.
Needed a little bit of flare in the handbrake area to break up all the black.
So much black.
OEM black and OEM chrome.
Flare.
Still am undecided what route I want to go for shift knob and hand brake handle. I really enjoy the matching voodoo set up I have. Have had this set for close to 10 years now. May go with polished brake handle eventually but not sure which one I prefer. Figured Ill start with the chrome button and see what it looks like. It may be just the ticket.
Sent from my iPhone using Tapatalk
BRGNA8 (05-09-2017),Greasemonkey2000 (05-04-2017),HarryB (05-04-2017),JamieH (05-03-2017),NCGreasemonkey (05-03-2017),Roadster7 (05-03-2017)
Jass Performance needle caps arrived today.
May hold off a little bit on installing these. Would like to replace the squeaky speedo cable and the original cluster hood that has a few broken clips. Also need to reverse 1 or 2 LED bulbs i installed backwards.
Sent from my iPhone using Tapatalk
BRGNA8 (05-09-2017),Greasemonkey2000 (05-04-2017),JamieH (05-04-2017),NCGreasemonkey (05-04-2017),Roadster7 (05-10-2017)

I would have given you my 'chrome' ebrake button, Paul!
'01 NB2 aka MisF1re: http://mazdaroadster.net/showthread....218#post207218
'97 M aka Warbird, gone but not forgotten: http://mazdaroadster.net/showthread....B&goto=newpost
Instagram: @greasemonkey2000
Paul B (05-04-2017)
Dang! I would have been honored to have it! Oh well, too late now. Thank you though.
Sent from my iPhone using Tapatalk
Installed the Jass Performance needle caps that arrived a few days ago. They slide right on. The larger ones seemed a bit loose so I used a dab of silicone underneath to make sure they were secure and wouldn't rattle. The three smaller caps seemed to snap into place. Very happy with the fit, finish, and price of the Jass caps.
Before:
After:
After I installed my LED bulbs in my cluster I noticed that the right side of the cluster wasn't lighting up. Installed them during the day time so wasn't 100% sure how it was in the dark or if it was an install error or maybe even a bulb issue. (I know nothing about LEDs.)
A quick email to Adam and he sent me some info and linked me to his gauge install video on YouTube. Quickly found the portion that says its an easy fix, just gotta spin the bulb & socket 180. Who knew?! Not me obviously.
A trial and error and got the lights all fixed. Damn I didnt think they were that bright at first but wow. Never thought Id have to consider dimming the gauges in a 1990 Miata ever.
Was curious of I did something wrong again as those two lower orange-ish lights are on with the lights. Another quick email to Adam and another fast and informative response. My car is early enough that these lights are lit. Im OK with them being on while the lights are also on, just wanted to make sure I didnt have anything messed up again.
In my opinion, its almost as if these two lights are the vintage version of the modern day indicator that tells the driver "hey, your lights are on,dumbass." Either way, the cluster looks incredible. The lights and bulbs look amazing. I am super amped with how this cluster had turned out.
Next I removed the replica GV lip and re-installed my rep R package lip. The phase Im in now has me really enjoying and appreciating what Mazda designers did at the factory. Has me searching for an R package trunk lid spoiler now.
Horrible photo in my ugly garage.
Sent from my iPhone using Tapatalk
BRGNA8 (05-09-2017),Greasemonkey2000 (05-09-2017),HarryB (05-09-2017),JamieH (05-09-2017),NCGreasemonkey (05-11-2017),Roadster7 (05-10-2017),speedypenguin (05-10-2017)

Looks fantastic Paul! It's really coming along very nicely!
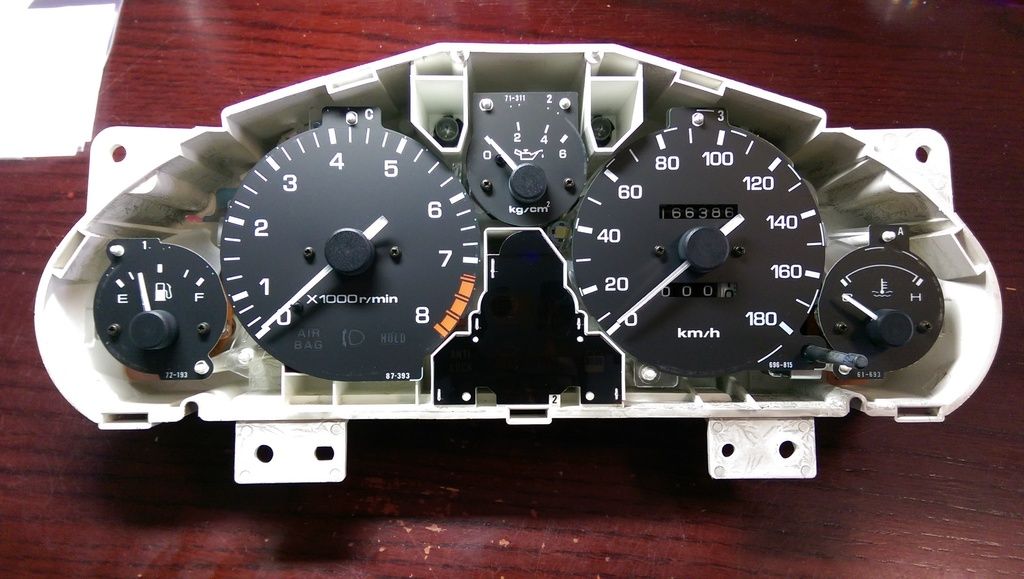
Re: the two orange lights on the left and the right of the centre indicators, the reason why it lights up is because theres nothing on your cluster to block the lenses from lighting it up it seems? Here's mine for comparison
I re-wired it so that the popup headlight light now turns on from one of the orange lights (bottom left) since the old gauge face had the pop up headlight icon on the face of the actual gauge as shown above, and the gauges I got from Adam don't.
Glad to see you don't mind it but if it becomes annoying down the line, my friend of mine cut up some black plastic and stuck it over the lenses so that the light doesn't penetrate through and it seems to do the job
Follow on Facebook
http://www.facebook.com/96BRG
Follow on Instagram
http://www.instagram.com/96BRG
http://www.instagram.com/95NA8C
Thanks for the info! And the kind words. Catching up to your car slowly lol
Yea it depends on model year from what Adam said if your panel has a row of 4 lights or 2. My car is a 90.
And it would seem that at least one of these lights would light up the headlight icon with OEM gauges. Just my guess. Must be the way the KG panel says "headlights on"
As if today I dont see the lights becoming annoying. If anything, it makes the gauge panel look even more awesome at night haha.
If they do get annoying it was recommended using some thin cardboard to block them. We will see down the road.
Sent from my iPhone using Tapatalk
BRGNA8 (05-09-2017)
Today was the day to cut up a 27 year old dashboard.
With the help of a 2 yr old.
The spare crash pad has been ready for a couple months now.
"Gauges" ...voltmeter and clock...(silly, I know) are ordered. Should be here in a few days. Just some Autometer Traditional Chrome series. Eventually these may be moved and swapped for gauges related to a turbo build.
Time to hack up something nice.
Used a tool my father got as a gift years ago. He has hardly ever used it since he is literally the guy who has everything. And every tool you can imagine from being a mechanic since he was 14. Introducing The Rotozip. I didnt have proper attachments for my cheap rotary tool so this Rotozip worked well. Only negative is the mess it makes. Oh well. Made quick work of the plastic. Cut isnt pretty but idc. Crash pad will cover it.
Cut off more than I needed for the two gauges but in the future I may add a third gauge once turbo goes in, so extra is ok.
This bracket is a pain in the ass if the dash is still in the car. Very difficult to get the screw that is inside the dash, facing the trunk and sandwiched behind the support tubing. Had to used a tiny 1/4" open end wrech and a phillips head bit to get it off. Only thing that would fit in there
I imagine this bracket is much easier to remove when dash is out of the car. Didnt want to break it and risk cracking the dash. And didnt feel like cutting it.
Gauge pods rest nicely. They are slightly not level but final adjustments will be made once gauges are here and ready to go in.
Only issue I ran into was that stupid bracket which led to a glove box issue. Had to remove glove box to get to the hidden screw. In doing so, broke one of the tabs that hold the hinge for the glove box. Ugh. Glovebox came out and found it was cracked through on the upper wall from top to bottom. The hinge might be able to be JB welded back on and the crack can be fixed/reinforced with some styrene. Will get me by so I have a glove box to hold the reg & insurance and gloves lol yes, gloves in a glove box. Was planning on working on the glove box area anyway eventually to eliminate some rattling. Eventually Ill ebay a glove box in better condition.
Sent from my iPhone using Tapatalk
Greasemonkey2000 (05-10-2017),HarryB (05-10-2017),JamieH (05-10-2017),MiataQuest (05-10-2017),NCGreasemonkey (05-11-2017),Roadster7 (05-10-2017),RustRat (05-11-2017)

Looks fantastic! Gauges should look right at home.
Paul B (05-10-2017)
 Posting Permissions


 Reply With Quote