A quick release steering wheel helps for entry/exit with a fixed seat and high bolsters. It will also move the wheel closer to you.


A quick release steering wheel helps for entry/exit with a fixed seat and high bolsters. It will also move the wheel closer to you.

This is another one of those great threads that makes my OCD incredibly happy. Keep up the great work! Those seats look awesome!
-Matt
Agent☣Orange (06-09-2020),MaRcOp01o (02-26-2020),oldgrayleather (02-26-2020),zco (02-26-2020)

Thanks Steven! Yeh, I have been looking at my options, however, nothing seems appealing right now.Originally Posted by kung fu jesus

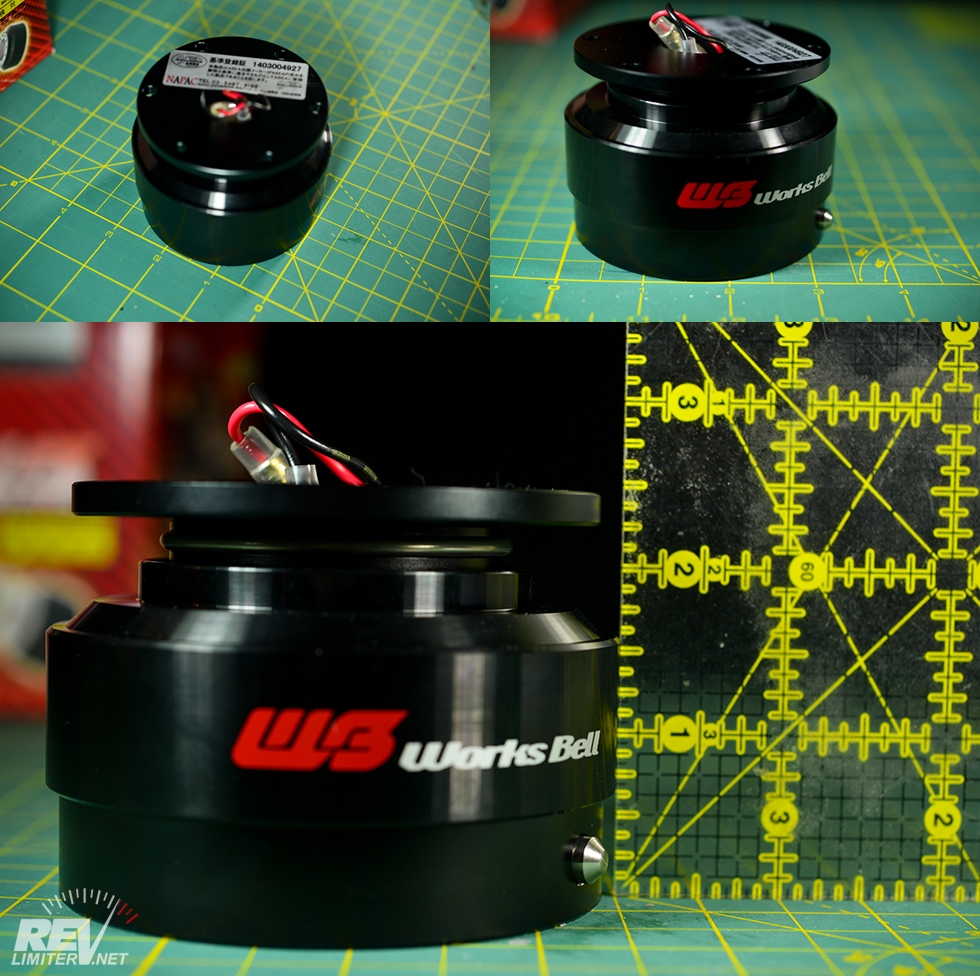
WB QR hub is too thick
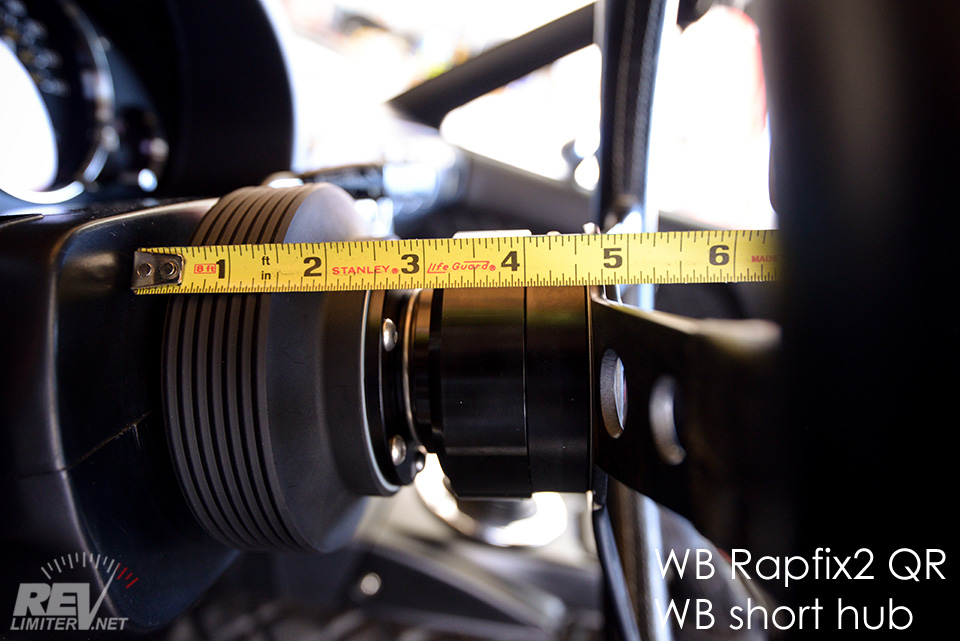
Even with the short hub, this is how far it sits out.. 1.5" more than stock. The perfect driving position for me is when I sit in my seat, left leg comfortably on the dead pedal and my wrists touching the top of the steering wheel when my arms are fully extended. The current setup does just that, so ideally, the hub + QR combo needs to be close to stock.
Adam says he's still able to reach the indicator stalks, but to be honest, it looks like an eye sore and is also 1.5" greater than OEM
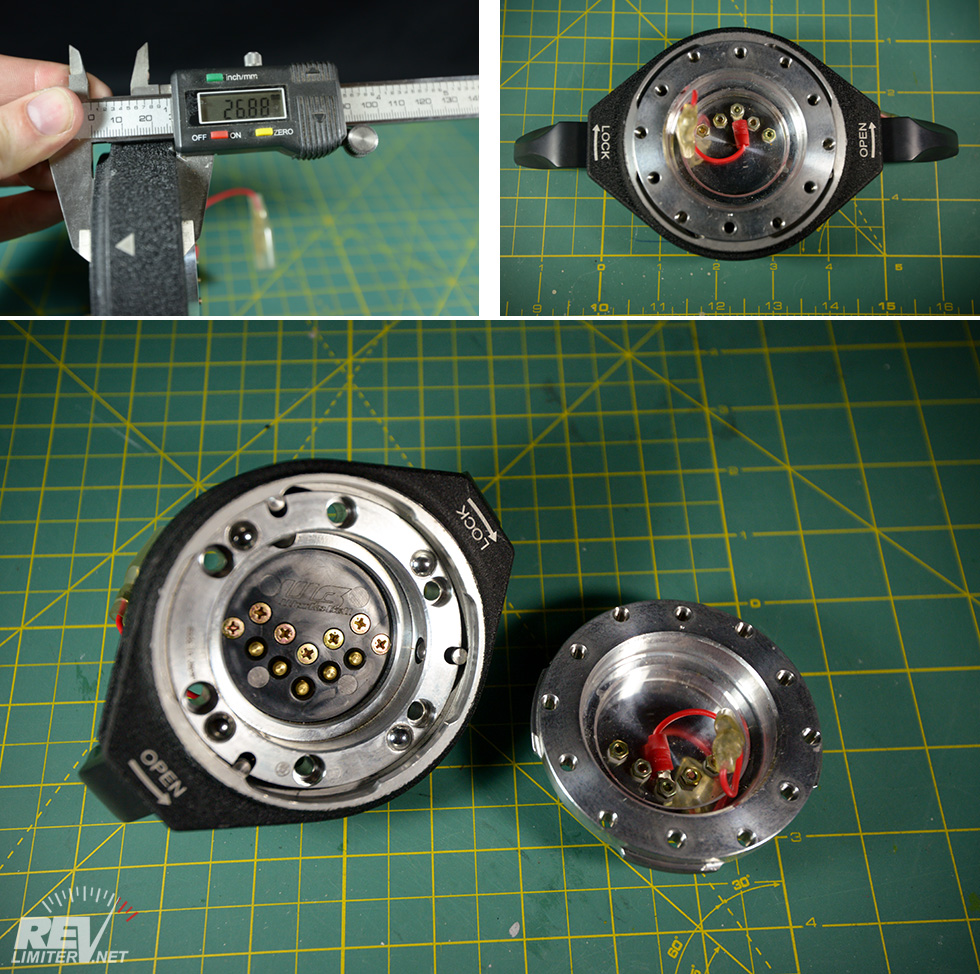
The perfect QR for me would be this one.. a WB QRII (discontinued back in the early 2000's), probably combined with a short hub.
I did find one on ebay but it was approx 700USD delivered. I also found one on Yahoo Japan but they're asking 50k yen for it LOL both out of my budget.
I have looked at other thin options from Adam's thread https://revlimiter.net/blog/2016/04/...ease-review-2/ , none of which appeal to me. One time I bought an NRG hub for my little Civic, and it split right in the centre as I was tightening the steering column nut. You can imagine how safe those products would have been for critical components such as steering, so I'm definitely not touching an NRG product again.
Over the last 15 years playing with cars, I've learnt that if I'm patient enough, discontinued parts do eventually show up at a decent price once in a while. I'll have to continue to wait
MiataQuest (04-22-2020),tsingson (02-26-2020)
I used a slim NRG QR in my NA. It took a day or two to get used to the stalks being further away, but I didnt get my race seat where I needed it until I removed the rear mounting bumps on the floor. That gave me more recline angle to work with and a little more front to rear seat travel. The real PITA was trying to fit it to clear the diagonal and main hoop on the rollbar. I was also fighting with door bars and had to trim the seat quite a bit to make it work.
If I were to need to go to a fixed seat again, I would consider a custom rollbar, flat floor, and trans tunnel notch plate.
tsingson (02-26-2020)

I am currently using a Circuit Sports V2 short(23.5mm) qr and Works Bell 75mm hub so just under 4" and it's just right, imo. Previously I had a 55mm Circuit Sports hub with said QR and it was too far away.
'01 NB2 aka MisF1re: http://mazdaroadster.net/showthread....218#post207218
'97 M aka Warbird, gone but not forgotten: http://mazdaroadster.net/showthread....B&goto=newpost
Instagram: @greasemonkey2000
zco (03-19-2020)
I almost forgot about this thread, I hope everyone is staying safe and occupied.. looking forward to all your new miata updates since everyone has been isolated. A few things have happened since I last posted. The hunt for a boss kit continues, no update there.
The rollbar was removed from the car and sold. It wasn't light at all, a good 18kgs / 40lbs of weight. I like the cleaner look of the car without the rollbar.
With all the kerfuffle going on with Corona, lockdown in Australia was inevitable. I took the opportunity to take the car out for one last spirited drive... down the 1/4 mile haha
I wasn't expecting anything spectacular, but I did want to see how the car performed with the newly installed clutch/flywheel/6speed gbox.
Car: 1995 Mazda MX5 NA8, Standard NA8 motor.
Mods: OEM airbox, Fujitsubo headers, 200cel HFC, 60mm catback, 6Speed Gbox, Exedy Clutch and Maruha Flywheel, OEM 4.1 Open diff.
Wheels/Tyres: 14x6.5 +15 TE37 + RE71R tyres 185/60R14 at 40psi
Weight: 931kgs / 2052lbs (without driver). The passenger seat, spare tyre & tools, AC and PS removed. Had just under a 1/4 tank of fuel. Here's a photo from the weigh bridge.
I had 3 runs, and went home with an ET 15.91 @ 87.63mph, 2.24 60ft. The car felt like it got off the line fine, didnt spin or anything. I didnt lose traction between shifts either. Shifting seemed quite smooth, couldn't really improve on much to be honest. Might have to revisit my launches.
I was quite happy with how I went on the night, the car did seem to run out of breath after 5500rpm.. possibly the 14degree timing? Or maybe the restrictive OEM airbox.. no idea. I'll do a bit of reading and see how we go.
Next plans for the car are to prepare it for some trackdays. I have already taken the TE37's and tyres off, and sold them to some friends of mine. Good news is, they'll be going on another Miata/MX5 hehe you guys could probably guess which car they're going on lol They're great looking wheels, and the sizing is perfect for an NA, just not a fast enough set up for the track. So they'll be replaced with some 15x8" wheels instead. I did think about going for a 15x9 set up but the car is close to standard and 15x9 may be too wide and heavy for it, especially without PS.
So long my dear TE37's....
I did think of keeping the rollbar for track duties, but with the suspension I have in the car now, it hasnt really made much difference to how the car drives without the rollbar.
Other than plans for future trackdays, there will just be more updates on maintenance and replacements of more OEM goodies. Will update thread soon
Stay safe everyone!
Last edited by zco; 04-22-2020 at 04:01 AM.
Agent☣Orange (06-09-2020),BRGNA8 (04-23-2020),Greasemonkey2000 (04-22-2020),HarryB (04-22-2020),HMT (12-14-2023),MiataQuest (04-22-2020),oldgrayleather (04-22-2020),Roadster7 (06-09-2020),tsingson (04-25-2020),Vegard (04-25-2020)
Watanabes back on

BRGNA8 (04-23-2020),Greasemonkey2000 (04-22-2020),HarryB (04-23-2020),MiataQuest (04-22-2020),MikeA (04-23-2020),oldgrayleather (04-22-2020),Roadster7 (06-09-2020),tsingson (04-25-2020),Vegard (04-25-2020)
Some of you would have seen my instagram updates already, but here are some pics for those that dont have me on IG.
I booked my car in with a mate of mine that does paint correction. The cars' paint is still original from factory and was still in fantastic condition, however, after 25 years, was obviously lacking that shine and depth. As you would have seen in previous posts in this thread, I had collected many many parts for over a year in anticipation for this very day. It was very rewarding to see it all come together. Here is how the day went.
The guys arrived nice and early for a 08:00 start. First up was a snowfoam wash, to remove all loose dirt / dust particles.
Rinsed the foam off, and gave the car an iron decontamination spray. It seems like the previous owner had looked after the car quite well, as we only found two panels with iron contaminants in the paint.
No iron contamination on bonnet at all.
Slight reaction see (purple bits) on bumper and front right guard
The car was then washed with pH neutral soap, then claybar/clay mitted.
Car was given a final rinse before moved into the garage for an inspection.
I also removed all lights, reflectors, wipers and wiper cowl, door and window seals/mouldings, door handles, antenna, frankenstein bolts and hardtop plates. I had planned for the guys to get into every crevice of the car, and also at the same time, have all components replaced with brand new items.
Before paint correction, the paintwork gets inspected so they get an understanding of the thickness of the paint and know how much they've got to work with. Results are:
-Bonnet 72 microns (thinnest panel)
-Driver and Passenger sides front guards, doors and rear guards 150-160 microns
-Rear boot 200 microns
Paint work consisted of 2 stage correction, followed by a round of refinement and gloss enhancement.
The hardtop was left on to prevent dust from getting inside. The guys also tapped up any gaps to keep the interior clean as well. Usually they would tape the seals up but I had removed the seals already. I also did not get the hardtop paint corrected as it is currently not the correct colour (crystal white). I would either respray this to Chaste White, or wait to swap with someone.
The rear garnish was also removed so i could remove the badges properly, and it also gave the guys easier access to polish the garnish with smaller buffers.
Last step in paint correction was to remove the hardtop so they could get to the area that was missed
Once the paint was corrected, all panels and glass were sprayed/wiped down to remove any residue and polishing compound, followed by a final inspection prior to applying the ceramic coating.
Ceramic coating being applied. First guy applies, second guy wipes excess off, 3rd guy inspects.

Agent☣Orange (06-09-2020),dnaha (06-09-2020),Greasemonkey2000 (06-09-2020),MiataQuest (06-09-2020),MikeA (06-12-2020),MLambert19 (06-09-2020),oldgrayleather (06-09-2020),Roadster7 (06-09-2020),speedypenguin (06-09-2020),tsingson (06-09-2020),vote4pedro (06-10-2020)
Along with the paint and glassware, my mirrors also got the ceramic treatment. All the new OEM parts got a quick refinement, and then were also ceramic coated. Now even better than brand new
I probably wont use the Raybrig headlamps, they'll sit in storage.
Wheels got the treatment as well
Here are a series of before and after shots
The car was then moved outside to take some photos in natural lighting. The sun was setting and there wasn't much light left, but the pictures still turned out great I think.
After a 8.5 hour day, watching the guys revive the car from chalky flat surface was well worth every dollar spent. The Miata's single stage paint is notoriously thin, and I was not willing to risk damaging the paint by attempting the paint correction myself. I'd rather go to work for an extra day to earn my wage and pay these guys with it, than spend that day working on the paint and potential screw it up. I am quite hands on with my car, but some things aren't worth the risk.
The car then sat inside for 24 hours to cure before I got to work installing all the new parts. I'll cover that in the next post
Agent☣Orange (06-09-2020),dnaha (06-09-2020),Greasemonkey2000 (06-09-2020),HarryB (06-09-2020),MaRcOp01o (06-09-2020),MiataQuest (06-09-2020),newoldm (06-09-2020),oldgrayleather (06-09-2020),Roadster7 (06-09-2020),sammjoey (06-09-2020),speedypenguin (06-09-2020),tsingson (06-09-2020),vote4pedro (06-09-2020)

This is too satisfying.
Follow the Builds
1993 Eunos Roadster B-spec by Mazdaspeed
http://mazdaroadster.net/showthread....819#post222819
1993 Mazda Miata LE
https://mazdaroadster.net/showthread...233#post244233
zco (06-11-2020)
Wow.

Exactly this ^
I had the chance to drool over my phone when you posted these on IG, but appreciate the full story (and did not missed my chance to drool over my keyboard as well)
zco (06-11-2020)

Wow, just wow!
I'm really enjoying the lengths that you're going to here! Almost no stone unturned in getting everything as perfect as it can be!
NC1 Sport, BC Racing Coilovers, RE Amemiya AW7 Wheels.
zco (06-11-2020)
Captured it perfectly.
I did this similar process to mine earlier this year, but crappy phone pics couldnt capture the color difference.
Nice work.
zco (06-11-2020)

I need a towel or a really long sock.
No todo que es oro brilla.
 Posting Permissions

 Reply With Quote