Bell Engineering Group inc, Auxiliary Fuel Pressure Regulator.
Have over 10 years use on this unit and still works fine. It came with a cast finish and had a large CAR TECH raised casting on the top. Several years ago polished it and removed the lettering. There are newer units out that look different. From the one I did see, it appears to work the same. Had it out to test a different unit, so is on the workbench for another polishing and a photo opportunity. It is a rising rate unit, and the best part is can adjust base fuel pressure to the injectors while in vacuum condition, or raise fuel pressure for boost conditions. Will touch on this a little before taking it apart to see how it works, and point out a few problems that may occur.
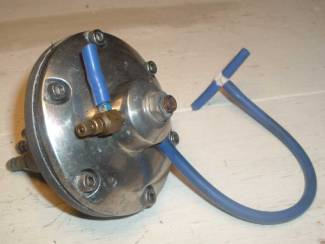 The
longer hose is the signal line that senses intake manifold pressure and can be
adjusted to react to vacuum, boost, or both.
The short hoses at the plastic T fit on the nipples of the stock FPR and
the intake manifold. The signal is
parallel to the stock FPR, but the fuel flow is in series. The longer hose came with a restrictor valve,
but found no difference with or without it.
My guess is that it could slow down the rise and fall rate of fuel
pressure. If wishing to tinker with one,
suggest putting about a 1" piece of WD-40 spray tube inside the line.
The
longer hose is the signal line that senses intake manifold pressure and can be
adjusted to react to vacuum, boost, or both.
The short hoses at the plastic T fit on the nipples of the stock FPR and
the intake manifold. The signal is
parallel to the stock FPR, but the fuel flow is in series. The longer hose came with a restrictor valve,
but found no difference with or without it.
My guess is that it could slow down the rise and fall rate of fuel
pressure. If wishing to tinker with one,
suggest putting about a 1" piece of WD-40 spray tube inside the line.
The needle valve is used to adjust fuel pressure at desired boost. The little bulge in the hose segment is a one-way valve to bleed excess boost.
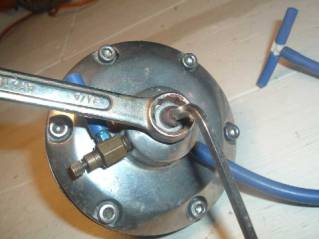 Is
easier to show how to adjust base fuel pressure on the workbench, but must be
installed to actually do it. 9/16"
wrench loosens the lock nut, and a 3/16 hex turns a threaded rod to change
pressure on a spring inside. We can see
how this works a little later.
Is
easier to show how to adjust base fuel pressure on the workbench, but must be
installed to actually do it. 9/16"
wrench loosens the lock nut, and a 3/16 hex turns a threaded rod to change
pressure on a spring inside. We can see
how this works a little later.
The stock FPR only clamps about low-mid 40s of the low 80s PSI of fuel pressure available at atmosphere, so want to adjust fuel pressure a bit higher prior to boost onset. When installed with engine at idle and signal line disconnected, adjust base pressure to about 47-50 PSI. On a road test we want a nice smooth transition between about -2 or 3" hg to 1-3 PSI boost. This is not possible with the supplied Greddy Vortech AFPR.
 The
bleeder valve is used to adjust fuel pressure to your highest boost
target. This is best done during an
actual road test. We want about 6 PSI of
additional fuel pressure for each PSI of boost.
In theory would want about 98 PSI fuel pressure for 8 PSI of boost. I prefer about 92-94 for optimal
crispness. Your preference there, but
will need higher pressure fuel pump(s). Stock
pump should be good for 5-6 PSI boost since it produces roughly 78-86 PSI of
available fuel pressure.
The
bleeder valve is used to adjust fuel pressure to your highest boost
target. This is best done during an
actual road test. We want about 6 PSI of
additional fuel pressure for each PSI of boost.
In theory would want about 98 PSI fuel pressure for 8 PSI of boost. I prefer about 92-94 for optimal
crispness. Your preference there, but
will need higher pressure fuel pump(s). Stock
pump should be good for 5-6 PSI boost since it produces roughly 78-86 PSI of
available fuel pressure.
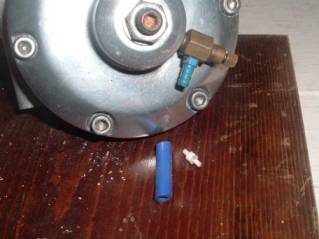
Note the little white one-way valve is removed. This valve permits bleeding of excess boost pressure and blocking vacuum leaks. Valves are available at most Auto Parts stores. Looks different, but has the same function.
 Stripped
the cap for polishing, but normally no reason for doing this. Caution if removing the three lower fittings
as they are soft brass and easy to strip the threads or break.
Stripped
the cap for polishing, but normally no reason for doing this. Caution if removing the three lower fittings
as they are soft brass and easy to strip the threads or break.
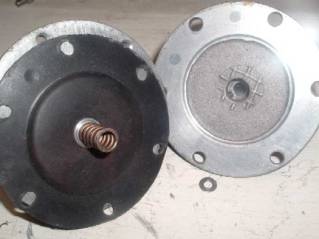 Top
chamber is removed by removing the 6 each 3/16” hex screws. Will probably need to pry it apart, but
caution is needed not to rip the flexible black diaphragm. Note the small washer and spring inside. The base pressure adjustment screw changes
pressure on the spring.
Top
chamber is removed by removing the 6 each 3/16” hex screws. Will probably need to pry it apart, but
caution is needed not to rip the flexible black diaphragm. Note the small washer and spring inside. The base pressure adjustment screw changes
pressure on the spring.
As vacuum in the top chamber decreases, it allows the spring to exert more pressure on the piston underneath. That can be adjusted to make the unit raise fuel pressure beyond the stock FPR clamps even with a selected plateau of manifold vacuum.
When boost is applied, it assists the spring to push harder on the piston. Again, that is controlled by the needle and one-way valve.
 With
diaphragm reversed can view the center chamber and metal disk that pushes down
on the piston. Note the hole at the 6
O’clock position. This keeps the center
chamber vented to atmosphere pressure.
With
diaphragm reversed can view the center chamber and metal disk that pushes down
on the piston. Note the hole at the 6
O’clock position. This keeps the center
chamber vented to atmosphere pressure.
There is a small black O-Ring on the piston. It appears to act as a cushion on the upper disk and seal any vacuum or boost leaks from the top chamber.
The piston is well machined and held in place by vacuum against a lower diaphragm. It can get gummed up so it will not slide freely and require periodic cleaning.
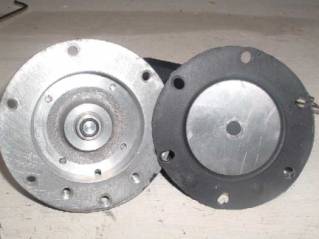
 Exposing
the lower chamber requires removing the 4 each 5/32” hex screws. Again, will probably need to pry it apart
using caution not to ruin the flexible diaphragm sandwiched inside.
Exposing
the lower chamber requires removing the 4 each 5/32” hex screws. Again, will probably need to pry it apart
using caution not to ruin the flexible diaphragm sandwiched inside.
The center fitting is for the fuel return line back to the fuel tank. The off set fitting is for the fuel line from the rear of the fuel rail, just after the stock FPR. Get the lines reversed and the unit will not work.
 With
the diaphragm removed, the piston slides easily in and out of the center
hole. It will fall through in either
direction. The small O-Ring is on the end
that does not show. Prior to assembly
will apply a very thin smear of white lithium to the piston. Why white lithium? Because I have a big tub of it on a shelf and
don’t know what those flexible diaphragms are made from.
With
the diaphragm removed, the piston slides easily in and out of the center
hole. It will fall through in either
direction. The small O-Ring is on the end
that does not show. Prior to assembly
will apply a very thin smear of white lithium to the piston. Why white lithium? Because I have a big tub of it on a shelf and
don’t know what those flexible diaphragms are made from.
 The
bottom chamber is the only portion of the unit that fuel sees. The thin metal plate stuck to the diaphragm
is more like a flexible foil. It presses
down over the ridge on the fuel return outlet by pressure on the piston. The additional clamping of the return line
increases fuel pressure to the fuel rail.
The
bottom chamber is the only portion of the unit that fuel sees. The thin metal plate stuck to the diaphragm
is more like a flexible foil. It presses
down over the ridge on the fuel return outlet by pressure on the piston. The additional clamping of the return line
increases fuel pressure to the fuel rail.
The actual movement of the piston is very small. One problem I had with this twice is a tiny chunk of broken fuel hose trapped between the lip in center and the metal foil. This ruined a proper seal and was unable to raise fuel pressure properly.
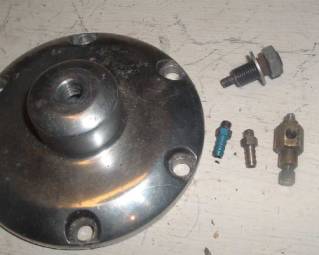
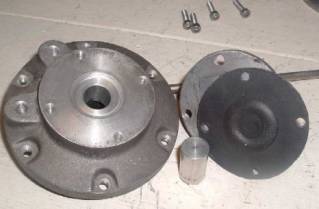
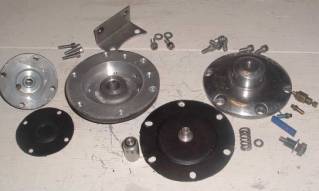 These
are all the parts as shown from the top.
Many of these are coming up used in the Miata.net Classifieds or on
E-Bay. Could be a very good buy for
something that works so well.
These
are all the parts as shown from the top.
Many of these are coming up used in the Miata.net Classifieds or on
E-Bay. Could be a very good buy for
something that works so well.
If you do buy a used one or yours is not working properly, may wish to take it apart and check. Will not harm anything.
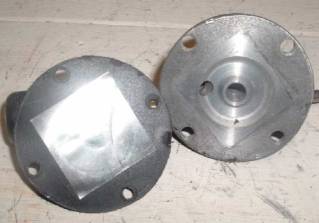
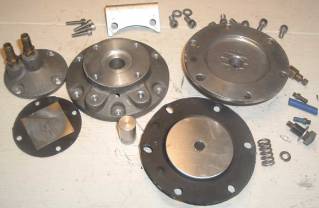 A
bottom view showing the parts. Should be
fairly simple now to see how it all works and what could go wrong.
A
bottom view showing the parts. Should be
fairly simple now to see how it all works and what could go wrong.
Only thing more to add is that if you read my pages on the Greddy AFPR, will understand that boost cannot be faked on this using a Mighty-Vac or bicycle pump. Will need to check your fuel pressure under boost conditions on an actual road test.
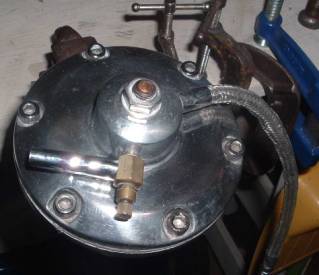 Finished
the polishing and all back together. Does
not look as shiny now, but that is because I sprayed it with some clear
coat. Settled for a lesser gloss here
since is rather difficult to maintain over time.
Finished
the polishing and all back together. Does
not look as shiny now, but that is because I sprayed it with some clear
coat. Settled for a lesser gloss here
since is rather difficult to maintain over time.
Will be replacing the fuel hoses since are 15 years old and I have a large coil of 5/16” fuel hose rated at 250 PSI.
Nearly time to see if it is still working properly!
Side note since I have space here: The stock FPR has no impact on raising fuel pressure when boost is applied. It only reacted to varying vacuum conditions. I simulated 25 PSI of boost to an isolated stock FPR, and it made no changes in fuel pressure above atmosphere.
 Prior
to the install I wanted to check the fuel pressure available with combination
of stock fuel pump and in-line Pierberg fuel pump. Little over 140 PSI of pressure!
Prior
to the install I wanted to check the fuel pressure available with combination
of stock fuel pump and in-line Pierberg fuel pump. Little over 140 PSI of pressure!
Test must be done in “Prime Mode” because engine will stall when reaching 70-80 PSI at idle. Strap the FP and GND in diagnostic test box, switch ignition switch to ON (Do not start engine), and clamp the fuel return line shut. A partially clogged fuel filter has no impact on this test since there is no demand for fuel. A bad filter could have a big impact on fuel pressure available during an actual road test.
When in doubt, change the filter. It is about $17 and 10 minutes.
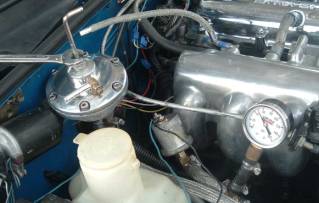 With
engine idling at –22 hg (Florida)
and engine warmed up disconnect the signal line to the FPR(s). I adjusted the base fuel pressure to 48 PSI,
based on previous experience. Can adjust
this slightly again as needed after a road test.
With
engine idling at –22 hg (Florida)
and engine warmed up disconnect the signal line to the FPR(s). I adjusted the base fuel pressure to 48 PSI,
based on previous experience. Can adjust
this slightly again as needed after a road test.
Thumbscrew adjustment is for a road test under boost. Adjust it as stated earlier to your top boost level desired. Can take a longer hose and temporarily tape gauge to outside of windshield. Ease into boost in upper gears and stop frequently for minor adjustments.
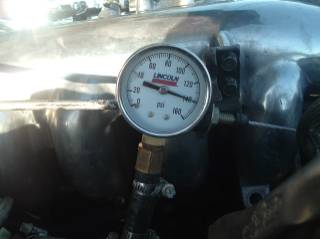
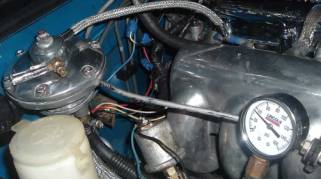 Added
this picture to show 34 PSI of fuel pressure (signal line connected) at
idle. There is no noticed change by
using the Pierberg, BEGI or Vortech AFPRs.
Are looking at what is being clamped by the stock FPR.
Added
this picture to show 34 PSI of fuel pressure (signal line connected) at
idle. There is no noticed change by
using the Pierberg, BEGI or Vortech AFPRs.
Are looking at what is being clamped by the stock FPR.
Vented to atmosphere, the only change was with the BEGI adjusted to 48 PSI rather than having it at stock 42-44 PSI.
At this point am unaware of any other fuel pump than the Pierberg where this works the same.