The objective here is to change the Cam Angle Sensor (CAS) O ring in about 10 minutes without removing the cam cover. A timing light is not needed. Have demonstrated this method multiple times and found it works just as easily on both the 1.6 and 1.8 NA Miatas. Only variation is the CAS is on the back of the intake cam on the1.6, and on the back of the exhaust cam on the 1.8s. Some of the 1.8s had an extra bracket and bolts to remove, so will take a bit more time. Both are just as easy to do. Started doing this around Y2K, after doing several others using by the book. If not comfortable trying it this way then please follow instructions in your manual.
CAUTION: If unwilling or unable to follow all of the instructions given, or try your own shortcut method, it could be a very long job. Also remember if the engine is rotated at any time with the CAS removed, the position of the cam slots will change and the second pencil mark made is worthless. An easy remedy is also included. The first pencil mark made for the ignition timing will not change.
 Have
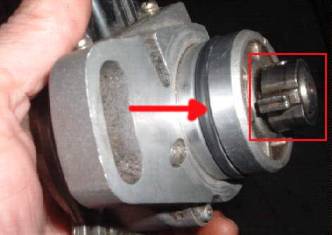
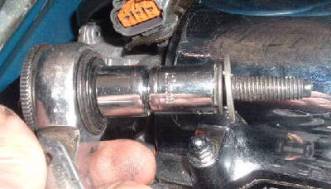
a spare CAS, so we can look at one to see what we are trying to do. The arrow points to the O Ring we will be
replacing. The area in the box is the
tip that rotates inside the rear of the cam.
The elongated slot is for the bolt that holds the CAS in place. This bolt is loosened for the CAS to rotate
when changing the ignition timing.
Have
a spare CAS, so we can look at one to see what we are trying to do. The arrow points to the O Ring we will be
replacing. The area in the box is the
tip that rotates inside the rear of the cam.
The elongated slot is for the bolt that holds the CAS in place. This bolt is loosened for the CAS to rotate
when changing the ignition timing.
Also note the slot for the O-Ring is wider than the ring. This allows the ring to expand front to back when compressed.
 A
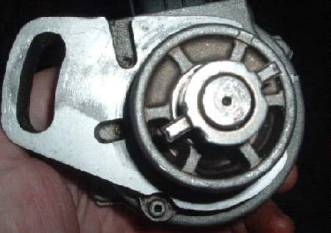
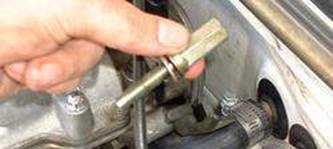
different view shows the two little “tangs” at the end of the rotating
tip. They are slightly off center. There is only one way it will fit, so no
chance of it being 180’ out of phase after installation. Also note one end has a little groove running
down the end, which is a bit clearer in the previous picture. The opposing tang has a little dot stamped
near the end and no groove. Found some
that may include a flat unmarked end or a bevel. Does not matter. Just need to remember which end is which when
removed.
A
different view shows the two little “tangs” at the end of the rotating
tip. They are slightly off center. There is only one way it will fit, so no
chance of it being 180’ out of phase after installation. Also note one end has a little groove running
down the end, which is a bit clearer in the previous picture. The opposing tang has a little dot stamped
near the end and no groove. Found some
that may include a flat unmarked end or a bevel. Does not matter. Just need to remember which end is which when
removed.
 The
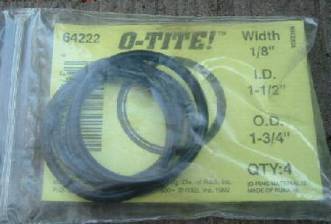
size of O Ring needed is 1/8” – 1 ½” x 1 3/4”.
They run around 59 cents each at about any local auto parts store, or can
get this little pack of 4 each for $1.79.
As far as I can tell it is made from the same material as the Dealership
replacement units. BUNA-N. If you are not sure of this, go ahead and get
one from the Dealership. Expect to pay
at least $6, even with some sort of discount.
The
size of O Ring needed is 1/8” – 1 ½” x 1 3/4”.
They run around 59 cents each at about any local auto parts store, or can
get this little pack of 4 each for $1.79.
As far as I can tell it is made from the same material as the Dealership
replacement units. BUNA-N. If you are not sure of this, go ahead and get
one from the Dealership. Expect to pay
at least $6, even with some sort of discount.
Another option is a Viton ring, rated for higher temperatures. Personally see little value in a Vitron ring since the job is easy and inexpensive to do and in many instances will need to buy those rings in quantities of at least 10.
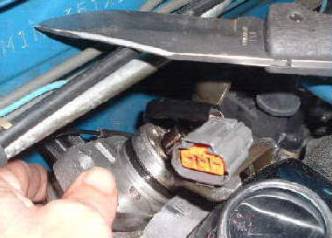
 To
prep for removal, the picture shows both plugs and the O2 sensor (1.6) have
been unplugged. I tucked them back out
of the way so have some working space.
If needed, remove the rear engine hoist bracket for more working
space. I used a soft lead pencil to mark
the position of the CAS. After the new
O-Ring is installed and CAS is aligned properly in the
To
prep for removal, the picture shows both plugs and the O2 sensor (1.6) have
been unplugged. I tucked them back out
of the way so have some working space.
If needed, remove the rear engine hoist bracket for more working
space. I used a soft lead pencil to mark
the position of the CAS. After the new
O-Ring is installed and CAS is aligned properly in the
As a side note for those that frequently prefer to change ignition timing, scribe a timing gauge here for different ignition settings. Will only take a moment to change it later and no need to use a timing light or allow the engine to warm up first. As the timing belt ages, or belt is replaced, this extra gauge will probably not be accurate.
 Remove
the 12 mm bolt. Does not matter if the CAS
is rotated slightly after removing the bolt, since the ignition timing is
marked. Usually after a turn or two on
the bolt, it seems easier to remove using your fingers. Just need to be careful we don’t slide the
CAS out of the back of the head during this stage. At this point can rotate the CAS back and
forth to loosen things up a little as long
as it is still snug against the rear of the head.
Remove
the 12 mm bolt. Does not matter if the CAS
is rotated slightly after removing the bolt, since the ignition timing is
marked. Usually after a turn or two on
the bolt, it seems easier to remove using your fingers. Just need to be careful we don’t slide the
CAS out of the back of the head during this stage. At this point can rotate the CAS back and
forth to loosen things up a little as long
as it is still snug against the rear of the head.
 Dave
let me use this picture of his 1.8 CAS bolt.
Little different shape and has a longer bolt head. May be unable to get a ratchet and socket to
fit behind the head, but a 12 mm off set box wrench works very well on both the
1.6 and 1.8. Will need both hands and a
pencil again for the next critical step.
Dave
let me use this picture of his 1.8 CAS bolt.
Little different shape and has a longer bolt head. May be unable to get a ratchet and socket to
fit behind the head, but a 12 mm off set box wrench works very well on both the
1.6 and 1.8. Will need both hands and a
pencil again for the next critical step.
 Now
for a bit of dexterity! Ensure the
ignition timing pencil mark is aligned, then slide the CAS straight back toward
the firewall. Do not twist it during
removal and try to avoid hitting the tip on anything. When clear, lower the back and rotate the
front upward. I made a second pencil
mark to show orientation where the little tang fits inside the cam. If you disturb the end slightly, make your
best correction guess and mark it anyway.
At best will only be a few degrees off, but may take a few extra light
pokes when installing it back together.
This will be clearer as we progress.
In this instance, the position marked was not the tang with the
groove. That should be easy to
remember! The second mark here is
critical. Since that is where the valve cam stopped, we need to know how to
orient the nose when installing it again.
Now
for a bit of dexterity! Ensure the
ignition timing pencil mark is aligned, then slide the CAS straight back toward
the firewall. Do not twist it during
removal and try to avoid hitting the tip on anything. When clear, lower the back and rotate the
front upward. I made a second pencil
mark to show orientation where the little tang fits inside the cam. If you disturb the end slightly, make your
best correction guess and mark it anyway.
At best will only be a few degrees off, but may take a few extra light
pokes when installing it back together.
This will be clearer as we progress.
In this instance, the position marked was not the tang with the
groove. That should be easy to
remember! The second mark here is
critical. Since that is where the valve cam stopped, we need to know how to
orient the nose when installing it again.
 Used
pocketknife to cut the old ring off, or when you pry up on it a little, it may
shatter and fall behind the engine. Have
a new ring handy to fumble in place. The
barrel should have enough oil remaining for lubrication. If you need a little more oil to smear, just
poke finger inside back of cam. Be
generous with the oil and ensure the new ring and slot are well lubricated. Does not matter if the tip was rotated, since
will need to orient it again prior to installing the CAS. Caution is needed at these stages that pencil
marks are not erased. For the next step
will line up our pencil marks, starting with the little tang on the tip, orient
it with the cam and ignition timing pencil mark and slide it in back in
place.
Used
pocketknife to cut the old ring off, or when you pry up on it a little, it may
shatter and fall behind the engine. Have
a new ring handy to fumble in place. The
barrel should have enough oil remaining for lubrication. If you need a little more oil to smear, just
poke finger inside back of cam. Be
generous with the oil and ensure the new ring and slot are well lubricated. Does not matter if the tip was rotated, since
will need to orient it again prior to installing the CAS. Caution is needed at these stages that pencil
marks are not erased. For the next step
will line up our pencil marks, starting with the little tang on the tip, orient
it with the cam and ignition timing pencil mark and slide it in back in
place.
Note. Many instances it is difficult to remove the CAS from behind the head, but still easy enough to replace ring as shown.
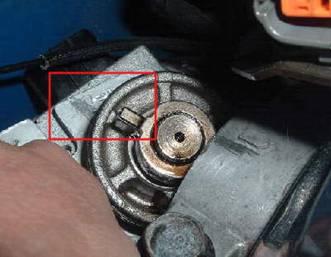
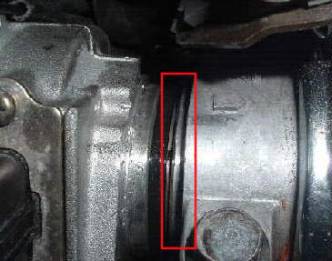 To
replace, eyeball align both pencil marks and slide it back in. If you see this little space on the barrel
between the new O-Ring and head, means the little tangs are not properly
aligned with the cam. Back the CAS out
slightly and rotate it a hair. Try
another poke. Repeat if needed until it
slides in. If you try rotating the unit
with pressure on the cam, will just be twisting the nose out of position and be
at it for a long time! I have only hit
one exactly with the first poke, but could expect about 3 to 5 little
jabs. Most will be pending on how well
you eyeballed both pencil marks.
To
replace, eyeball align both pencil marks and slide it back in. If you see this little space on the barrel
between the new O-Ring and head, means the little tangs are not properly
aligned with the cam. Back the CAS out
slightly and rotate it a hair. Try
another poke. Repeat if needed until it
slides in. If you try rotating the unit
with pressure on the cam, will just be twisting the nose out of position and be
at it for a long time! I have only hit
one exactly with the first poke, but could expect about 3 to 5 little
jabs. Most will be pending on how well
you eyeballed both pencil marks.
If for some reason you failed to mark the second critical mark or erased it, suggest pulling the CAS back out and use your finger to locate the slots in the rear of the cam, and identify the slot position with thumb on the journal cap. If it is in an awkward position, can bump the starter to relocate the slots and try again. This will not change the ignition timing mark made, only the cam position. Will have a 50/50 chance of being in a close ballpark position.
 In
this position the new O ring is flush against the head. If you followed all the previous instructions
exactly, it is properly aligned inside the cam.
The fatter new O-Ring will be a little harder to squeeze inside the yoke. It should have some oil on it, can push
harder on it and twist the CAS around a bit until it snaps back in place. Some are snugger than others and require a
little harder twist and push.. The Miata
has a handy built in oil can to add a little more lubrication as needed. Use the dipstick.
In
this position the new O ring is flush against the head. If you followed all the previous instructions
exactly, it is properly aligned inside the cam.
The fatter new O-Ring will be a little harder to squeeze inside the yoke. It should have some oil on it, can push
harder on it and twist the CAS around a bit until it snaps back in place. Some are snugger than others and require a
little harder twist and push.. The Miata
has a handy built in oil can to add a little more lubrication as needed. Use the dipstick.
If still having problems, suggest loosening both of the cam journal bolts slightly for a little more room, then tighten again after installation. No need to remove the cam cover to just loosen the cap a little.
Brings
us back to this picture. Replace the
bolt and ensure your first pencil mark is aligned prior to tightening. Now the ignition timing is back in the same
setting before the CAS was removed. Plug
the 3 plugs back in and go for a drive!
Pat your self on the back for saving a $100 from having a Dealership do
the job. Should also be able to do the
job in about 10 minutes rather than dropping the Miata off somewhere for a day.
Why do it like this? For other reasons than stated above, the O ring and the cam gasket may not fail at the same time. Many owners are unaware of this ring when replacing the cam gasket. The 1.8 can leak oil down and ruin the heater hose.. The 1.6 can leak oil down on the small unused water cap nipple. Not sure if this will hurt the cap but will guess it does not do it much good! We could pull the cam cover to do it, but will probably be spending at least 5 times longer. Even if the cam gasket is still serviceable, no need to move the coil bracket or clean the old gasket sealer from the 6 points and apply fresh sealant.
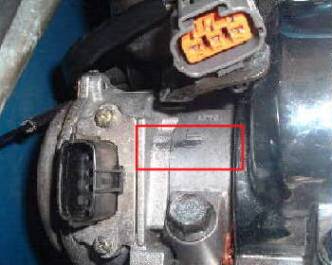
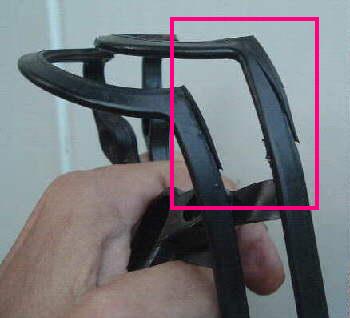 Included
this picture as somewhat related. These
were from visiting 1.6 Miatas where the owners failed to loosen or remove the
coil pack completely when replacing the cam cover gasket. With just the top two bolts removed there is
enough play to slide the cam cover forward and out. When replacing the cover need to drop the
cover straight down in proper position to avoid folding the rear edge over if
trying to slide it back in place between the head and top two flanges for the
coil pack. Several owners seem to have
problems removing/loosening the third coil pack bolt due to it’s awkward
location between the head and firewall.
Included
this picture as somewhat related. These
were from visiting 1.6 Miatas where the owners failed to loosen or remove the
coil pack completely when replacing the cam cover gasket. With just the top two bolts removed there is
enough play to slide the cam cover forward and out. When replacing the cover need to drop the
cover straight down in proper position to avoid folding the rear edge over if
trying to slide it back in place between the head and top two flanges for the
coil pack. Several owners seem to have
problems removing/loosening the third coil pack bolt due to it’s awkward
location between the head and firewall.
A little acetone was used to clean the old gasket sealant to show better the damage.
If the objective was to only change the CAS O-ring and not remove cam cover, then is not an issue.