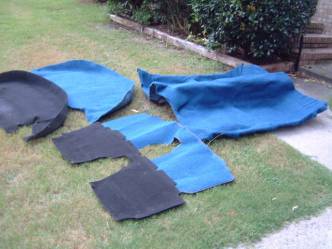
 The
blue carpet set is the $129 set distributed by AABest. It completely came “Green” and only the
section behind the seats was cut to fit and had the edges finished. Still had to make holes for the carpet
fasteners. The bulkhead and floor pieces
were molded very well and fit fine. All
remaining edges had a much as 4” to trim off.
From the marks on the back, appears it was formed in a real Miata floor
pan. The carpet chosen was not intended
for a Miata, but AA Best arranged to have some samples of different colors to
select from. Believe this was one of the
Corvette colors.
The
blue carpet set is the $129 set distributed by AABest. It completely came “Green” and only the
section behind the seats was cut to fit and had the edges finished. Still had to make holes for the carpet
fasteners. The bulkhead and floor pieces
were molded very well and fit fine. All
remaining edges had a much as 4” to trim off.
From the marks on the back, appears it was formed in a real Miata floor
pan. The carpet chosen was not intended
for a Miata, but AA Best arranged to have some samples of different colors to
select from. Believe this was one of the
Corvette colors.
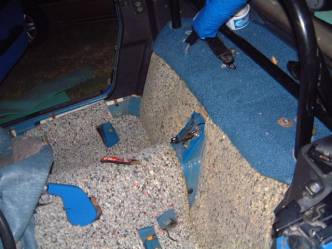
Floor piece looks a bit sad, but was just dumped out of the box and not properly posed. At a later stage, can lay sections of original carpet on top to make marks with chalk where the holes should be. To keep the cut areas from fraying, I just used a little PVC cement on the cut edges. The little PVC applicator brush works fine for this.
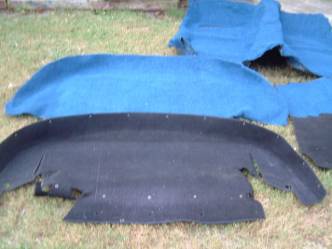 This
gives an idea of what cuts and holes are needed just for the rear bulkhead
piece.
This
gives an idea of what cuts and holes are needed just for the rear bulkhead
piece.
There are a multitude of carpet fasteners. Have them under the seats, front foot wells, near the seat belts, under the heat core, and about 18 alone in this piece. They come out fairly well with a salad fork, but will probably break a few. Suggest a blister pack of generic clips from local Auto Store. They won’t look exactly the same, but can swap them around where they do not show.
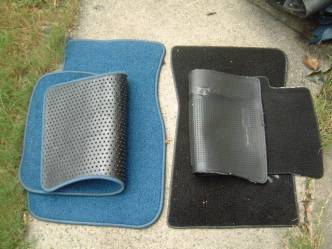 Ordered
the $32 optional matching floor mats.
They are not designed for left or right size fitting, so can interchange
them. They both still fit very
well. The edges are completely finished
and about 1 ½ times thicker than the stock mats.
Ordered
the $32 optional matching floor mats.
They are not designed for left or right size fitting, so can interchange
them. They both still fit very
well. The edges are completely finished
and about 1 ½ times thicker than the stock mats.
As a side note will find the stock carpet to be thin and lightweight. It appears to be a sheet of vinyl with some fuzz embedded on one side.
 This
was the most time consuming part for me.
Several extra cuts had to be made for the roll bar. In addition the roll bar had to be removed to
get the carpet in. Having a dummy attack
when installing the bar I tack welded the nuts and bolts to the mounting plates
on the frame. That was good for an easy
extra ½ day’s work! The piece behind the
seats is just posing for the picture and not secured in place yet.
This
was the most time consuming part for me.
Several extra cuts had to be made for the roll bar. In addition the roll bar had to be removed to
get the carpet in. Having a dummy attack
when installing the bar I tack welded the nuts and bolts to the mounting plates
on the frame. That was good for an easy
extra ½ day’s work! The piece behind the
seats is just posing for the picture and not secured in place yet.
The padding under is a tight woven mat, is about ½” thick. Fairly difficult to cut and trim. The padding fused to the carpet. Even the floor padding is much thicker and covers more area than OEM skimpy padding.
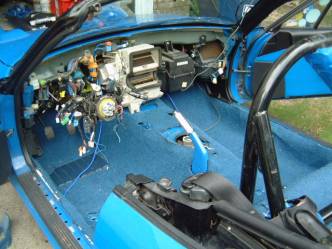
 Time
to remove the dash. Need to remove these
things first to get to it. There is also
a little bowl of nuts and bolts and the other seat.
Time
to remove the dash. Need to remove these
things first to get to it. There is also
a little bowl of nuts and bolts and the other seat.
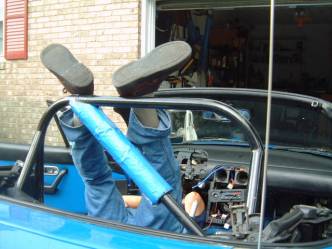 My
wife and neighbors found this picture more amusing than I did. These old bones did not like it very
well. If I remember correctly there were
9 bolts and 22 electrical connections to remove. Also have the HVAC clips to remove. Nothing really difficult about it, as was
just busy work in an awkward position.
No real need to tag any of the electrical connectors since the
connectors are all different and won’t interchange.
My
wife and neighbors found this picture more amusing than I did. These old bones did not like it very
well. If I remember correctly there were
9 bolts and 22 electrical connections to remove. Also have the HVAC clips to remove. Nothing really difficult about it, as was
just busy work in an awkward position.
No real need to tag any of the electrical connectors since the
connectors are all different and won’t interchange.
Was slightly more busy work because have CB radio mounted in the armrest console, 12 extra connections to the gauge pod, a MSD and Bipes mod in ECU compartment, nitrous arming and safety switches, permanent garage door opener installed, lighted mirror, and a few anti-theft modifications. Those all had to be removed.
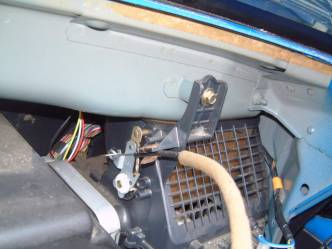 Here
was another dummy attack. Removed the
HVAC control the difficult way. All I
had to do under the dash was pop the cable out of the little clip and unhook it
from the door lever. Should have known
that since adjusted both flaps on other Miatas.
Here
was another dummy attack. Removed the
HVAC control the difficult way. All I
had to do under the dash was pop the cable out of the little clip and unhook it
from the door lever. Should have known
that since adjusted both flaps on other Miatas.
 After
making small cuts using old carpet for a template, I worked from center to
front, then center to rear, and finally to both sides. I cut and enlarged holes as I went. Got everything stretched so was snug fitting
without wrinkles. This was a bit more
difficult because added an extra layer of carpet padding to all under carpeted
areas. In some places that had padding,
it is now 1” thick. It looks a bit
“puffy” as evident by looking at the front plastic piece installed.
After
making small cuts using old carpet for a template, I worked from center to
front, then center to rear, and finally to both sides. I cut and enlarged holes as I went. Got everything stretched so was snug fitting
without wrinkles. This was a bit more
difficult because added an extra layer of carpet padding to all under carpeted
areas. In some places that had padding,
it is now 1” thick. It looks a bit
“puffy” as evident by looking at the front plastic piece installed.
 Working
my way toward the rear, it shows the extra ½” foam padding added to all under
carpet areas. Raided the local carpet
store dumpster for suitable padding.
Lots of new scraps and since will be trimming it into small pieces, no
need for large pieces. Was easy to cut
with scissors, and once in place with the carpet installed, it is held firmly
in place. Best part is that it is
completely free and works extremely well.
Working
my way toward the rear, it shows the extra ½” foam padding added to all under
carpet areas. Raided the local carpet
store dumpster for suitable padding.
Lots of new scraps and since will be trimming it into small pieces, no
need for large pieces. Was easy to cut
with scissors, and once in place with the carpet installed, it is held firmly
in place. Best part is that it is
completely free and works extremely well.
11 years earlier did something similar but not to this extent. There was no evidence or any rust or damage to the floor plan. What I do like about the padding is the nice soft cushy feel and the reduction of road noise and heat. Most noticed heat reduction is around the transmission tunnel and in foot wells.
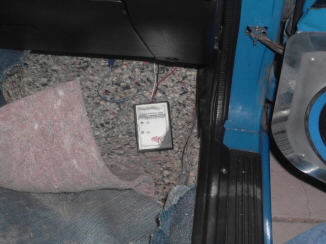 This
picture was taken 3 years later when adjusting the Bipes MSD modification
installed in the ECU compartment.
Looking at the passenger foot well, can see the layer of carpet padding
on the ECU compartment cover. The pink
material is the fiber padding that came with the carpeting. I pulled part of it loose from the back of
the carpet for a photo opportunity. The
padding that came with the AA Best carpeting was more substantial than the sketchy
OEM padding.
This
picture was taken 3 years later when adjusting the Bipes MSD modification
installed in the ECU compartment.
Looking at the passenger foot well, can see the layer of carpet padding
on the ECU compartment cover. The pink
material is the fiber padding that came with the carpeting. I pulled part of it loose from the back of
the carpet for a photo opportunity. The
padding that came with the AA Best carpeting was more substantial than the sketchy
OEM padding.
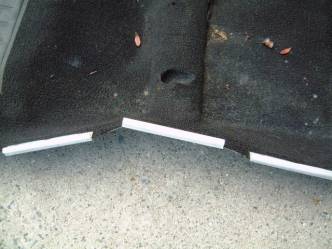 One
of the last steps of install was to recycle these strips. They stretch the carpet out to the sides and
secure the sides of carpet to ledge at door sills. Did not have a proper stapler to staple the
strips to the carpet, so stapled them together on a slat of wood. Pried it off the wood slat and closed the
staples with pliers.
One
of the last steps of install was to recycle these strips. They stretch the carpet out to the sides and
secure the sides of carpet to ledge at door sills. Did not have a proper stapler to staple the
strips to the carpet, so stapled them together on a slat of wood. Pried it off the wood slat and closed the
staples with pliers.
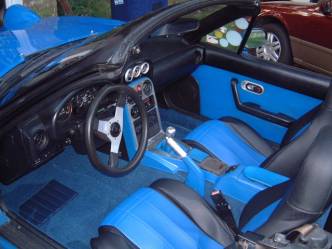 Finished. If I have any regrets about doing it may be
from the choice of over 70 different colors and piles. Probably should have gone a bit darker.
Finished. If I have any regrets about doing it may be
from the choice of over 70 different colors and piles. Probably should have gone a bit darker.
As to how long it will last, will need to ask me in another 14 years.
As to the strength of the stock carpet, I tore it into little pieces by hand so it would fit in the garbage can. Sure I can’t do that with this carpeting.
If I had to do this over again, would probably do it without removing the dash. Would cut the piece out under the forward console then stitch it together under the console with lacing twine. Wanted to pull the dash and do it as saw some other really poor looking jobs where people tried gluing it in place or just tried to tuck the edges under the Tupperware.