Again, many of these pictures were taken a several years back and using a cheapo detachable net cam.
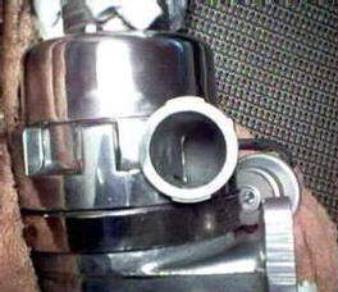 This
is one of my first polishing projects.
It may have been Aerodyne # 3 or # 4.
At time taken it was not to show the polishing, but the casting flash
remaining inside. Stopped in middle of
polishing when noticing the problem.
This
is one of my first polishing projects.
It may have been Aerodyne # 3 or # 4.
At time taken it was not to show the polishing, but the casting flash
remaining inside. Stopped in middle of
polishing when noticing the problem.
Started with #240 sanding medium. Followed that in 3 stages. A hard muslin wheel and coarse rouge, medium wheel and medium rouge, and finished with a soft wheel and fine tripoli. Probably in the second buffing stage here.
This was rather easy because there were no really sharp corners or deep crevices.
If you start with too coarse a sanding medium, it will leave deep scratches that are more difficult to remove from the casting.
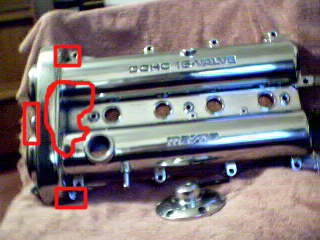 These
were the most difficult areas to do.
Probably represents over 2/3 of the total polishing time, and a lot of
sore finger tips. Used a tiny hard
rubber sanding block when I could. If
you wish to cut the front off and expose the cam gears, many polishing hours
would be saved.
These
were the most difficult areas to do.
Probably represents over 2/3 of the total polishing time, and a lot of
sore finger tips. Used a tiny hard
rubber sanding block when I could. If
you wish to cut the front off and expose the cam gears, many polishing hours
would be saved.
At the time I did this there was little guidance out on how to do it so did a lot of time consuming extra work. The bulk of the sanding was done using medium and fine sanding sponges. This has close to 30 hours work and later did more.
The BEGI AFPR cap was simple. Ran a shank through it and spun it on a drill press.
 If
going for a shine like this, suggest not using any type of a rotary
sander. When entering the final buffing
stages, it looks like a rippled washboard.
Had to go back over it with a padded sanding block to smooth the ripples
out and buff it again.
If
going for a shine like this, suggest not using any type of a rotary
sander. When entering the final buffing
stages, it looks like a rippled washboard.
Had to go back over it with a padded sanding block to smooth the ripples
out and buff it again.
The bulk of the rough polishing done was using a 6” hard cutting wheel and a coarse rust removing type rouge.
Thought I could use a Dremel tool for some of the tight areas, but it cut too fast and deep and left ripples. Spent a lot of money for buffing tips and still had to correct mistakes by hand.
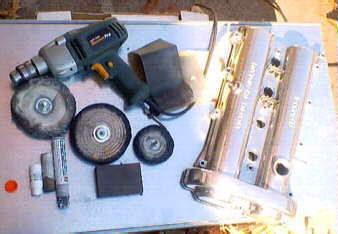 This
picture was taken a few years later during another project. Shows the basic tools used. Sanding sponge and variety of muslin wheels
and rouges.
This
picture was taken a few years later during another project. Shows the basic tools used. Sanding sponge and variety of muslin wheels
and rouges.
Probably want to start with the hardest wheel available with the most stitching. If unable to find one hard enough, may want to add more stitching or sew two together. Drill shown is 6 Amps. If using a little $50 B&D, will probably burn it out quickly and be unable to get any groceries behind your work.
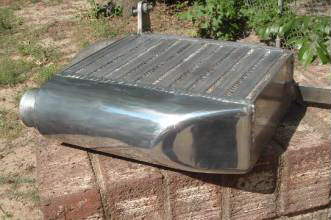 Can’t
neglect the intercooler! This was fairly
easy also. Only did the bottom tank and
sides. Did not want to be messing around
with a buffing wheel on the slats between the cooling fins.
Can’t
neglect the intercooler! This was fairly
easy also. Only did the bottom tank and
sides. Did not want to be messing around
with a buffing wheel on the slats between the cooling fins.
I stated earlier not to use a sanding disk. After you buff it, can see the slight rippling it leaves when the light is right. Would take about an hour or so to go back over it with a sanding sponge to remove, then buff it again.
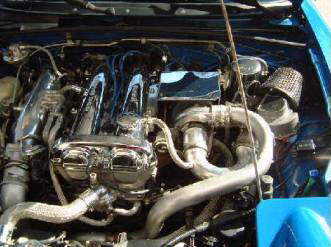
 Polished
the intake manifold in place. Did that a
little at a time because my back did not like bending over the engine bay for
long periods. Just did the parts that
show as best as possible. Used a file to
remove the casting ridges. Also used a
file on the edges of the cam cover prior to polishing.
Polished
the intake manifold in place. Did that a
little at a time because my back did not like bending over the engine bay for
long periods. Just did the parts that
show as best as possible. Used a file to
remove the casting ridges. Also used a
file on the edges of the cam cover prior to polishing.
Removed the valve to polish. Made it easier and allowed me a little more room to get some areas of the manifold.
The two bolts were simple to remove and push the throttle cable out of the way to reach down between the runners.
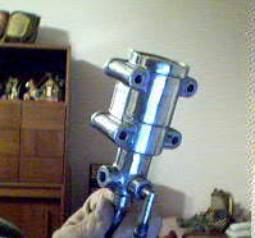
 The
pulley brackets are steel. They polished
nicely but the electroplating I used did not hold up well. After a few years they started rusting. Suggest leaving them alone or have them
chrome plated.
The
pulley brackets are steel. They polished
nicely but the electroplating I used did not hold up well. After a few years they started rusting. Suggest leaving them alone or have them
chrome plated.
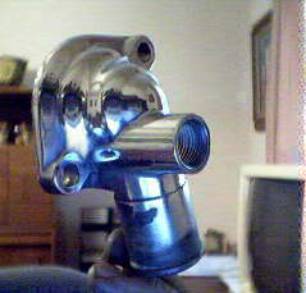 The
thermostat housing was one of the easier projects. The aluminum casting was smoother than the
cam cover and intake manifold. I worked
on it with a sanding sponge while taking the dog for a walk. When arriving home it was ready for a few
minutes on the buffing wheel.
The
thermostat housing was one of the easier projects. The aluminum casting was smoother than the
cam cover and intake manifold. I worked
on it with a sanding sponge while taking the dog for a walk. When arriving home it was ready for a few
minutes on the buffing wheel.
Suggest doing this as a starting project and see if will lose craving to try a larger project.
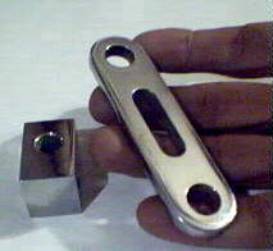
 The
radiator cap is stainless steel and fairly difficult to polish. The polished one was a Stant. It had stamped lettering all around the
top. Figured I could remember how many
PSI it was and not to remove it while hot.
The
radiator cap is stainless steel and fairly difficult to polish. The polished one was a Stant. It had stamped lettering all around the
top. Figured I could remember how many
PSI it was and not to remove it while hot.
Used a whetstone and 3 walks with the dog to reduce the metal. Back home, just sanded out the edges and buffed it shiny.
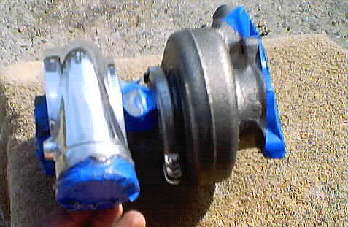
 The
fuel pressure sensor was steel and polished up nicely. Sprayed it then with some clear lacquer. It dulled the shine a little but held up well
for several years.
The
fuel pressure sensor was steel and polished up nicely. Sprayed it then with some clear lacquer. It dulled the shine a little but held up well
for several years.
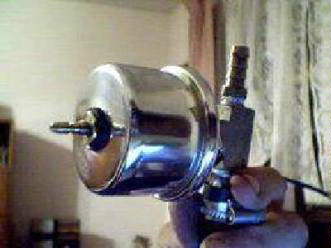
 Prior
to switching over to the Greddy, I polished the aluminum housing. This was a fairly fast and simple
project. No sanding was needed and did
the job with a 6” and 4” buffing wheels.
Estimated time was 40 minutes.
Prior
to switching over to the Greddy, I polished the aluminum housing. This was a fairly fast and simple
project. No sanding was needed and did
the job with a 6” and 4” buffing wheels.
Estimated time was 40 minutes.
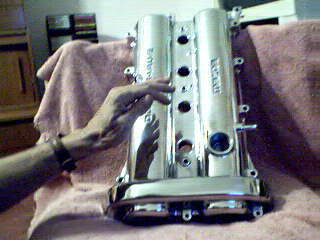
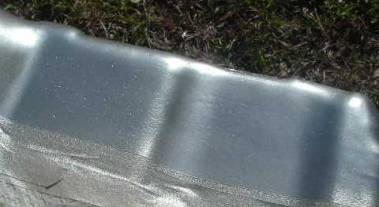
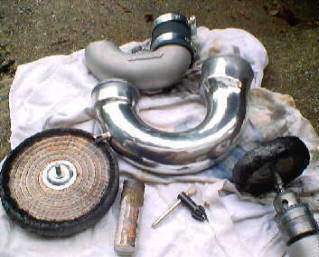 The
Greddy intake plumbing was also easy to work on. Did not even need to use a sanding
sponge. The cutting wheels alone worked
well enough. Can compare it with the
unpolished piece at top. This task took
about 20 minutes.
The
Greddy intake plumbing was also easy to work on. Did not even need to use a sanding
sponge. The cutting wheels alone worked
well enough. Can compare it with the
unpolished piece at top. This task took
about 20 minutes.
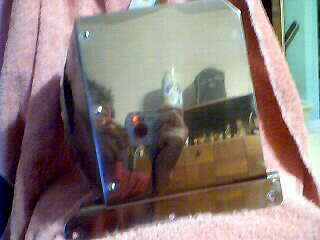 The
BBowser heat shields were made from brushed stainless steel. Easy two hours of work on this and most of
that time was spent on the top piece alone.
Can even see my little plastic blue and white net cam!
The
BBowser heat shields were made from brushed stainless steel. Easy two hours of work on this and most of
that time was spent on the top piece alone.
Can even see my little plastic blue and white net cam!
At a later time, came back and did a better job.
 The
cam cover is now chrome. The problem
with chrome is that it makes all your polishing work look dull!
The
cam cover is now chrome. The problem
with chrome is that it makes all your polishing work look dull!
Note on the shown BBowser heat shield. This is one of the later prototypes in brushed stainless. Had the pleasure of assisting him with fitment of a better design.
Did the sanding work with a mouse type sander. The triangular shape easily allowed me to work around the rivets. Speculate without proper knowledge tools that this type sander would have shaved several hours of time for some of the difficult areas in the cam cover.
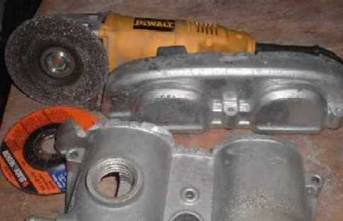 Tossing
this out in case you wish to do more and as part of debadging. If wishing to expose the cam gears and
eliminate a lot of polishing time, Mr. DeWalt is a handy tool to have. Will use some less aggressive tools to finish
the end prior to polishing.
Tossing
this out in case you wish to do more and as part of debadging. If wishing to expose the cam gears and
eliminate a lot of polishing time, Mr. DeWalt is a handy tool to have. Will use some less aggressive tools to finish
the end prior to polishing.
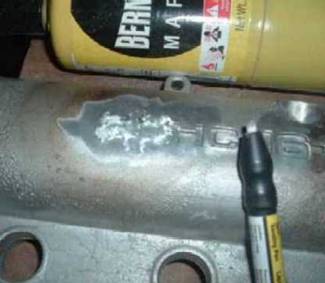 Part
of the debadging process could include filling in the recessed lettering on the
1.6 cam cover. The nylon spot sanding
pen (usually used for touch-up painting) did an excellent job of scouring out
the recessed lettering. Will need a very clean working surface for
the next step. Used some aluminum
brazing rods to fill them in. They are
available at Home Depot or similar stores for a nominal price. They have a working temperature of 750F, and
a Brinnell hardness of 100. Not sure a
typical propane torch will be able to heat a large enough area without using a
turbo head, so just used a MAPP torch for a wider flame. A trial and error work found the need to heat
the whole area from your working point to around a 3” radius so the aluminum
will flow freely.
Part
of the debadging process could include filling in the recessed lettering on the
1.6 cam cover. The nylon spot sanding
pen (usually used for touch-up painting) did an excellent job of scouring out
the recessed lettering. Will need a very clean working surface for
the next step. Used some aluminum
brazing rods to fill them in. They are
available at Home Depot or similar stores for a nominal price. They have a working temperature of 750F, and
a Brinnell hardness of 100. Not sure a
typical propane torch will be able to heat a large enough area without using a
turbo head, so just used a MAPP torch for a wider flame. A trial and error work found the need to heat
the whole area from your working point to around a 3” radius so the aluminum
will flow freely.
 At
this point, sanded then down flush with the surface, and can clearly see if
work needs to be redone. When happy with
the results can start polishing.
At
this point, sanded then down flush with the surface, and can clearly see if
work needs to be redone. When happy with
the results can start polishing.
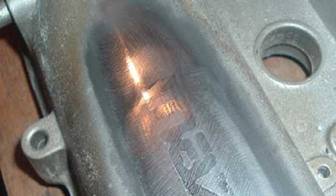
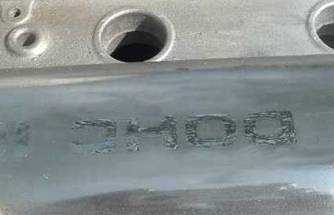 This
was a kinda funny picture. Is not what
the eyes see but what the digital camera captured. After the initial coarse polishing stage the
lettering appeared slightly brighter …
more like a chrome inset in the polished aluminum. The speckling is the reflection of an
overhead tree leaves when outside in the Florida sunshine.
This
was a kinda funny picture. Is not what
the eyes see but what the digital camera captured. After the initial coarse polishing stage the
lettering appeared slightly brighter …
more like a chrome inset in the polished aluminum. The speckling is the reflection of an
overhead tree leaves when outside in the Florida sunshine.
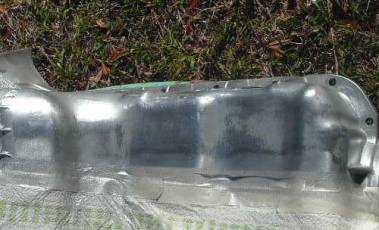
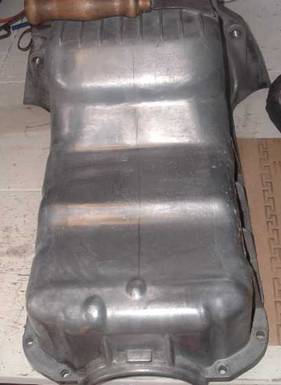 Am
frequently asked for more details concerning how to polish so adding this
segment. This is an unserviceable 1.6
Miata oil pan. The blessings of being
retired!
Am
frequently asked for more details concerning how to polish so adding this
segment. This is an unserviceable 1.6
Miata oil pan. The blessings of being
retired!
A steel Brillo type soap pad was used for the cleaning, followed by a good rinsing. This cleaned out all the dirt and grease from the numerous pores and roughcast finish. There are several small casting nuggets protruding from the finish the Brillo pad removed, but will still require some sanding to remove the remaining.
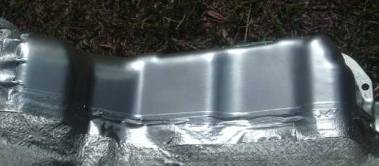
I scratched a line down the center, planning to polish ½ and paint the other half. Then decided to add a third method of using a wire brush finish down the center. If this tinkering works out, should be able to see the difference and compare.
This is a lot less work than a cam cover! I can get my buffing wheel around all the minor bends without resorting to sore fingertips from all the crevices. In addition, the oil pan is a much softer and easier to sand and buff than the alloy used in the cam cover and intake manifold.
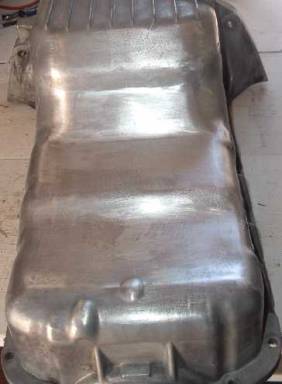 A
light sanding with 220 Grit removed the remaining little nuggets.
A
light sanding with 220 Grit removed the remaining little nuggets.
Did not time this, but guessing less than two minutes. Was no attempt to sand the recessed pores even or fix the uneven finish remaining. Just rubbed the surface with medium until it felt smooth. Some areas just required a bit more rubbing than others.
A later picture will show how rough the remaining casing is, but this picture does not show it very well. It permitted using a uniform starting platform for a comparison.
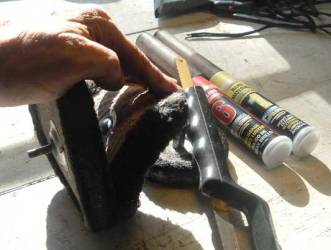 Polishing
tools used:
Polishing
tools used:
1. 6 Amp drill or bigger. Need some torque behind your work so you don’t bog the motor or burn it out quickly. Probably also have better things to do during the remainder of the week!
2. The muslin wheels. The one bent over on the right is the firmest one I found at Home Depot. It is way too flexible for initial polishing. If unable to find something firmer, suggest sewing two of them tightly together and using on one arbor. Will use the firm one for the initial polishing and the Home Depot one for the final polishing. Can push down hard enough while working until the 6 Amp drill starts to protest the load without the wheel bending and meander.
3. Rouge/compound/Tripoli. For the brand shown #1 was designed for removing rust on iron and steel. No need to get that abrasive, but I kept moving the wheel so not to dig a trench in the aluminum. #6 was the least abrasive, designed for polishing precious metals. Will use that one in the final polishing stage to remove the scratches remaining from the initial polishing wheel and compound. Add a tiny amount of compound to the wheel for every two or three square inches polished.
4. Hacksaw blade. For the first polishing had to clean the buffing wheel twice. The wheel will cake up with the compound and metal dust. It will start clumping up on the work piece in spots and can leave deeper scratches than when you started! Spin the wheel against the blade to comb the wheel.
5. Mineral spirits or solvent (not shown). The working surface will get fairly warm and tends to clump up the polishing compound. A quick swipe with mineral spirits on a rag wipes it right off.
6. You and everything around you will get very dirty. Choose your location well! Also clamping my work piece in a bench vice so it will not slide around when extra groceries are applied.
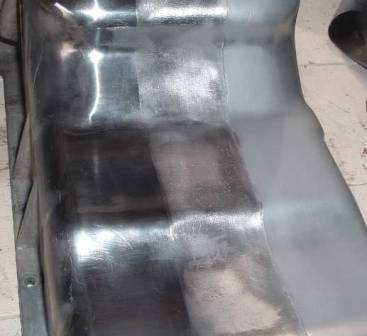
 This
I timed to 11 minutes using the #1 compound and hard wheel. Still a load of fine scratches remaining, but
can still see the reflection of the sky, workshop, and trees.
This
I timed to 11 minutes using the #1 compound and hard wheel. Still a load of fine scratches remaining, but
can still see the reflection of the sky, workshop, and trees.
The center section looks a little different because I did it first testing the wire brush.
At this point will do the painting, redo the wire brush section, and then finish with the #6 compound and the Home Depot muslin wheel.
 .The
first light coat of silver paint is applied.
Prefer to use aluminum paint, but did not have any handy. The paint hides a lot of the pits and
roughness of the metal. The roughness
and pits are still quite visible. Will
let this bask in the February Florida sunshine for a couple of hours and come
back later.
.The
first light coat of silver paint is applied.
Prefer to use aluminum paint, but did not have any handy. The paint hides a lot of the pits and
roughness of the metal. The roughness
and pits are still quite visible. Will
let this bask in the February Florida sunshine for a couple of hours and come
back later.
 Went
over it with some 000 steel wool. Just
took the high points out to smooth out the surface. Will not remove the paint build up inside the
pits or the low points in the rough surface.
Went
over it with some 000 steel wool. Just
took the high points out to smooth out the surface. Will not remove the paint build up inside the
pits or the low points in the rough surface.
Also notice the strip along the edge of the masking tape. That is a section that was previously wire brushed.
 Skipping
the pictures of the second coat of paint and second reduction with steel wool
and showing the 3d and final coat of paint.directly to the third coat of paint. As far as I am concerned it looks very smooth
and the roughness and pits are gone. If
doing a cam cover, would want the paint as thin a possible so it will not crack
and wrinkle from the heat.
Skipping
the pictures of the second coat of paint and second reduction with steel wool
and showing the 3d and final coat of paint.directly to the third coat of paint. As far as I am concerned it looks very smooth
and the roughness and pits are gone. If
doing a cam cover, would want the paint as thin a possible so it will not crack
and wrinkle from the heat.
 This
is a good comparison of the three finished surfaces. The wired brushed section in the center shows
a fair idea of what we started with.
This
is a good comparison of the three finished surfaces. The wired brushed section in the center shows
a fair idea of what we started with.
The left section is a better close-up of my 11 minutes with the hard wheel and coarse compound. It also makes the fractures along the left edge stand out more. Can still see some haze and light scratches produced by the first polishing stage. Will work on that next.
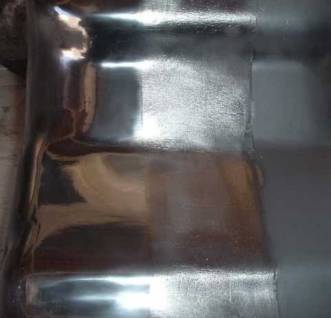 This
represents an additional 9 minutes using the softer HD buffing wheel and the
fine polishing compound. If you do a
poor first polishing stage, it will really show up here.
This
represents an additional 9 minutes using the softer HD buffing wheel and the
fine polishing compound. If you do a
poor first polishing stage, it will really show up here.
Not shabby at all for about 20 minutes on this surface. It represents a strip approximately 12” long and 3” wide, or approximately 36 square inches.
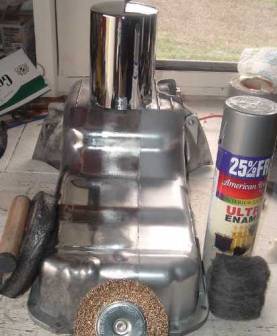 Here
are three options for DIY home garage project.
Here
are three options for DIY home garage project.
Polish it.
Wire brush it.
Paint it.
Unable to take a good picture of this in direct sunlight with my digital camera. Sitting on top is a chromed oil filter cover. The do look similar in the picture, but these old eyes without bi-focals can still see a big difference!
Want to add additional emphasis that the oil pan was just a show and tell. The aluminum is much softer than the alloy materials in the cam cover and intake manifold. Probably could have brought 3 or 4 complete oil pans to the same mirror finish faster than doing one cam cover.