This applies to the stock NA Miata. Unknown if it works with our friends across the big pond with the different size tags or with any of the aftermarket electric trunk locks. Know from testing it will not work on a NB. The idea is the same but the landmark dimple is in another location.
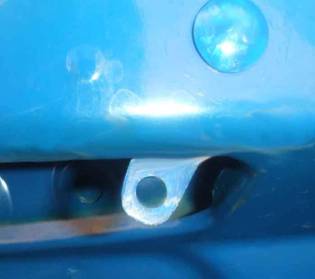
 With
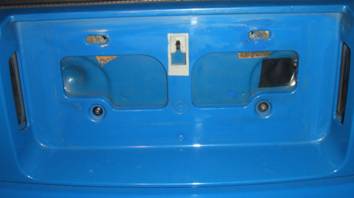
the license plate removed, notice a dimple on each side. The passenger side has a piece of black tape
over the hole I drilled in that dimple about 13 years ago after being locked
out of the trunk.
With
the license plate removed, notice a dimple on each side. The passenger side has a piece of black tape
over the hole I drilled in that dimple about 13 years ago after being locked
out of the trunk.
 Another
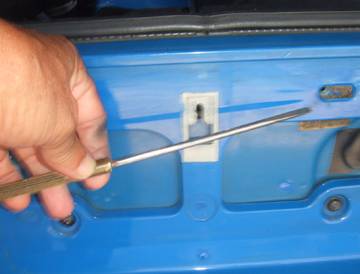
post stated to drill out that grey plastic tab and insert a small screwdriver
and push. The tab was removed and
discarded and was still unable to open the trunk. Even with the trunk open where I could watch
the latch mechanism was still unable to trip it. It appears possible to do if the hole was
much larger. Would still also require
cutting through two layers of plastic fascia, the sheet metal, then at about 1
½” deeper will hit a second sheet metal plate with a small hole. That may need enlarging also. Not planning to do that since I already have
an opening that works very well.
Another
post stated to drill out that grey plastic tab and insert a small screwdriver
and push. The tab was removed and
discarded and was still unable to open the trunk. Even with the trunk open where I could watch
the latch mechanism was still unable to trip it. It appears possible to do if the hole was
much larger. Would still also require
cutting through two layers of plastic fascia, the sheet metal, then at about 1
½” deeper will hit a second sheet metal plate with a small hole. That may need enlarging also. Not planning to do that since I already have
an opening that works very well.
 With
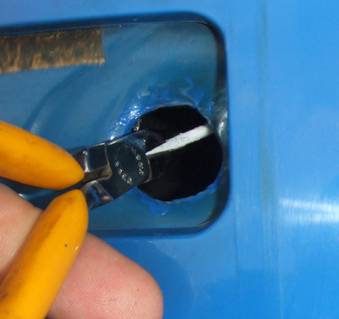
the tape removed can see the hole I drilled.
Only really need a ½” hole, but shown for a better picture used a 1”
hole. If you drill more than ¼” deep
will probably hit that connecting rod behind it. The connecting rod was enhanced a bit with
some white-out for easier viewing. The
rod connects to the lower part of the latch to the top of the lock
cylinder.
With
the tape removed can see the hole I drilled.
Only really need a ½” hole, but shown for a better picture used a 1”
hole. If you drill more than ¼” deep
will probably hit that connecting rod behind it. The connecting rod was enhanced a bit with
some white-out for easier viewing. The
rod connects to the lower part of the latch to the top of the lock
cylinder.
 Plenty
of space to take a pair of needle nose pliers and slide that rod to the right
towards the lock. *SNIK* Trunk is
open. That rod is only about ½” behind
the dimple. When you are locked out at
an inopportune time may not have a lot of nice tools handy, so may require
using what you find in your pockets or just available. Once for some vacationers I used my Gerber
pocket tool to poke a hole in the metal, then hogged it out larger with the
pliers. At the Gap gathering in ’07,
another Miataphile used a small screwdriver as a chisel to cut a small slot
across the thin sheet metal dimple. That
worked as well. When finished, used a
little touch up paint to prevent rusting and covered the opening with some
tape. Could use a metal patch or
something different but the tape works well enough. None of this will show when the license plate
is installed.
Plenty
of space to take a pair of needle nose pliers and slide that rod to the right
towards the lock. *SNIK* Trunk is
open. That rod is only about ½” behind
the dimple. When you are locked out at
an inopportune time may not have a lot of nice tools handy, so may require
using what you find in your pockets or just available. Once for some vacationers I used my Gerber
pocket tool to poke a hole in the metal, then hogged it out larger with the
pliers. At the Gap gathering in ’07,
another Miataphile used a small screwdriver as a chisel to cut a small slot
across the thin sheet metal dimple. That
worked as well. When finished, used a
little touch up paint to prevent rusting and covered the opening with some
tape. Could use a metal patch or
something different but the tape works well enough. None of this will show when the license plate
is installed.
 With
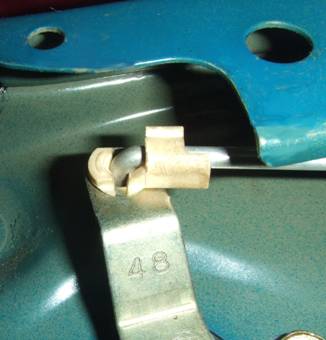
the trunk open, can loosen the top of the rear trunk liner and view the most
common cause of a malfunctioning trunk lock.
It is that little white plastic piece that snaps over the connecting rod
to the lever arm on the lock body. Is fairly
easy to knock loose by things bouncing around in the trunk or having the rod
bent or distorted from over packing. Can
also see there is little protection for it other than the thin rear trunk
liner. Since the rod is within ½” of the
dimple, anything pushed against the back will add a lot of resistance to the
force needed to turn the key. The rod on
the latch side is covered much better with a steel plate and in the past 12
years or so on posting this method have never heard of that problem on the latch
end.
With
the trunk open, can loosen the top of the rear trunk liner and view the most
common cause of a malfunctioning trunk lock.
It is that little white plastic piece that snaps over the connecting rod
to the lever arm on the lock body. Is fairly
easy to knock loose by things bouncing around in the trunk or having the rod
bent or distorted from over packing. Can
also see there is little protection for it other than the thin rear trunk
liner. Since the rod is within ½” of the
dimple, anything pushed against the back will add a lot of resistance to the
force needed to turn the key. The rod on
the latch side is covered much better with a steel plate and in the past 12
years or so on posting this method have never heard of that problem on the latch
end.
In all I have assisted with opening, most had that white clip partially removed so it was just loose enough where the trunk could not be unlatched. In one case it fell off completely but was still easy to spot and fish up a bit from the hole drilled.
Suggestion is to take a couple of minutes and go check that area before getting locked out at an inopportune time. It may be a bit loose and just waiting for the right little jarring to finish the job!
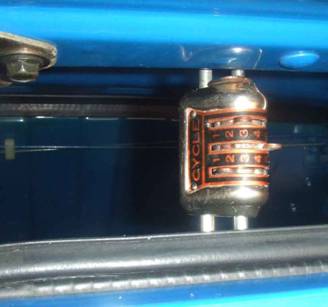 Adding
a small amount of trunk security. This
is just a $4 bicycle lock with levers to work the combination. Shortened the chain on the lower end, added
an eye bolt, drilled a small hole thru the bottom of the trunk, and sandwiched
the eyebolt with two 3” washers through the bottom of the trunk. The trunk lid opens about 4” … enough to get
my hand inside and feel the levers to work the combination as there is no need
to see them. No need to use it all the
time. When not in use the chain just
drops down along the back of the trunk and is not in the way.
Adding
a small amount of trunk security. This
is just a $4 bicycle lock with levers to work the combination. Shortened the chain on the lower end, added
an eye bolt, drilled a small hole thru the bottom of the trunk, and sandwiched
the eyebolt with two 3” washers through the bottom of the trunk. The trunk lid opens about 4” … enough to get
my hand inside and feel the levers to work the combination as there is no need
to see them. No need to use it all the
time. When not in use the chain just
drops down along the back of the trunk and is not in the way.
 The
eyelet for the top of the lock was ground down from an old strap hinge. Used an existing hole in the trunk lid, just
needed a rat tail file to make it square for the shown carriage bolt. Added an old hunk of ¼” X ¾” steel bar under
the lip, with holes for the carriage bolt, and the right trunk latch bolt.
The
eyelet for the top of the lock was ground down from an old strap hinge. Used an existing hole in the trunk lid, just
needed a rat tail file to make it square for the shown carriage bolt. Added an old hunk of ¼” X ¾” steel bar under
the lip, with holes for the carriage bolt, and the right trunk latch bolt.
The eyelet must be offset back a little or will be unable to close the trunk. With this piece in place, can attach the lock and let the chain fall down to determine the proper length and best location to drill hole in trunk floor.
Nothing about this really provides much security other than slowing down a forced entry attempt. Is still about $4 out of your pocket and maybe 20 minutes of your time. Your call if you choose to do it.
Opening a Locked Miata
Is fairly stale news by now about sliding your hand under the soft top and rear plastic window to unzip. If you use the little Velcro strap inside it can make the window a little more difficult to unzip without stretching the material. If you have the OEM whip antenna, then your Miata is equipped with its own 32” break-in tool. Unscrew it from the base.
It is flexible enough to bend easily without damage. Poke the Velcro strap loose and get the zipper started far enough to reach it easily. When rear window is unzipped, use the antenna to reach inside and push the door lock forward. No need to climb in over the trunk and try to get past any roll or style bar.
Removing Broken Keys
 Sometimes
you just break a key and a piece is stuck inside the keyway. May wish to try this simple remedy first.
Sometimes
you just break a key and a piece is stuck inside the keyway. May wish to try this simple remedy first.
This applies to most wafer, disk, and pin tumbler locks in your vehicles or around the house. Posted this a few times for others also experiencing vandalism with slivers of wood or other debris jammed in the keyway.
Broken keys are a bit more difficult since the only way a broken piece can be removed is by first aligning the keyway
into the position where the key can normally be extracted. Without doing this, any broken piece cannot be removed.
It will jamb against the wafers, or in other types of locks against the disks, sidebars, or pins
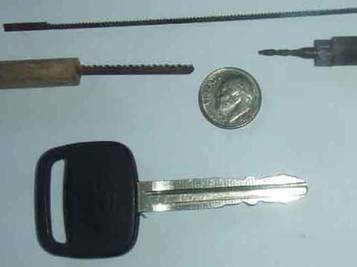
What we want to do is slide a small saw blade between the broken key tip and keyway. The teeth must be facing
out from the lock, Push the blade in past the obstruction, twist the teeth into the object, and pull it out.
Found the best size blade to use is a 1/8” coping saw blade shown mounted in the wooden handle. To the right is
a wire drill bit. Can twist that in along the side of the stuck object and allow the bit edges to work it back and out.
Wire drill bits may be difficult to find, but provide another working option.
At the top is a fine tooth scroll saw blade. Many times if a key breaks inside it will deform at the break and leave a bent edge that makes it difficult to extract. Try using the small scroll saw blade as a file to remove the deformed edge. Keys are made from brass and fairly easy to cut and file.
Opening Gas Lid
 Not
too often, but a few posters have been unable to open the gas lid using the
cockpit lever. Don’t know at the time
where
Not
too often, but a few posters have been unable to open the gas lid using the
cockpit lever. Don’t know at the time
where
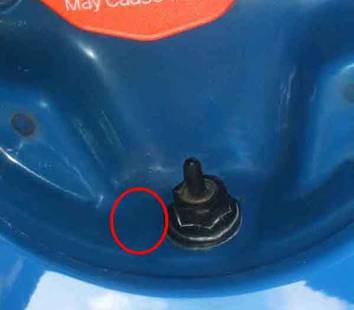
the problem is but will still need to open the lid to make repairs. The release cable is routed underneath and then forward
to the spring loaded black catch. If you open the trunk and follow the release cable to just behind the metal under the red
circle, will find a trigger shaped lever. Pull that lever and it will release the catch.
Appears Mazda anticipated this malfunction and provided an additional method to open.
Armrest Console and Glove Compartment. Both compartments use 4 or 5 staggered wafers. Practical opening is by manipulation if not wishing any additional repairs. Since10 year olds can rip both open using only their fingers, seems little point in posting more. I have open locked glove compartments without manipulation or damage, but it requires some novelty tools and has not always worked. Also want to destroy the myth that removing the two bottom screws under the glove compartment will open a locked or unlocked compartment. Those two screws will only permit removal of the compartment afterit is opened.
The locks on both compartments just basically help keep the sometimes honest people a little more honest.