Did enough fuel filter changes to decide there is an easier way to do it than following manual instructions. I can change one in about 10 minutes, without the use of golf Ts or line clamps. When finished, the dirty fuel is still trapped inside the filter for easy disposal, the only fuel spilled will be a few drops on fingers, and will then test the new filter connections for leaks at least twice the pressure found during any actual road use. The manual also calls for things like disconnecting the battery, using line clamps, and wearing protective goggles and gloves. If you feel more comfortable doing it that way … please do so! I do also fully agree to work in a ventilated area.
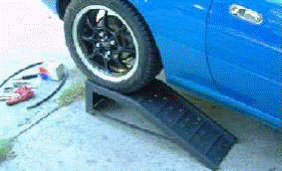 The hardest part of the job is getting these
old bones up and down from the ground. The taller ramps provide enough space to work easily by crawling under
the passenger rear bumper. Not shown,
but the front wheels are chocked in both directions. Big difference in being lazy than in being
stupid! Have all tools handy for easy
reach.
The hardest part of the job is getting these
old bones up and down from the ground. The taller ramps provide enough space to work easily by crawling under
the passenger rear bumper. Not shown,
but the front wheels are chocked in both directions. Big difference in being lazy than in being
stupid! Have all tools handy for easy
reach.
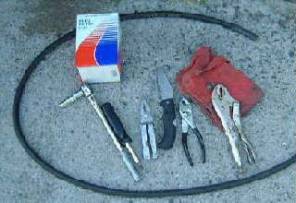 Hunk
of 5/16” fuel line in event may need to replace a section, rag, socket for the
filter bracket, assorted pliers and 4 in 1 screwdriver, since unsure of what
clamps will be on the hoses. The knife
can be used to cut hoses as needed and also serves as a lever to pry up any
damaged plastic screws securing the cover. May not need all stuff, but plan to make a minimum amount of trips
underneath.
Hunk
of 5/16” fuel line in event may need to replace a section, rag, socket for the
filter bracket, assorted pliers and 4 in 1 screwdriver, since unsure of what
clamps will be on the hoses. The knife
can be used to cut hoses as needed and also serves as a lever to pry up any
damaged plastic screws securing the cover. May not need all stuff, but plan to make a minimum amount of trips
underneath.
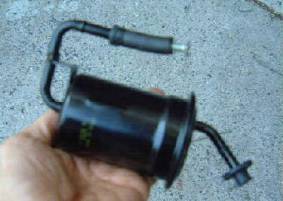 The
replacement filter came with one cap missing. Not an issue unless wishing to follow remaining instructions. I made a
cap with a short hunk of line and fat screw. During the install will be switching one line at a time and replacing
each cap to the old filter. The is no
need to drain the lines, contaminated fuel is trapped inside the old filter,
and with a small amount of dexterity will only lose a few drops of fuel. This will not work unless the fuel system is
properly depressurized.
The
replacement filter came with one cap missing. Not an issue unless wishing to follow remaining instructions. I made a
cap with a short hunk of line and fat screw. During the install will be switching one line at a time and replacing
each cap to the old filter. The is no
need to drain the lines, contaminated fuel is trapped inside the old filter,
and with a small amount of dexterity will only lose a few drops of fuel. This will not work unless the fuel system is
properly depressurized.
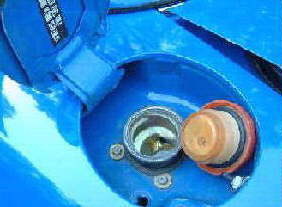 Removing
the fuel cap does not depressurize fuel to the filter or the fuel
rail. It merely relieves pressure in the
fuel tank and return fuel line from the stock FPR. This step is rather minor as we are working
on the other side of the FPR. Remove it
anyway, but remember we will still have nearly 30 PSI remaining at the fuel
filter after engine is turned off. With
an electronic fuel pressure gauge installed, found the pressure will slowly
dissipate over time but can still show some pressure after 8 hours.
Removing
the fuel cap does not depressurize fuel to the filter or the fuel
rail. It merely relieves pressure in the
fuel tank and return fuel line from the stock FPR. This step is rather minor as we are working
on the other side of the FPR. Remove it
anyway, but remember we will still have nearly 30 PSI remaining at the fuel
filter after engine is turned off. With
an electronic fuel pressure gauge installed, found the pressure will slowly
dissipate over time but can still show some pressure after 8 hours.
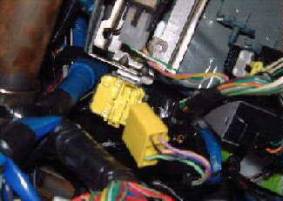 With
engine at idle, disconnect the clunky yellow plug under the dash near the
steering column. This is the Circuit
Opening Relay (1.6), or the Fuel Pump Relay (1.8). Slightly different function, but the end
result is the same. It shuts off power
to the fuel pump, so in a few moments the engine will stall. When that happens, replace the plug and
switch ignition key to OFF. Fuel to the
filter is now nearly depressurized. Lines are still filled with fuel and can dribble out by gravity. Still not 100 % depressurized, since will
still retain a tiny amount of pressure. If you wrap a rag around the filter line when
twisting the first fuel line loose, the tiny spurt of fuel will be absorbed by
the rag.
With
engine at idle, disconnect the clunky yellow plug under the dash near the
steering column. This is the Circuit
Opening Relay (1.6), or the Fuel Pump Relay (1.8). Slightly different function, but the end
result is the same. It shuts off power
to the fuel pump, so in a few moments the engine will stall. When that happens, replace the plug and
switch ignition key to OFF. Fuel to the
filter is now nearly depressurized. Lines are still filled with fuel and can dribble out by gravity. Still not 100 % depressurized, since will
still retain a tiny amount of pressure. If you wrap a rag around the filter line when
twisting the first fuel line loose, the tiny spurt of fuel will be absorbed by
the rag.
 Crawling
under the passenger side rear bumper, locate the fuel filter cover. The cover is held in place by 4 or 5 plastic
type screw clamps. Frequently they
become stripped, so use the knife edge to pry them out slightly, and use cross
tip screwdriver to remove. If you find a
few broken ones, should be able to go to your local auto parts store for
suitable replacements. Once cover is
removed, your lines will probably look a bit different from mine, since routed
my fuel lines to other side of PPF for a Pierberg secondary fuel pump.
Crawling
under the passenger side rear bumper, locate the fuel filter cover. The cover is held in place by 4 or 5 plastic
type screw clamps. Frequently they
become stripped, so use the knife edge to pry them out slightly, and use cross
tip screwdriver to remove. If you find a
few broken ones, should be able to go to your local auto parts store for
suitable replacements. Once cover is
removed, your lines will probably look a bit different from mine, since routed
my fuel lines to other side of PPF for a Pierberg secondary fuel pump.
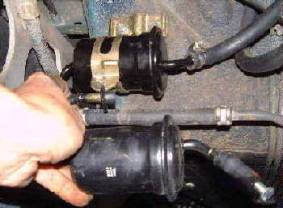
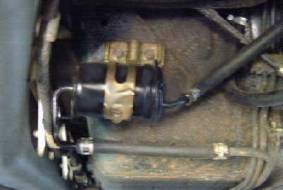 Here
is what we see with the cover off. Loosen
both hose clamps and slide up the lines a few inches to get them out of the
way. The fuel lines will probably be
stuck on there fairly tight. Use the rag
to pad the pliers jaws and break them loose. This is where the last tiny bit of pressure is released. If you have not depressurized the fuel system
as indicated above, will receive a liberal dousing of pressurized fuel. Do not completely remove the lines, just
loosen them up enough so they can easily be removed by hand. Does not matter if the metal filter lines are
smashed a little as will be throwing the old filter away. Just don’t damage the hoses.
Here
is what we see with the cover off. Loosen
both hose clamps and slide up the lines a few inches to get them out of the
way. The fuel lines will probably be
stuck on there fairly tight. Use the rag
to pad the pliers jaws and break them loose. This is where the last tiny bit of pressure is released. If you have not depressurized the fuel system
as indicated above, will receive a liberal dousing of pressurized fuel. Do not completely remove the lines, just
loosen them up enough so they can easily be removed by hand. Does not matter if the metal filter lines are
smashed a little as will be throwing the old filter away. Just don’t damage the hoses.
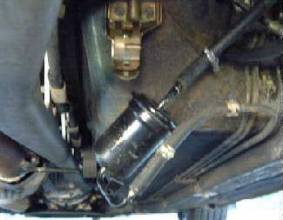 Here
the hose clamps are slid up the hoses, the fuel lines are broken loose but not
removed, and old filter is removed from bracket and dangling loose on the fuel
lines. Next step is to put new filter
inside bracket, but leave it loose so you can slide it around a bit as needed.
Here
the hose clamps are slid up the hoses, the fuel lines are broken loose but not
removed, and old filter is removed from bracket and dangling loose on the fuel
lines. Next step is to put new filter
inside bracket, but leave it loose so you can slide it around a bit as needed.
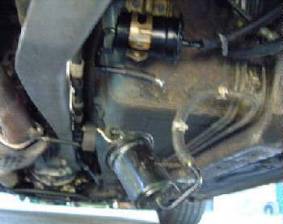 Here
the new filter is loosely held in place. Have already swapped out one of the lines. Dexterity here is needed to cap the filter
and the fuel line with fingers until getting one line on the new filter, and
putting the cap on the old filter. If
not trusting your dexterity can use some line clamps or golf T’s as desired. There is no pressure on the lines and only
clamping off flow from gravity.
Here
the new filter is loosely held in place. Have already swapped out one of the lines. Dexterity here is needed to cap the filter
and the fuel line with fingers until getting one line on the new filter, and
putting the cap on the old filter. If
not trusting your dexterity can use some line clamps or golf T’s as desired. There is no pressure on the lines and only
clamping off flow from gravity.
 Have
both lines swapped over and everything is secured in place. Dirty fuel is trapped in the old filter for
no spills and simplifies proper disposal. Prior to replacing cover, suggest testing it for leaks.
Have
both lines swapped over and everything is secured in place. Dirty fuel is trapped in the old filter for
no spills and simplifies proper disposal. Prior to replacing cover, suggest testing it for leaks.
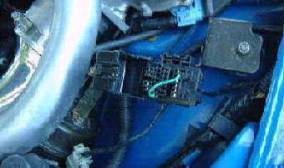 Unaware
of anyone else suggesting doing this, but it makes sense to me! Providing an optional additional test for
leaks. Strap the F/P and GND in the diagnostic test box under hood. This allows the fuel pump to run when
ignition switch is in the ON position when engine is not running.
Unaware
of anyone else suggesting doing this, but it makes sense to me! Providing an optional additional test for
leaks. Strap the F/P and GND in the diagnostic test box under hood. This allows the fuel pump to run when
ignition switch is in the ON position when engine is not running.
A very minor benefit here is priming the fuel lines to remove any air to save a bit of wear and tear on the starter. Minor yes, but still a freebie!
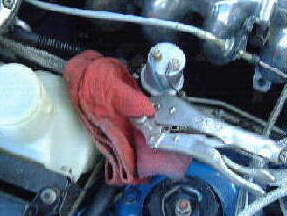 With
the fuel pump running, put a padded clamp on the fuel return line. Pinching the line shut will drive the fuel
pressure to the filter to around 78 – 85 PSI. This is about double it would see in any actual driving test. If you tried this with the engine running, it
will probably stall the engine.
With
the fuel pump running, put a padded clamp on the fuel return line. Pinching the line shut will drive the fuel
pressure to the filter to around 78 – 85 PSI. This is about double it would see in any actual driving test. If you tried this with the engine running, it
will probably stall the engine.
No leaks? Replace the cover, pull the strap and clamp, and go for a drive!.
Should not take more than 10 minutes to do this job… Well, the second time you do it!