Page 58 of 74 FirstFirst ... 84851525354555657585960616263646568 ... LastLast
Results 856 to 870 of 1108

Thread: This ain't no build thread!

  1. #856
    Nukuler banned! chiefmg's Avatar
    Location
    N KY
    Join Date
    Jan 2012
    Posts
    1,423
    Thanks Given
    184
    Thanked 1,226 Times in 527 Posts
    Went to take a drive yesterday but the battery was pretty flat. Looks like I need to do some testing for a parasitic drain.


    These showed up today:


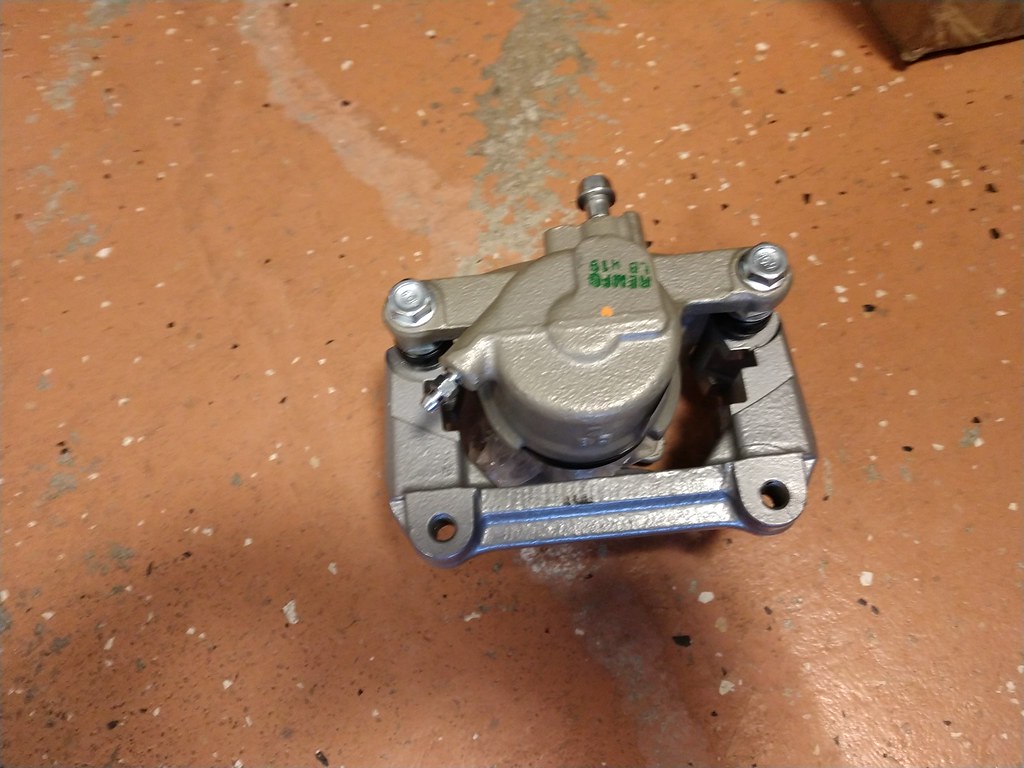
    Sport brake calipers. After talking to a few folks I figured this was my best and cheapest route to larger brakes without having to sacrifice my wheels. None of the breaker vendors I spoke to had any on hand so I just went with the easy button and ordered overhauled calipers from Rock Auto. Spent a bit extra and got the coated ones. Still need to order a master cylinder and decide on the rotors and pads I want to run.

  2. The Following 2 Users Say Thank You to chiefmg For This Useful Post:

    MiataQuest (01-18-2020),tsingson (01-17-2020)

  3. #857
    Nukuler banned! chiefmg's Avatar
    Location
    N KY
    Join Date
    Jan 2012
    Posts
    1,423
    Thanks Given
    184
    Thanked 1,226 Times in 527 Posts
    Last time I autocrossed I used the larger front sway I have. When I swapped back to the MSM bar I found the larger one had been moving side to side, resulting in damage to the bushings. The larger bar does not have any stops to prevent this from happening. Solution was to source a couple of split collars to use as stops:


    I bought the first one from Amazon for $7.29. It was the last one so waited a day or two to see if the stock came back up, but it was going to be 2-3 months before they were back in stock. After some searching found the same one on a different site, this time it was $28. Overall cost was $35 which isn't bad for a set of precision stainless collars. I'll post pictures of them installed once I get the bushings I have ordered.

    More deliveries set for tomorrow, then the fun begins.
    '00 SE, intercooled BRP MP62, Reverant MS2, Ohlins DFV, Konig Flatout (now X 2)
    __________________________________________________ ____________
    This ain't no build thread!

  4. The Following 3 Users Say Thank You to chiefmg For This Useful Post:

    kung fu jesus (01-23-2020),MiataQuest (01-24-2020),tsingson (01-23-2020)

  5. #858
    Ninja Messiah kung fu jesus's Avatar
    Drives
    1999 White
    Location
    Atlanta, GA
    Join Date
    Dec 2011
    Posts
    15,852
    Thanks Given
    2,791
    Thanked 7,202 Times in 3,433 Posts
    Granger sells shaft collars in 23mm.

  6. The Following User Says Thank You to kung fu jesus For This Useful Post:

    chiefmg (01-23-2020)

  7. #859
    Nukuler banned! chiefmg's Avatar
    Location
    N KY
    Join Date
    Jan 2012
    Posts
    1,423
    Thanks Given
    184
    Thanked 1,226 Times in 527 Posts
    The sway bar I have is 27mm. There were several different sites that had split collars listed, but the stainless variety were hard to pin down. I spent the extra money so I didn't have to worry about corrosion underneath the car.

  8. The Following 2 Users Say Thank You to chiefmg For This Useful Post:

    Martin (01-24-2020),tsingson (01-23-2020)

  9. #860
    Nukuler banned! chiefmg's Avatar
    Location
    N KY
    Join Date
    Jan 2012
    Posts
    1,423
    Thanks Given
    184
    Thanked 1,226 Times in 527 Posts
    Finally got around to checking for a parasitic electrical drain. To do this, you connect a multimeter between a battery terminal and the cable out (I did it using the negative terminal to keep from worrying about any shorting issues) and then put the meter on the max amp scale (in my case this was 10 amps). You need to make sure nothing is turned on when you do this as you want to measure anything that shouldn't be there. For additional info see the following video: https://www.youtube.com/watch?v=zdIKNnwEjIs It is very thorough and should be easy for anyone to follow (even without any electrical background).

    My result? A whopping 0 amp flow. Whatever I may have going on, there is nothing that is pulling down the battery in that manner. Might be looking at getting a replacement alternator after all.

    So today I received a couple of packages:


    Unfortunately I think the brake master cylinder I received is for an ABS equipped car so it isn't going to work for me. I ordered a new/rebuilt one from Rock Auto to correct that problem. Just for shits and grins I mounted up one of the front calipers and rotors to check wheel clearance. I am happy that it all looks good. No pictures until I get everything installed (patience is a virtue). Looks great though, the bigger Sport rotor really fills things up.

  10. The Following 2 Users Say Thank You to chiefmg For This Useful Post:

    HarryB (01-25-2020),tsingson (01-24-2020)

  11. #861
    Nukuler banned! chiefmg's Avatar
    Location
    N KY
    Join Date
    Jan 2012
    Posts
    1,423
    Thanks Given
    184
    Thanked 1,226 Times in 527 Posts
    After more research, it appears I received the master/booster from a MSM which has ABS (despite my telling the recycler that I didn't want ABS). I then managed to order the wrong master from Rock Auto so that one went back and I'm now waiting on the replacement.

    Received the new front sway bushings the other day. Slight size difference between the new and original as seen here:


    Shouldn't be an issue though.

    It was a bit warmer today so went to the garage to start my brake swap. Front went on without too much trouble in about 1/2 hour. The rear though was a bigger PITA. I tried bending the splash guard but had no luck so had to cut it down some. Didn't get a picture of that, will do so when I install the other side. The rubber seal for the caliper hinge pin in the back didn't want to go on with the caliper in place, so I removed it and put the seal on the caliper (it was easier to put it in the bracket side in place).


    I had cleaned/lubed the hubs the last time I did the brakes, there was some corrosion present in spite of that:


    A little work with a wire brush and then lubed them again:


    Driver's side is done except for bleeding, will finish up tomorrow. For comparison here is the difference between the 1.8 brakes and the Sport brakes.

    Front:


    Rear:


    One thing to note with the coated calipers, it's a good idea to run any fasteners through the holes before trying to install on the car. There was a little bit of overspray, just enough to make it difficult to get the bolts started otherwise.

  12. The Following 3 Users Say Thank You to chiefmg For This Useful Post:

    Greasemonkey2000 (01-31-2020),HarryB (01-30-2020),tsingson (01-29-2020)

  13. #862
    Nukuler banned! chiefmg's Avatar
    Location
    N KY
    Join Date
    Jan 2012
    Posts
    1,423
    Thanks Given
    184
    Thanked 1,226 Times in 527 Posts
    Finished the brake caliper/rotor install today. The cutting of the passenger side rear shield went much better, largely due to cutting in the direction that my aviation snips were made to cut.


    After the cutting:


    I'm not showing what the driver's side looks like. It's pretty easy to just push back the shields on the front wheels to get the clearance needed. Whenever I replace the wheel bearings I'll get the correct shields and install those.


    My oldest came over to help me get things bled. Hoping to get out tomorrow and bed in the new pads.

  14. The Following 6 Users Say Thank You to chiefmg For This Useful Post:

    Agent☣Orange (02-29-2020),Bryan (01-31-2020),Demon I Am (01-31-2020),Greasemonkey2000 (01-31-2020),MiataQuest (01-31-2020),tsingson (01-30-2020)

  15. #863
    Nukuler banned! chiefmg's Avatar
    Location
    N KY
    Join Date
    Jan 2012
    Posts
    1,423
    Thanks Given
    184
    Thanked 1,226 Times in 527 Posts
    Went out this morning to bed in the new pads. That turned out to be interesting as the pedal was very soft. Had to pump it a couple of times to get it to stiffen up, then the next time I went to brake it was the same. Apparently bleeding was not complete, first time I have had that problem. I was able to get them bedded in.

    Back to the house and I put her up on the QuickJack to swap the master cylinders. Had to pull the cowl plate, shock tower brace, cruise control actuator and 'charger inlet piping off to make things easier. The old master cylinder came out without too much trouble, then it was in to the cabin to remove the booster nuts. I had to remove the ECU in order to access those, that made it pretty simple with using a couple of extensions and a universal. First thing to remove is the connection pin between the brake pedal and booster yoke:


    There are four nuts, the lower left one is shown in this picture:


    Once the booster is out you will see a sort of gasket on there:


    I think this is probably like the isolators on the shock top hats to minimize noise. I pulled it off and transferred it to the replacement.

    There is a lot of info around on the difference between master cylinders and boosters so I won't rehash all of that here. In the interest of making life easy for folks, here are the two boosters to see the differences (Sport booster on the right):


    The masters have differences in length where they fit into the booster so you can't really mix and match those. Also the Sport master has an O-ring to seal where it fits into the booster.

    One thing that I did was to use the proportioning valve mounting bracket off my 2000. The Sport valve is mounted vertically below the master cylinder, which would have impacted how I run the intake tube. Here is how the stock 2000 unit is mounted:


    This meant that it was a little more fiddly getting all my brake lines hooked up, I had to mix and match some of the old lines from my original master but it is done. One word of caution if you do this, be sure not to cross-thread the flare nuts when attaching the brake lines. It may take a bit but better to make sure things are lined up instead of using brute force.

    Bleeding will be done tomorrow when I have my helper.

  16. The Following 4 Users Say Thank You to chiefmg For This Useful Post:

    Agent☣Orange (02-29-2020),Greasemonkey2000 (02-17-2020),kung fu jesus (02-18-2020),tsingson (02-17-2020)

  17. #864
    3,000 rpm - starting to feel the power atlex's Avatar
    Drives
    blue, white and two-tone
    Location
    Empordΰ, Catalunya, Spain
    Join Date
    May 2016
    Posts
    988
    Thanks Given
    502
    Thanked 440 Times in 245 Posts
    Got to say I liked the polished CE28N

  18. The Following User Says Thank You to atlex For This Useful Post:

    chiefmg (02-18-2020)

  19. #865
    Nukuler banned! chiefmg's Avatar
    Location
    N KY
    Join Date
    Jan 2012
    Posts
    1,423
    Thanks Given
    184
    Thanked 1,226 Times in 527 Posts
    Thanks, but I'm not baller enough to rock those (and my financial advisor would beat me senseless if I spent that much money for wheels). These are Konig Flatouts, which I believe were made from the molds for the CN28Ns after Ray's sold them.

  20. The Following 2 Users Say Thank You to chiefmg For This Useful Post:

    Bryan (02-18-2020),tsingson (02-18-2020)

  21. #866
    Nukuler banned! chiefmg's Avatar
    Location
    N KY
    Join Date
    Jan 2012
    Posts
    1,423
    Thanks Given
    184
    Thanked 1,226 Times in 527 Posts
    Spent a big part of the day in the garage, mostly on my back underneath. While I was off doing training I ordered a set of urethane bushings for the steering rack. First order of business was to install those. Well, to try and install them. The passenger side goes on without trouble, but the two on the driver's side are a different story. You have to remove the rack completely in order to replace those (without beating your head against the wall), and I didn't want to go down that rabbit hole at this point. So the passenger side was done and that is it.

    Then I tried installing the bigger (1 1/16") front sway with the new bushings and split collars I bought. That didn't work out either. The bushings and their brackets weren't a great fit, and the collars wouldn't clear the relocated radiator brackets (moved back due to my intercooler). So for now the MSM front sway I have been using went back on.

    Next I removed the center section of the butterfly brace to see what, if any, change that makes in perceived chassis stiffness. Finally I moved my way along the exhaust to see if I could figure out why it was resonating inside the cabin with the top up. Turned out the 949 rear subframe brace (that I had previously clearanced) was being contacted by the exhaust. Guess the Roadster Sport midpipe is just a little too big back there for it to work. I removed the brace and will see if that was the problem or not.

    Final job was bleeding the brakes, once my helper came over. Went round and round a few times, got a lot of air out of the system except for the driver's rear. It didn't seem like anything was coming out to the point where I was concerned that the caliper was faulty. I put my Mityvac on it and sucked for a few minutes until some fluid appeared. That did the trick because afterwards bleeding went normally. At this point I think the problem I had while bedding the pads was a bunch of air in the line to the driver's rear caliper. After everything was back together I moved her over so the wife's car could spend the night in the garage. Brake pedal stayed rock hard so I'm calling that good. I will do the bedding procedure again next time I take her out as I cannot now be certain they were good the first time.

  22. The Following 3 Users Say Thank You to chiefmg For This Useful Post:

    Agent☣Orange (03-06-2020),kung fu jesus (02-18-2020),tsingson (02-19-2020)

  23. #867
    6,000 rpm - mere mortals would shift HarryB's Avatar
    Drives
    '04 Strato Blue NB2
    Location
    Greece
    Join Date
    Jun 2015
    Posts
    5,935
    Thanks Given
    6,672
    Thanked 2,273 Times in 1,330 Posts
    Mike, does your car have ABS? If yes, I would try and engage that a few times. You can do that on a remote empty road, or follow the "official procedure" (bridging some pins in the diagnostics box, do not remember which ones but I can dig this out for you). Would prefer the latter TBH

  24. The Following 2 Users Say Thank You to HarryB For This Useful Post:

    chiefmg (02-19-2020),kung fu jesus (02-19-2020)

  25. #868
    Nukuler banned! chiefmg's Avatar
    Location
    N KY
    Join Date
    Jan 2012
    Posts
    1,423
    Thanks Given
    184
    Thanked 1,226 Times in 527 Posts
    Thanks for looking out Harry. No ABS. I do my braking the way God and Malcolm Loughead intended.

  26. The Following 4 Users Say Thank You to chiefmg For This Useful Post:

    Bryan (02-27-2020),HarryB (02-19-2020),Martin (02-19-2020),tsingson (02-19-2020)

  27. #869
    Nukuler banned! chiefmg's Avatar
    Location
    N KY
    Join Date
    Jan 2012
    Posts
    1,423
    Thanks Given
    184
    Thanked 1,226 Times in 527 Posts
    Had her out and bedded the pads again but it didn't really change how they bite. The battery was basically dead as I mentioned before, charged it several times and would be dead within two days. Searched everywhere but couldn't find the receipt for the damn thing. Thanks to my work log I knew when I had bought it (and from where), so I took it up today to see what could be done. I bought it at O'Reilly's, they scanned the bar code on the battery and cross-referenced it with my phone number. I walked out with a brand new battery, since the last one was less than a year old.


    Today I bought something from eBay, I will wait to reveal just what until I have hands-on and can post a picture.

  28. The Following 2 Users Say Thank You to chiefmg For This Useful Post:

    Slampen (02-29-2020),tsingson (02-27-2020)

  29. #870
    Nukuler banned! chiefmg's Avatar
    Location
    N KY
    Join Date
    Jan 2012
    Posts
    1,423
    Thanks Given
    184
    Thanked 1,226 Times in 527 Posts
    Finally had weather nice enough to go to C&C (although it was a little too cold to have the top down. I'm an enthusiast, not a masochist). First time running her on the highway after my last round of work. It is quieter inside the cabin, although I feel there is still a little too much reverberation going on. A friend at C&C asked me why the muffler was offset, when I looked I saw it had moved to the left. That is down to the angle of the hanger I installed that was missing off the RB muffler for my year. I'll have to go to a muffler shop to see about having a proper hanger welded on that lines things up.

    Cruise didn't work, I figured I had left something undone and sure enough when I checked, I had neglected to put the vacuum hose on the actuator. That fixed that problem. This evening I installed the new brake caliper bleed screw caps I got off Amazon, the new ones have the little tail to keep them on the screw when you are bleeding so you don't misplace them. I also readjusted the rear brakes.

    Tomorrow's weather is supposed to be great, but I have already committed to doing the brakes on one of our kids' cars. Hoping that won't take too long so I can get some top-down time.
    '00 SE, intercooled BRP MP62, Reverant MS2, Ohlins DFV, Konig Flatout (now X 2)
    __________________________________________________ ____________
    This ain't no build thread!

  30. The Following 3 Users Say Thank You to chiefmg For This Useful Post:

    Agent☣Orange (02-29-2020),HarryB (03-01-2020),tsingson (02-29-2020)

Page 58 of 74 FirstFirst ... 84851525354555657585960616263646568 ... LastLast

Posting Permissions

  • You may not post new threads
  • You may not post replies
  • You may not post attachments
  • You may not edit your posts
  •