Let's address coolant reroute questions in a different thread or if you prefer pm me. Thanks!


Let's address coolant reroute questions in a different thread or if you prefer pm me. Thanks!

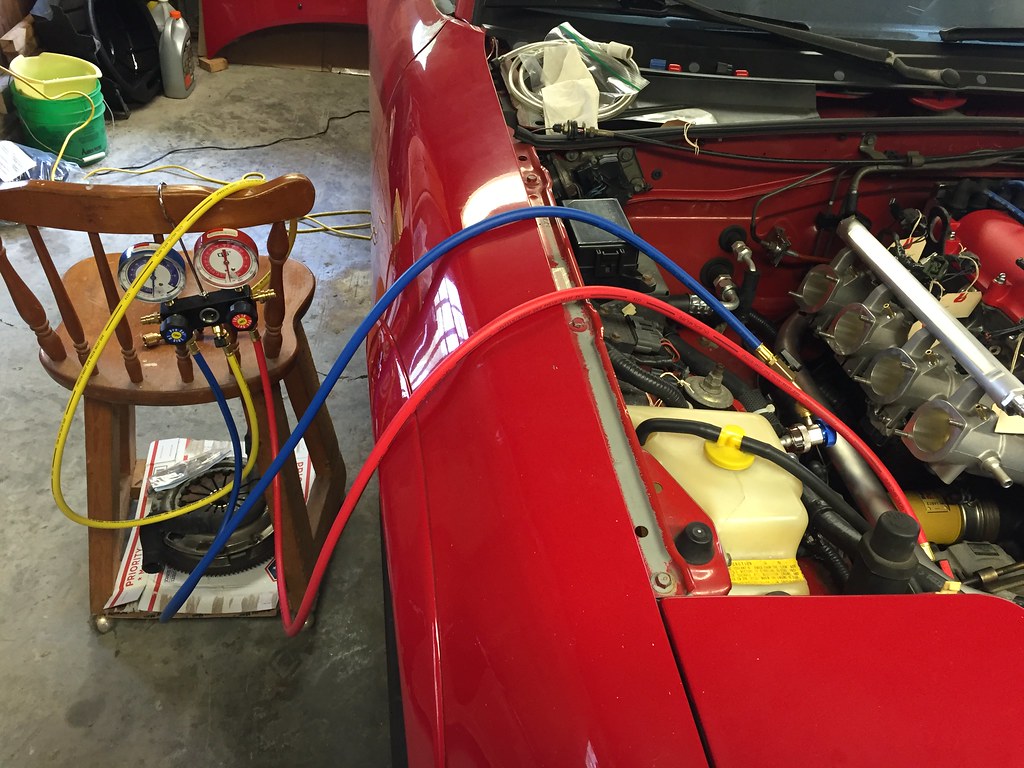
Finally got a chance to work on the car a bit this past weekend. The custom AC hose worked out okay. Initially I was very pleased with the hose routing but when we attempted to fit the ITG filter we still had an interference due to the service port so we ended up with a final routing that is not as nice but gets the job done. We made use of existing body holes for securing rubber coated p-clamps and we made one custom bracket. We installed new o-rings and pulled a vacuum on the system that held at 29.9" for 24 hours. AC should now be good to go once refilled with R134a.
Also got the new coolant return pipe fitted. Here we are mocking it up.
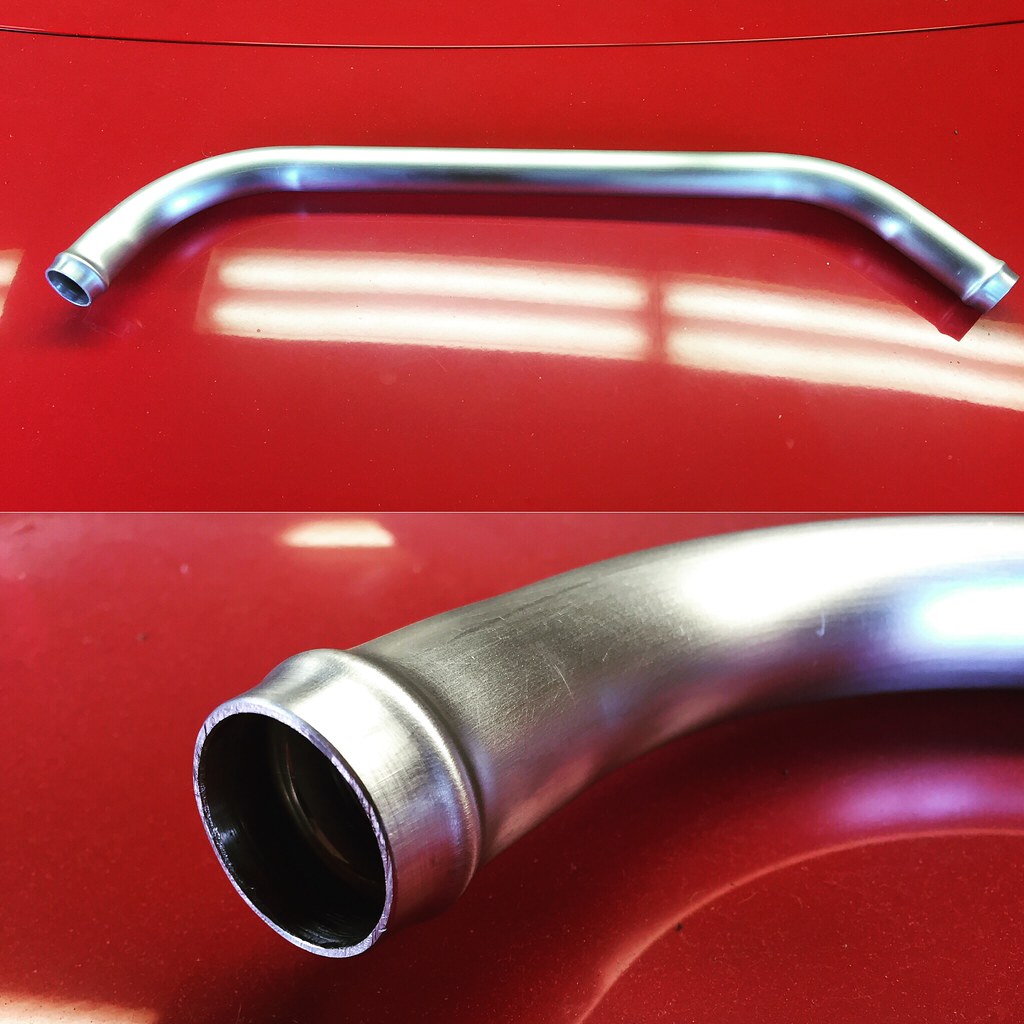
I greased up the Earl's EZ-Beader to make the rolled bead in each end to keep the hose clamps secure. Even though aluminum is soft I think it is prudent to use a lubricant to lessen wear and tear on your tools and get a smoother finish. I then cleaned out the grease with rags and flushed with brake cleaner. Then I used a new Scotch-Brite pad to give it an even brushed finish. You don't want to use old/dirty Scotch-Brite pads on aluminum as you can transfer contaminants that can cause corrosion.
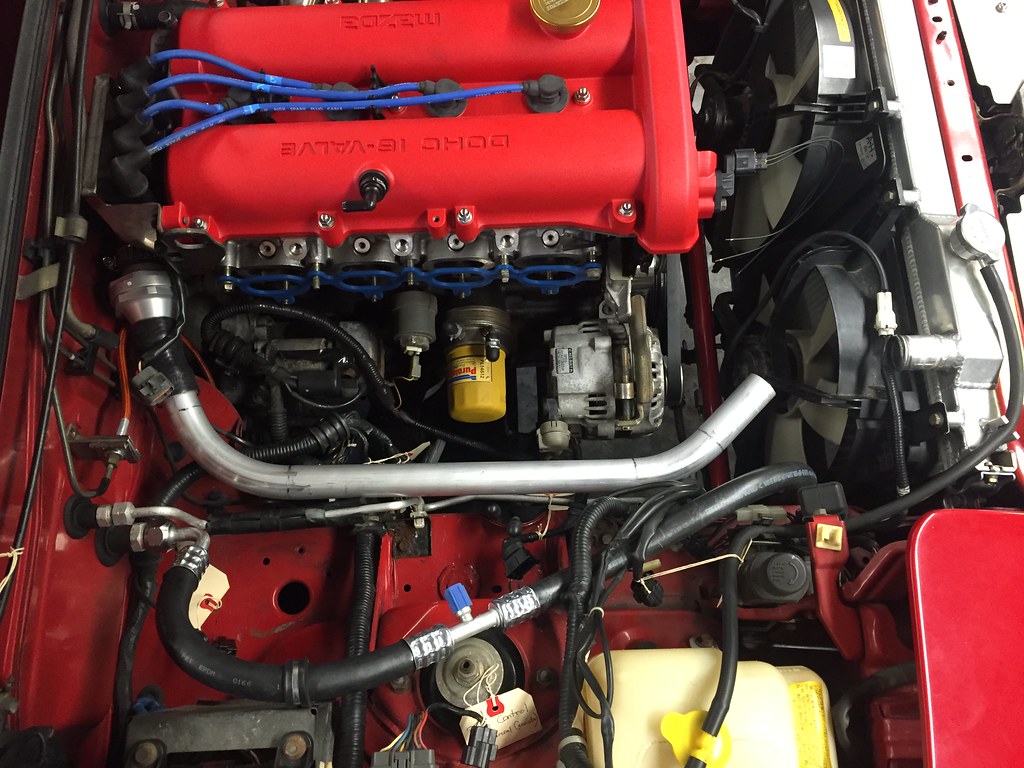
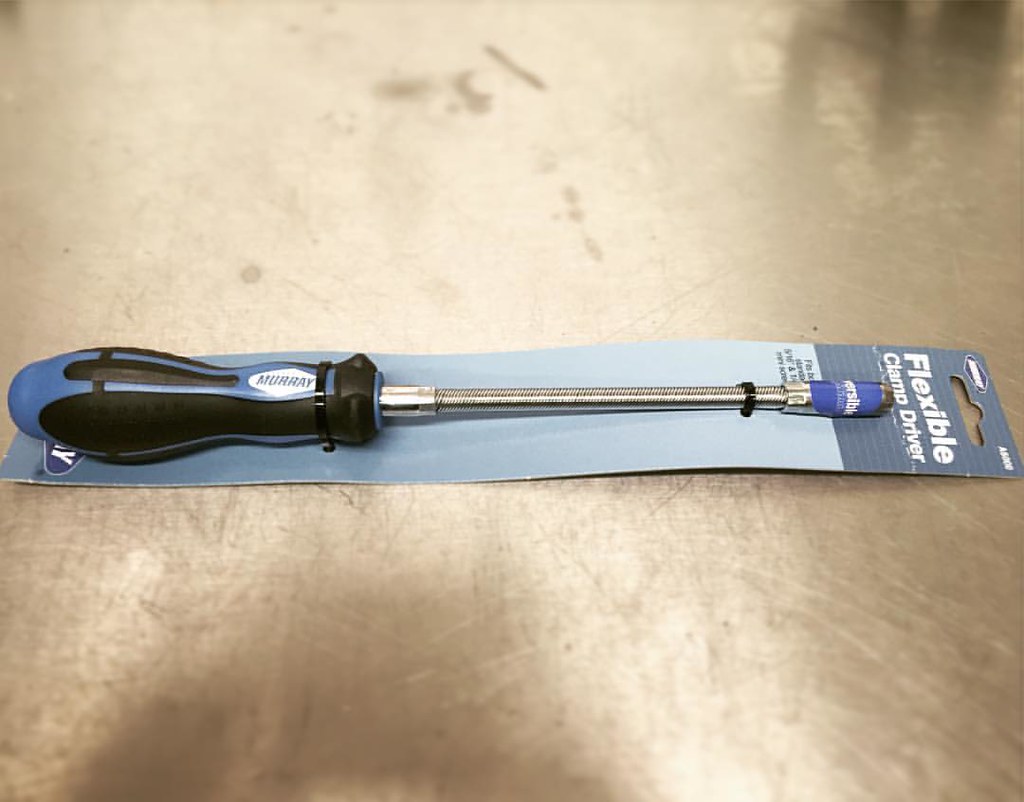
Here's the engine bay with AC and coolant return pipe fitted. We shortened the two hoses between the rear water outlet/ inline thermostat housing and between inline thermostat housing/ coolant return hard pipe. Initially I used a cut up OEM rubber NB lower radiator hose for the connection between the coolant return hard pipe and upper radiator neck but it fit way too loose. I did some quick ruick research online and it seems that many preformed rubber hoses fit tighter at the ends than they do in the middle so they aren't the greatest for hacking up for custom applications like this. I ended up using a section of the long silicone hose provided with the M-tuned reroute kit. Even then I really had to crank down in the hose clamp to tighten it. Fingers crossed there are no coolant leaks. That being said, my new flexible hose clamp driver is a life saver for getting to those hose clamps at the rear water outlet and a bargain at only $10. Time will tell if we will need additional support for the coolant return hard pipe once it's filled with water. But right now it doesn't rub against anything and goes exactly where we need it to go.
Next up: 1) make bracket to offset lower NA6 coolant hard pipe for radiator hose clearance around the sway bar and exhaust manifold to the mixing manifold. 2) cut new ITG air filter backing plate to place air filter in final location. 3) make custom fuel hoses. 4) wire up all sensors and finish Megasquirt and WB02 installation.
Greasemonkey2000 (05-23-2016),HarryB (05-16-2016),Phatmiata (05-16-2016)


Quality work, eager to see more!


make ma a reroute kit please! that looks great!!
Too many variables. It's best to custom fit the pipe to the car that needs it. But it's not too hard to copy what I've done. Just get 3-4 feet of 6061 T6 1.25x.065 aluminum tube, bend it as needed, cut the ends, debur edges, roll tube beads, clean up and install. Et voila!Originally Posted by Phatmiata

HarryB (05-16-2016)

It's the bending and the cutting and the rolling that us commoners can't easily do.
The bending is the hard part but if you look I'm sure you can find someone locally who could make the whole thing for you. If you can get it bent locally then all you have to do is cut with a hacksaw and I'd be willing to loan my bead rolling tool to anyone on here with a refundable deposit and you pay shipping both ways. If you can't find someone reasonably local to bend the tube you can always try making your own form and packing the tube full of sand and bending it yourself like ada at bayareamiatas did. Where there's a will there's a way!
Demon I Am (05-17-2016)
Traded some whisky for this roll of fiberglass chopped strand mat to use for making a mold of my M2-1001 replica front bumper. It's a project I hope to get to sometime this decade.

Demon I Am (05-23-2016),Rogue (06-22-2016),ueru (09-19-2016)
Quick update:
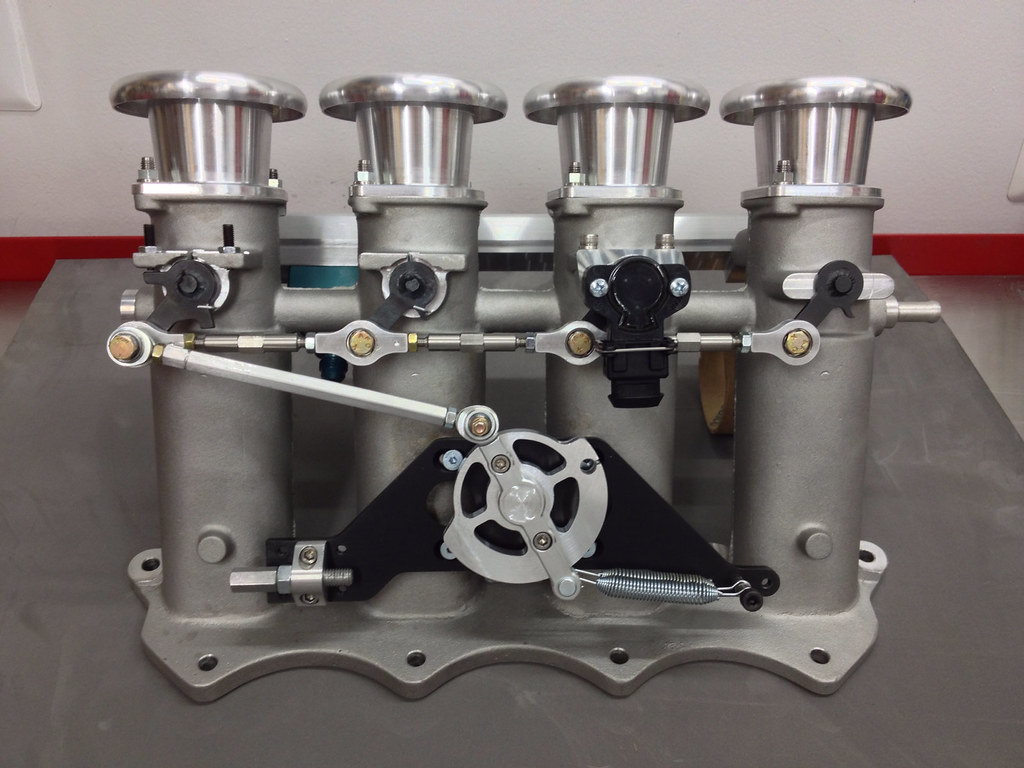
1) New air filter backing plate is cut to better position the air filter now that we've resolved the AC hose conflict. I feel like we checked this a few times but I'm hoping the Dzus quarter turn fasteners have sufficient fuel rail clearance.
2) 1.6 lower radiator hard pipe offset mounting bracket was made out of steel and painted. This positions the two 1.6 radiator hoses correctly so there is no contact with anything that could wear a hole through. We couldn't use the OEM 1-piece NB8 lower radiator hose due to conflict with our NA6 AC compressor and NA8 Racing Beat header. So now we've got the cooling system all sorted out (fingers crossed!).
3) The hard fuel lines interfere with the bottom of the air filter. This will require further bending of the hard fuel lines or possibly even remaking them from scratch. I know a lot of V8 guys run braided hose all the way from the fuel tank to the fuel rail. But if we end up having to make new fuel lines, I will probably try to recreate the OEM hard pipe as much as possible. I can't simply cut the original pipe further down because it is covered with rubberized undercoating and I would be unable to get to clean metal to make the cut and 37° flare for the tube nuts.
Fishbulb (06-20-2016),NCGreasemonkey (06-20-2016)

Can you give some more details on that? I have a bone stock 1.6L with AC/PS that I am about to install a one piece NB lower rad hose into (I hope!) Hoping to take the old metal pipe out of the equation.
Was it more of an issue with the header or the NA6 AC Compressor?
Thanks!
Jac
Sorry I don't have any pictures at the moment. Lots of people report success swapping to the NB8 lower radiator hose. But on my car the OEM rubber NB8 hose was touching the sway bar, compressor and primary tube for cylinder #1. Shortening the NB8 hose would not remedy my concerns. My case is somewhat unique in that I've got a thicker aftermarket aluminum radiator, 1.8 motor swap, NA8 aftermarket header and sway bar, AWR sway bar mounts and NA6 air conditioning. So I'm not sure exactly where the issue lies but it's probably a combination of things all adding up.
I went back to the original NA6 setup with the hard pipe and two rubber hoses. But even then I needed to do a little tweaking to get the perfect routing. The offset bracket is just a piece of steel with 4 holes drilled in it to move the hard pipe slightly inboard towards the center of the car and slightly forward.
Fishbulb (06-20-2016)
Forgot to add
4) Throttle cable is too long. I'm not sure what the deal is because Quinn, Wildo and circuitmstr didn't report any troubles. But my original 1.6 throttle cable is about 1.75" too long. Not the outer cable conduit part (although I suppose a little bit shorter might help some) but the inner part.
I cannot use the TWM supplied threaded cable adjuster as-is because the barrel end of the throttle cable is too large to pass through it. However, the TWM throttle linkage accepts the original Miata threaded cable adjuster that is already attached to the throttle cable. But with the adjuster dialed all the way I've still got so much slack that the pedal doesn't even move the throttle plates. So I've either got to shorten my existing cable or make a new one or make a throttle cable spacer or maybe cut off the OEM cable adjuster and slot the TWM cable adjuster so I can use it with my OEM cable. I can do this as I've made throttle/ clutch/ brake cables for motorcycles before. It's just more time lost, another setback.
BRGNA8 (06-22-2016),Greasemonkey2000 (06-20-2016),Phatmiata (06-28-2016)
Excellent, thank you for the info!

It is never the big parts. But the little ones that make you pull the hair out! If you still have hair, now. Big breath and rethink and all will fall in line. Until the next "Damn-it Man" moment.
With you in the trenches!
... Rick
For the thread on Noir click below
http://mazdaroadster.net/showthread....e-light-Slowly
Fishbulb (06-22-2016),freedomgli (06-22-2016)
Yep that's so true. Whenever you deviate from stock you've got to be adept at problem solving. We haven't experienced anything unexpected or out of the ordinary yet. Most people probably just don't take the time to list all the little problems they solved during the build process like I have. Onward and upward!
Fishbulb (06-22-2016)
 Posting Permissions

 Reply With Quote