I really like the small skirts!!!!!!!!!!


I really like the small skirts!!!!!!!!!!
"My For Sale Items"
"My 2014 Club"
1994 Laguna Blue - (Runabout)
2005 BM MSM #751 of 1428 - someone else is playing with her now
"Nardi Steering Wheel Restore"
91 SD Italia
revlimiter (07-17-2014)

Those look great!
revlimiter (07-17-2014)

Looks great Adam! Side skirts, small and large, make a huge difference on the NBs appearance.
I've got a lot less horsepower - luckily they are Japanese horses - usually in better shape and more motivated.
revlimiter (07-17-2014)

Thanks guys! I'm really pleased with these. Now to find the factory trunk lip...

If the NA one fit I'd ship it off to you. Decided not to run with it.
Are you looking for the Mazdaspeed or the small trunk only lip?Originally Posted by revlimiter

"My For Sale Items"
"My 2014 Club"
1994 Laguna Blue - (Runabout)
2005 BM MSM #751 of 1428 - someone else is playing with her now
"Nardi Steering Wheel Restore"
91 SD Italia
Small trunk lip only, pre-painted in Emerald green. Though... I might have to paint.
Thanks though!
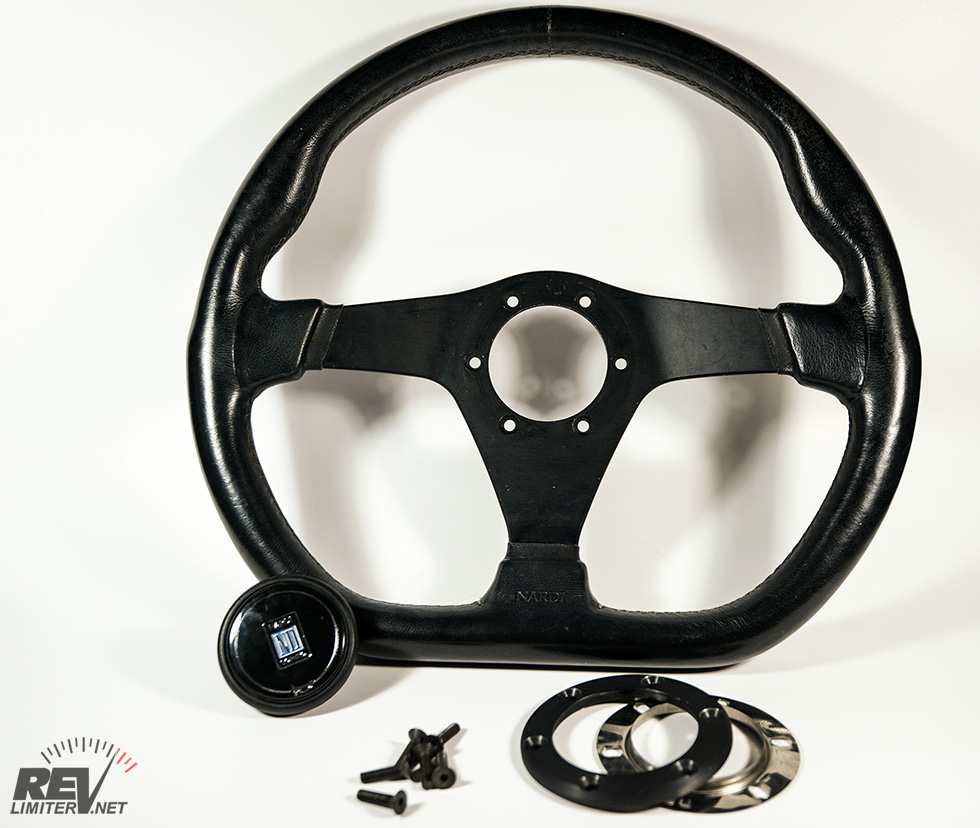
New steering wheel time!
I found this one on yahoo Japan for nearly free and just couldn't say no. Shipping made it not-free, but it was still a hell of a deal. It's a Nardi Gara Sport, I think. They're not really rare, I just don't often see them. Seemed like a neat wheel to put in a more modern Roadster.
And a plastic horn button. Far out! I've only ever had a metal Nardi button. I never knew they had an OEM plastic one.
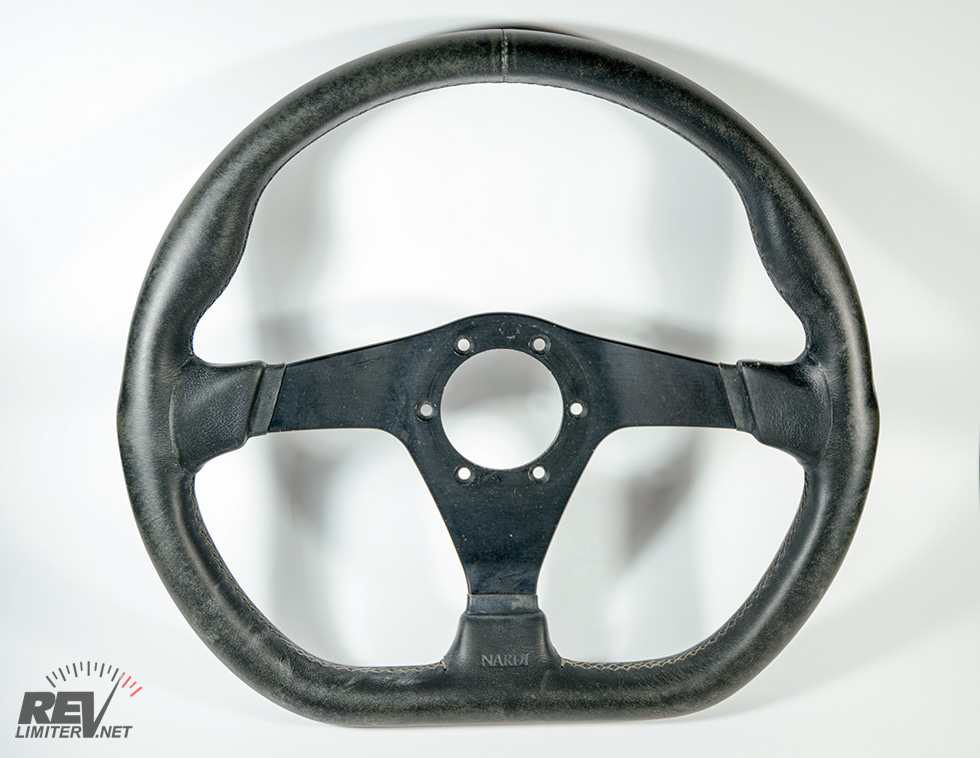
A bit of wear from the previous owners. The leather was fine, it was just the dye that had rubbed free. So...
As close to completely stripped as I could get. The leather really held onto that dye. But that's a good thing.
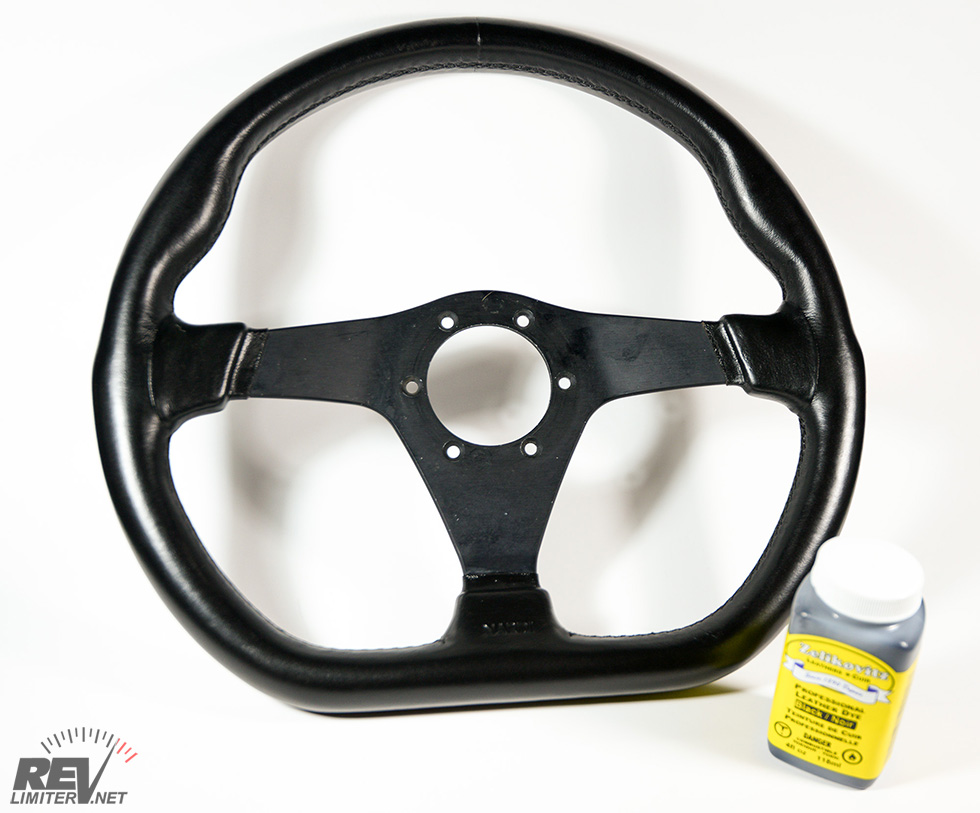
Re-dyed. Much prettier.
And installed!
The wheel feels really great. The anatomic hand holds at 3 and 9 are lovely. They're deep and grippy and help you keep your thumb not wrapped around the rim. And the flat bottom is lovely. When just cruising down the road, I often keep my hands at 6:00-ish. Bad habit, but this wheel really makes it a comfy bad habit.
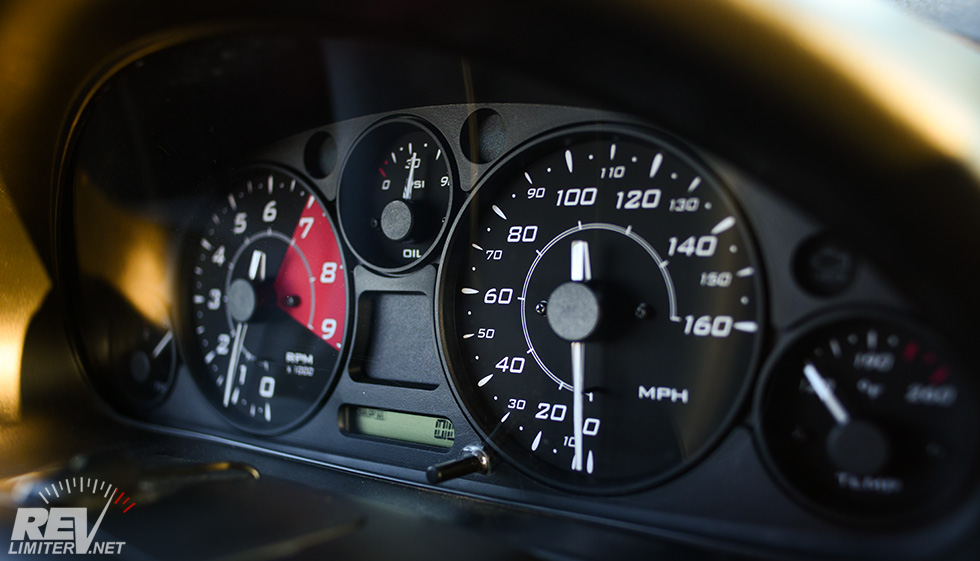
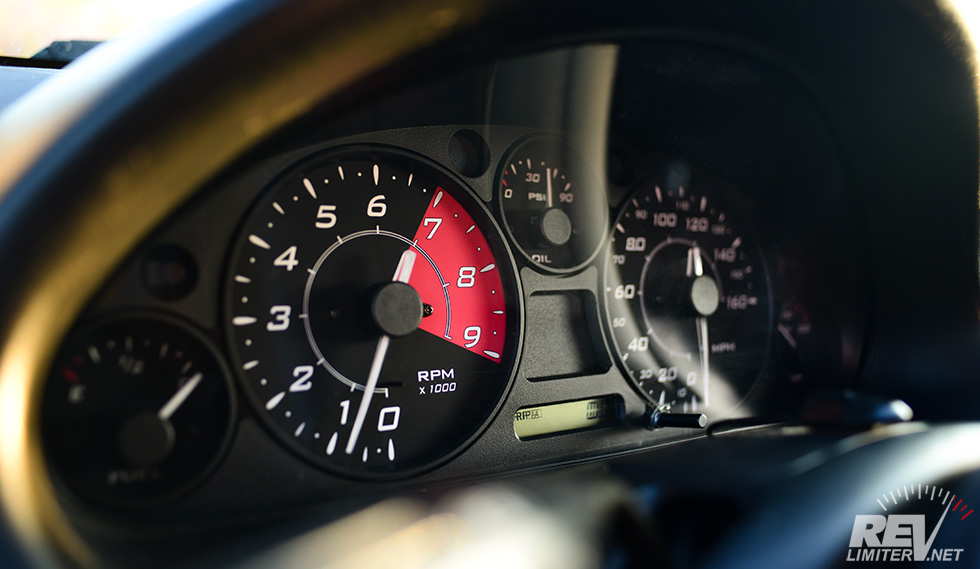
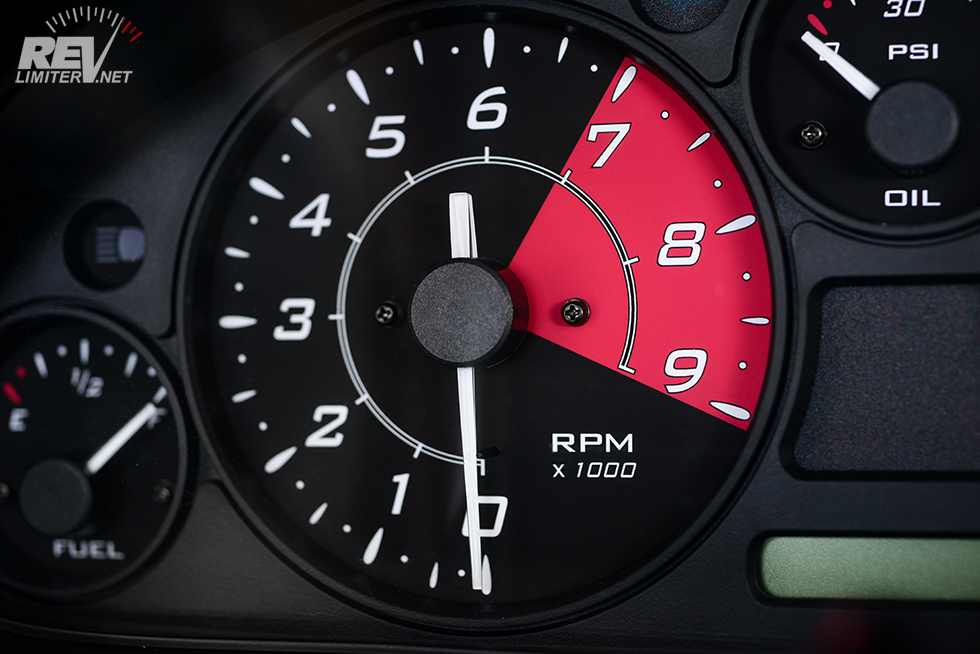
And there's some pretty gauges peeking out.
Version Circuit - Bucky's first new set of gauges in more than a year.
It's all about that red wedge. They're designed for maximum contrast and visibility.
Inspiration included a Spyker, my own MX-8 gauges, Pacman99's FC gauges, and a few random Ferrari gauges.
The night-mode wedge is kinda cool. I'm rather proud.
Ready to drive.
atank (08-06-2014),KAL (09-03-2014),RotorNutFD3S (08-06-2014),tsingson (09-05-2014)

That is coming along really well.
revlimiter (08-06-2014)
That Nardi looks great!
"My For Sale Items"
"My 2014 Club"
1994 Laguna Blue - (Runabout)
2005 BM MSM #751 of 1428 - someone else is playing with her now
"Nardi Steering Wheel Restore"
91 SD Italia
revlimiter (08-06-2014)
It's a very nice wheel. The leather isn't as soft as the Momo F1 D-cut I have, but I like the shape of the Nardi better. And it's pretty darn small.
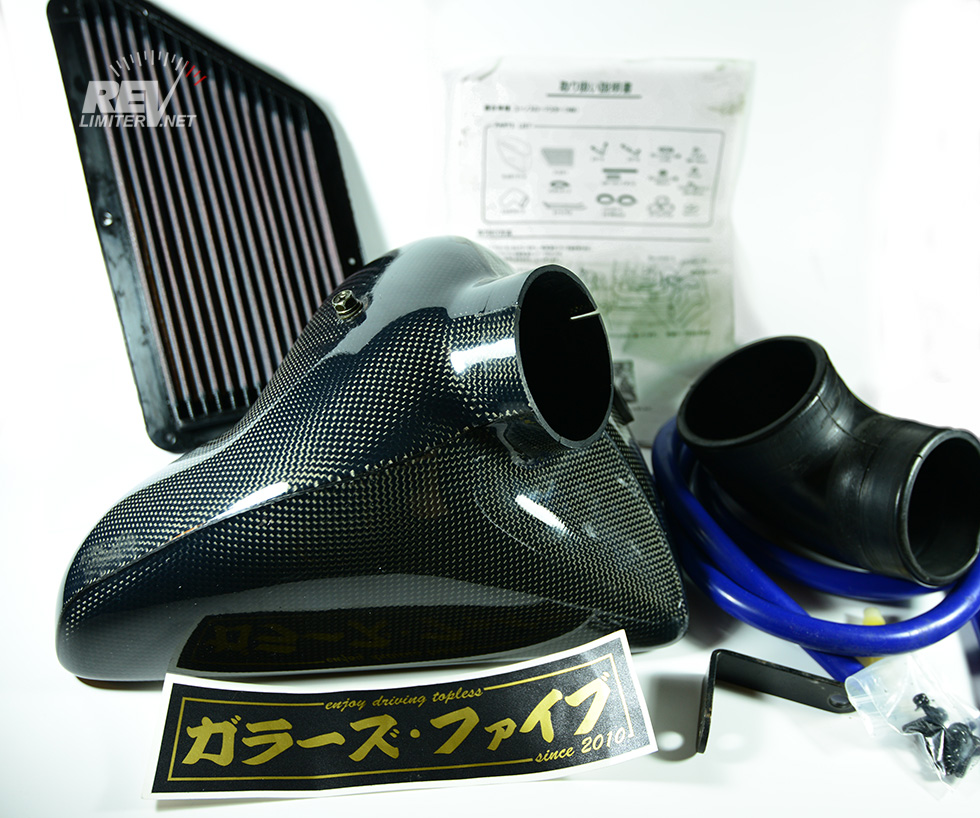
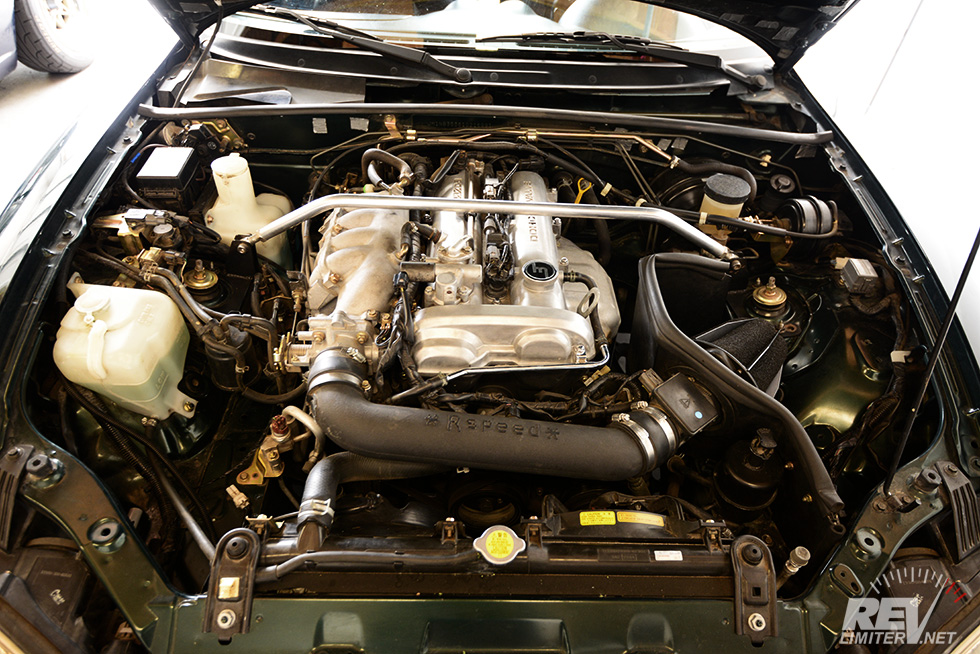
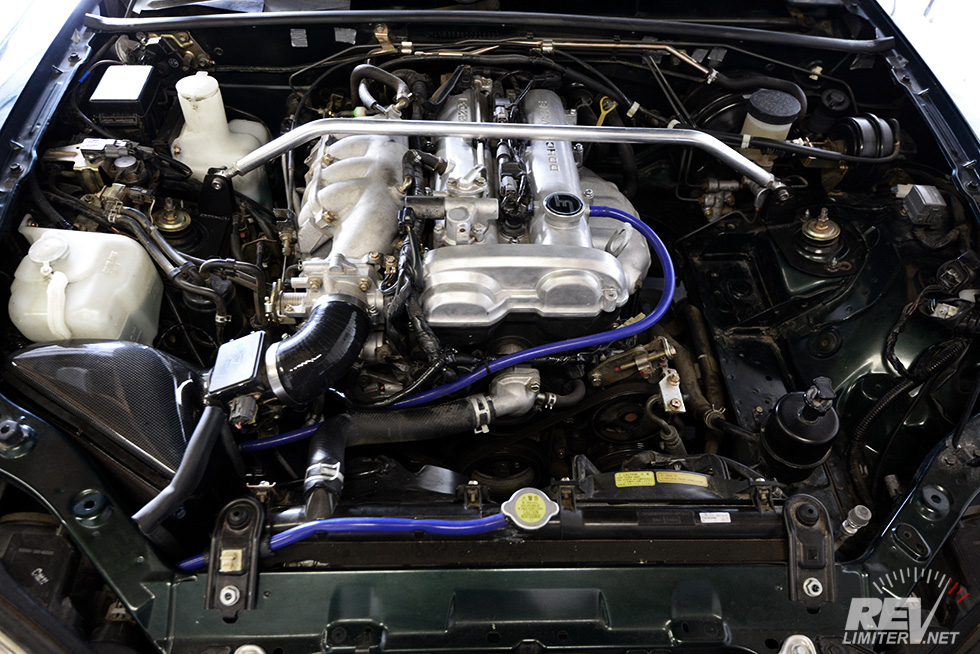
The D-Technique CF coldside intake, thanks to Georgee of Garage5.
I've had my eye out for a coldside intake for a while. I had plans to get the AutoEXE one, but this popped up here on the classifieds and I had to grab it. I've been a huge fan of the TD-1001R for years. Getting to have a real D-Tech piece on Bucky was too good to resist.
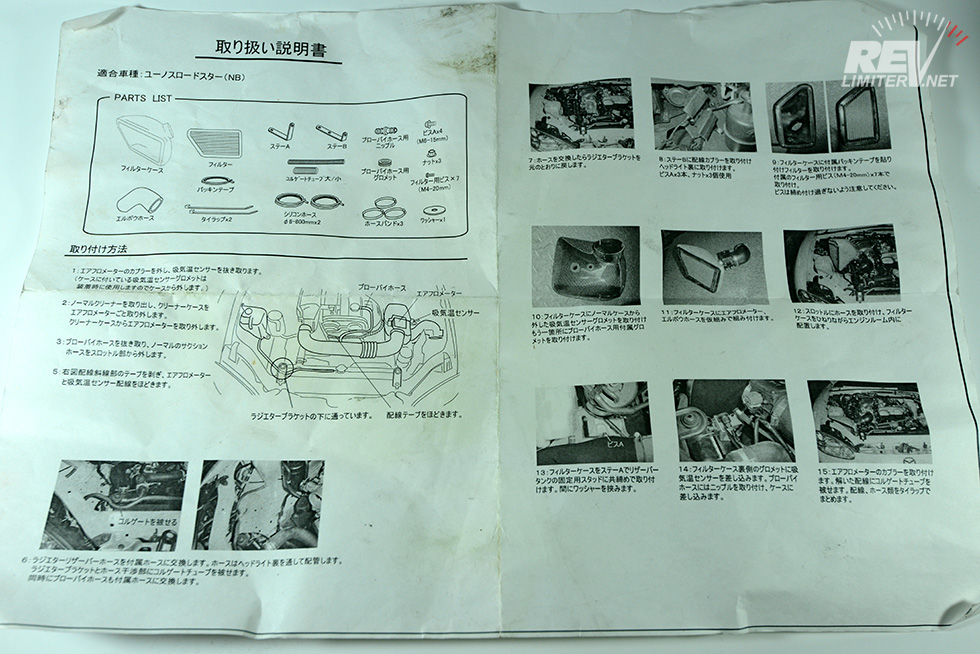
The original instructions.
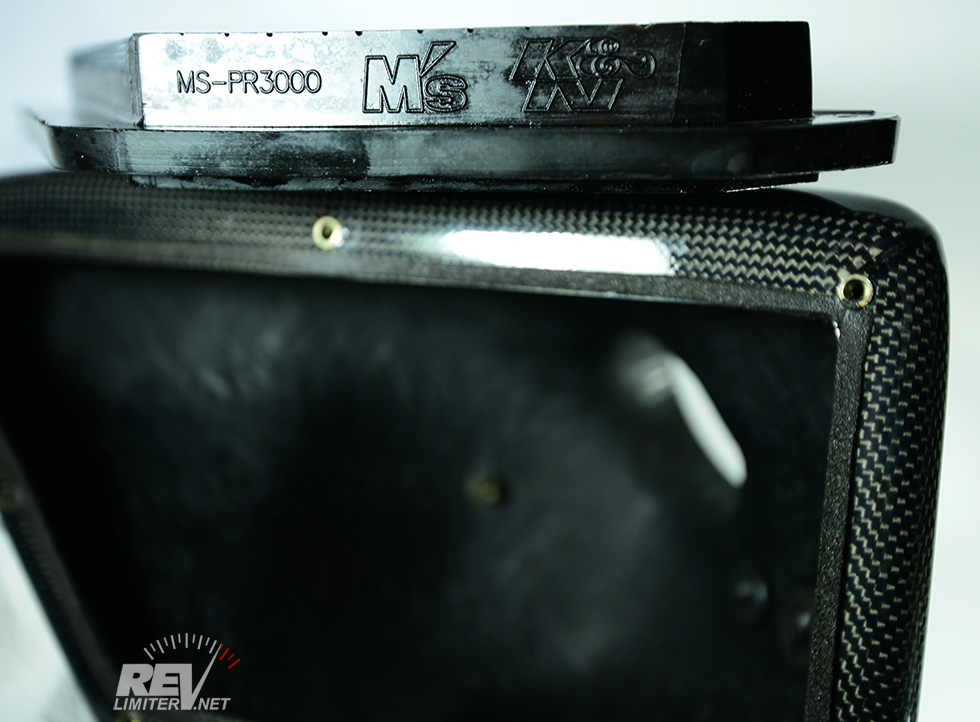
M's K&N filter
Getting to have the original instructions was a huge bonus. I love that kind of thing. The whole intake was in really great shape. Very lightly used.
The filter is an M's K&N. That's a Japan-only special filter from M's, who does mostly Skyline parts. As far as I know, M's is NOT Mine's, but I could be mistaken.
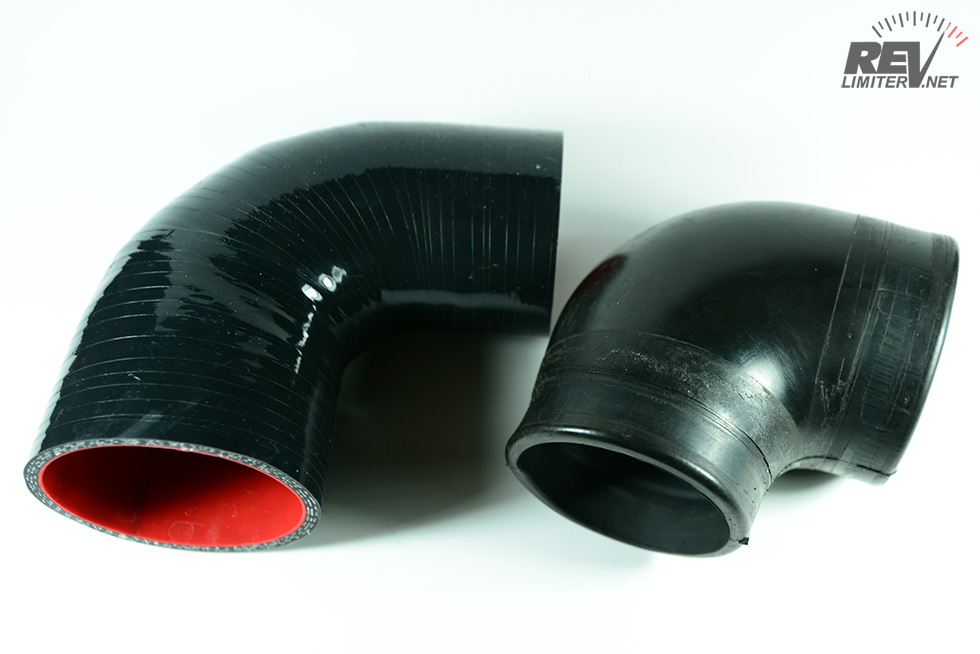
Silicone vs Rubber
The old rubber elbow was showing its age. There were a few hairline cracks and it just looked a bit weak. I grabbed a 2.5" / 2.75" elbow from amazon for $10 to replace the original with. It's a bit long, but that's easily fixed.
Old and busted.
Bucky's original intake. The very early Monsterflow units came from Rspeed and had their logo rotomolded onto the tube. They were NA-only items. (Odd trivia: the CF Monsterflows were NB-only items at first.) My Monsterflow has a plug on the side where the NA idle air bypass tube runs. Not the prettiest ever, but it worked okay.
Er… kinda okay. I’d never bothered to see how effective that heat shield was until I was ready to swap the intake. I brought an OBDII reader along for a few days worth of commute and found out it wasn’t very effective at all. The intake would heat soak after about 10 minutes in traffic and be sucking in air around 50-60* hotter than ambient. And it would never cool down no matter how long I drove in clean air after getting warmed up.
Pretty disappointing. I shoulda closed that box up and worked on ducting cold air at the filter years ago.
Wires extended.
A right of passage for every coldside intake - uncoiling the wires from the harness to reach. I love how Mazda gave plenty of wire to do this. Almost like they knew owners would want a shorty intake.
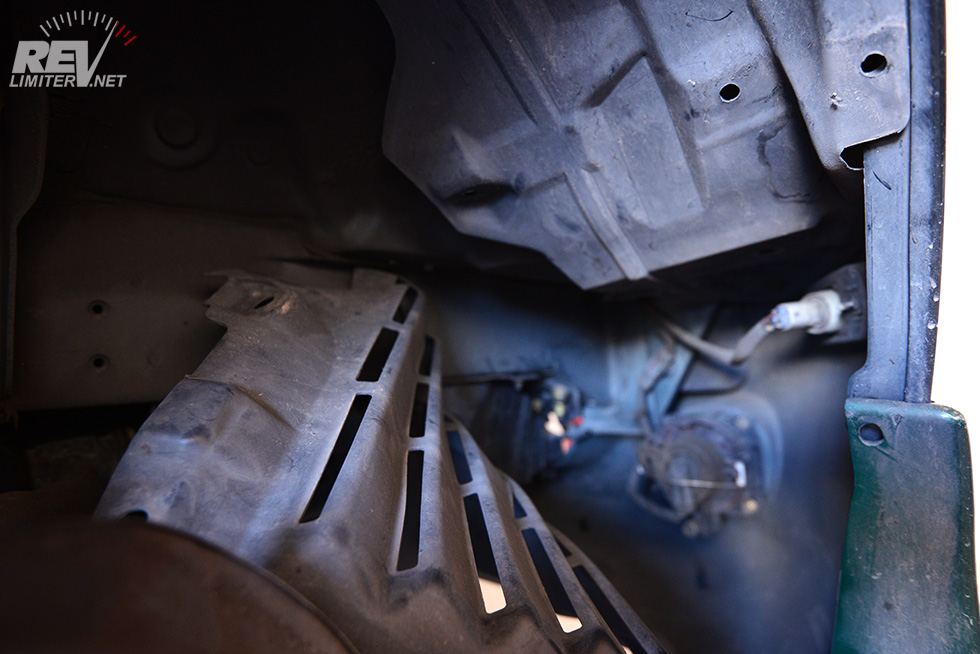
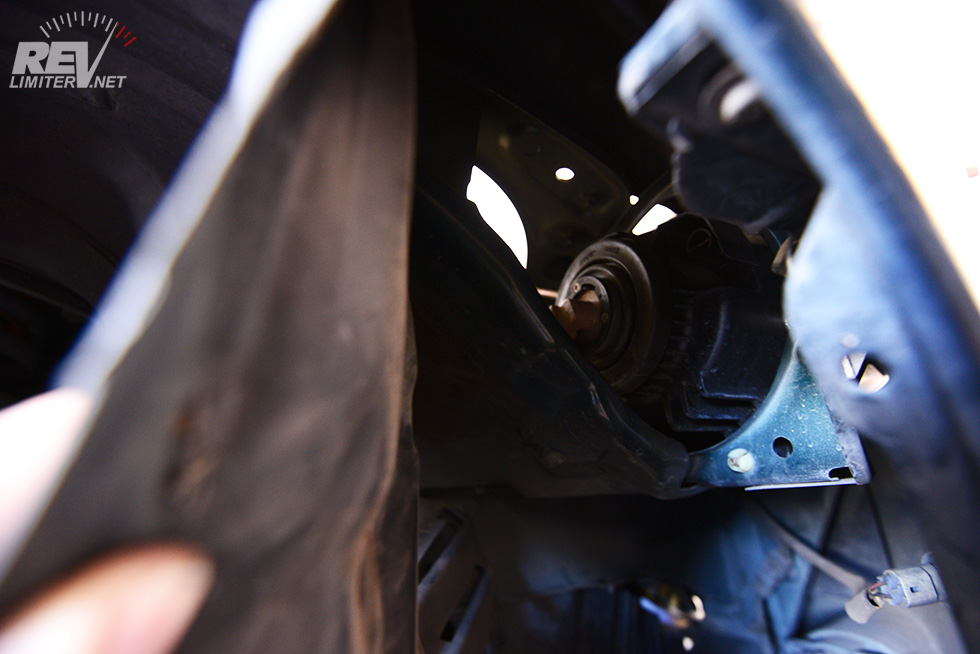
Under the fender.
Remove some liner and one hole opens up.
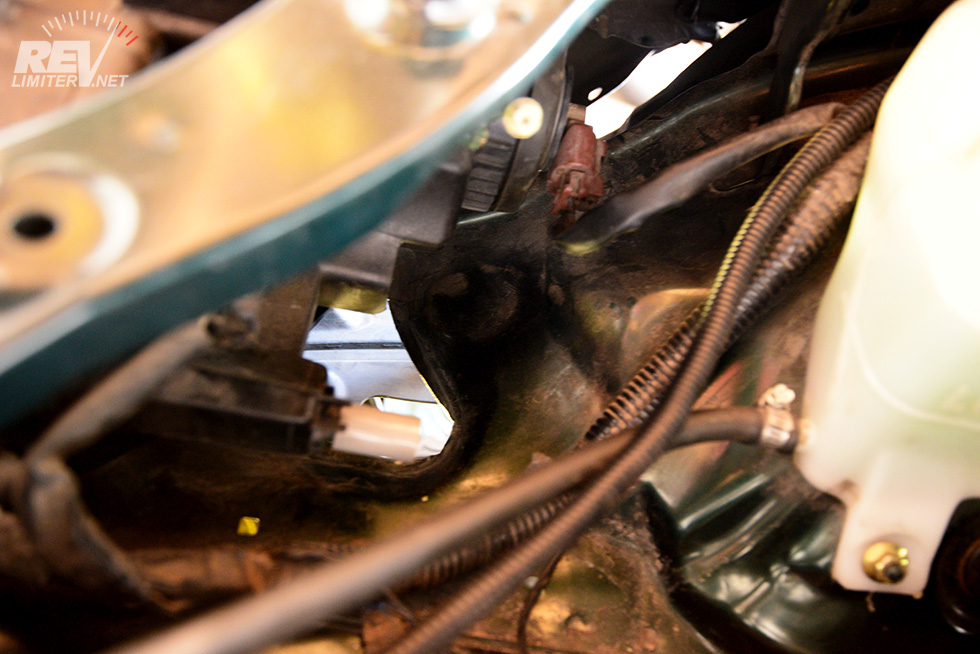
Whip out the demel and another hole magically appears!
I wanted a source of cold air for the new intake. After seeing the stupid intake temps the Monsterflow has been sucking for the past decade, I didn't want to actually take a step backwards. Removing some fender liner opened up one hole. Since there's two liners, things are still kept dry and free of mud splashes.
A bit of work with my dremel and a half dozen cut off wheels opened up another hole behind the headlight lid. I made it to match the factory hole on the driver's side. That now-unused hole got patched up with some temporary repair tape.
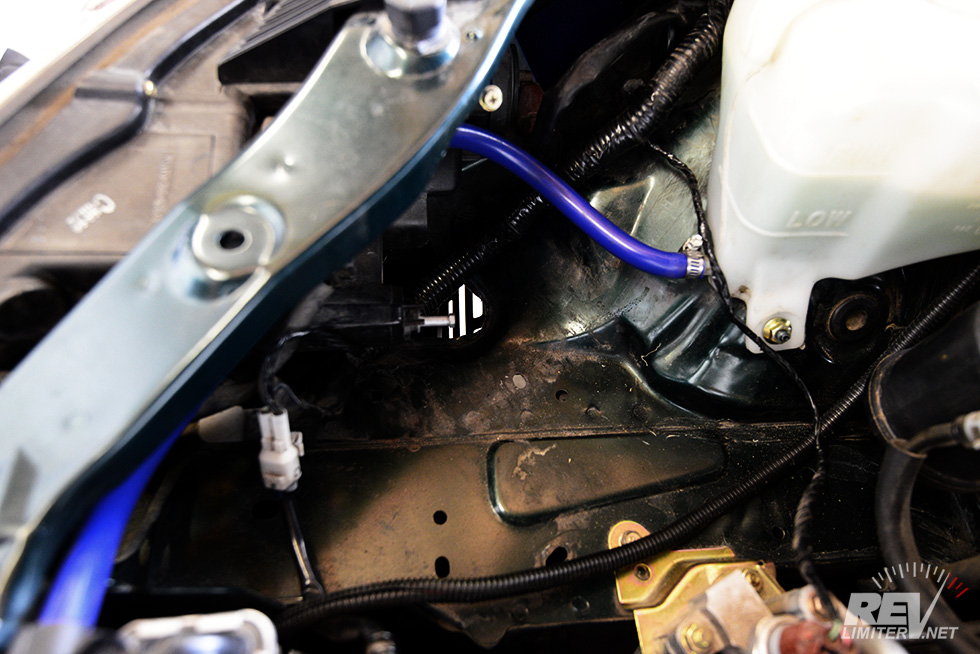
Moving all the wires and crap out of the way.
A successful test fit!
The carbon airbox is a TIGHT fit. It doesn't allow anything to be under the box. A lot of wires had to be carefully moved. I lengthened one wire behind the box... something for the emissions system. And then there's that blue hose. ugh.
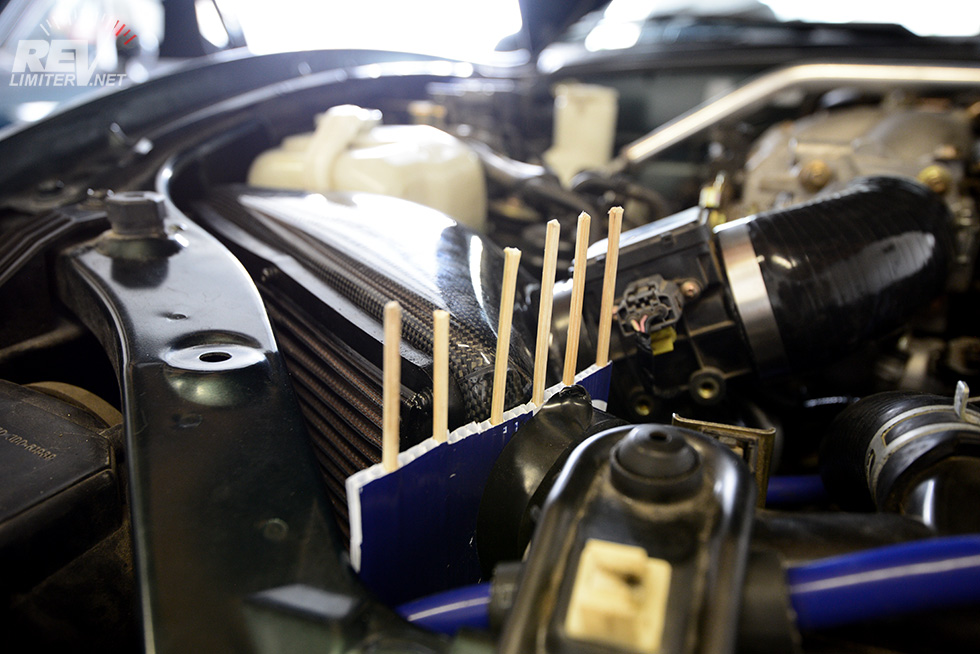
Tiny heat shield prototype.
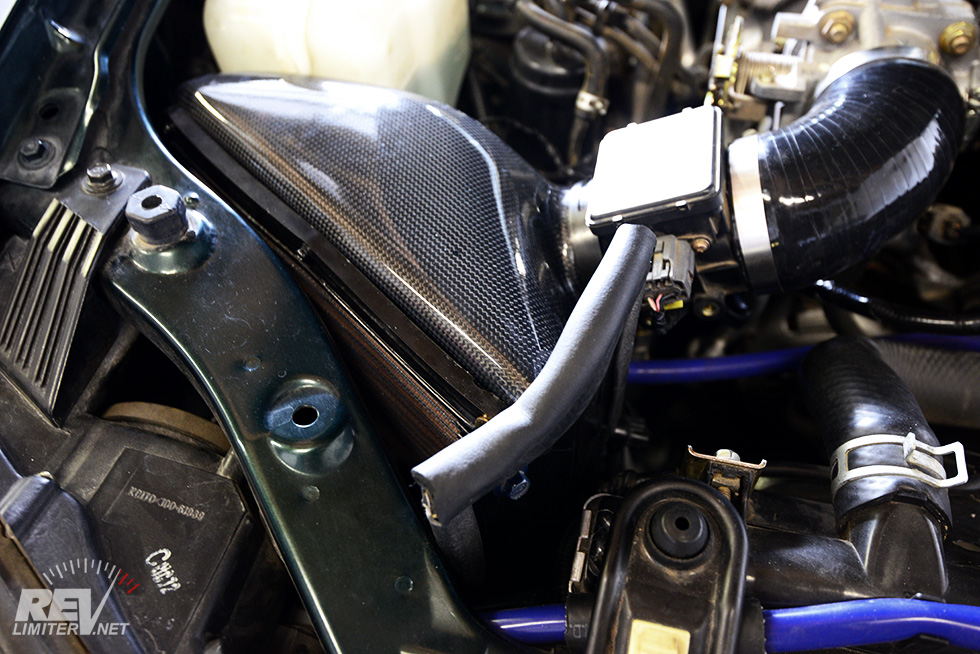
Finished tiny heat shield.
One more small mod needed to be done – shielding the filter from the hot radiator air. After hacking metal out of the engine bay, I didn’t want to undo all that good work by letting super-hot air have easy access to the filter. I whipped out some spare coroplast and some bamboo skewers to do a quick mock-up for a heat shield. It didn’t have to be a big one. Just enough to close off the side closest to the radiator.
If you look close, you can see the coroplast is braced against the filter box by a roll of electrical tape. It happened to be just the right width to keep the piece of plastic standing and allow the hood to smash the skewers into the coroplast. Whatever works, right?
After getting the dimensions right, I just had to cut up some spare ABS plastic and put some insulation on the top edge to let it seal against the hood. The shield is held in place by a small L bracket and two bolts – one bolt through the shield and one of the mounting bolts that holds the air filter to the CF box. Very simple.
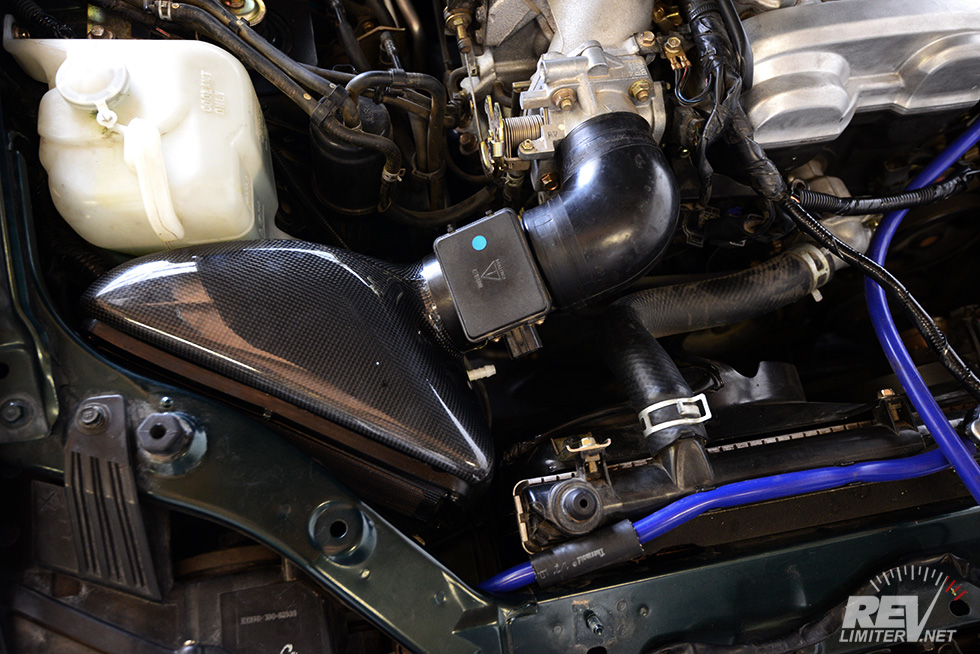
DONE! er... ignore the blue.
And there’s the coldside intake in all its glory. It really cleans up the engine bay. And, aside from those God-awful blue hoses, I love the look of the CF. It’s a keeper.
And I’m very pleased to report that it IS a cold air intake. On the same drive that was giving me 60*+ intake temps over ambient, I now get 5-15* higher than ambient. It is slower to heat soak in traffic, but, like any intake with the filter in the bay, it DOES heat soak. But a couple minutes driving at speed lowers the intake temp dramatically. Seeing that IAT number drop back down on the OBDII reader made me cheer.
As for those blue hoses, I’ll update this post with a fresh pic after I source some black replacements. I think I need 8mm or something like that...
fwdtamiya (09-03-2014),Grip Driver (09-03-2014),RotorNutFD3S (09-03-2014),speedypenguin (09-03-2014),tsingson (09-03-2014)

Bless you and your camera and your fingers.
'9 3 B R G
revlimiter (09-03-2014)

thats disappointing to hear about the monsterflow intake box since i have one myself lol.
love the new intake though!
revlimiter (09-03-2014)
LOL LOL LOL! Thanks!!! That's one of the best complements ever.
It would be pretty easy to fix the Monsterflow.
1: Add a back portion to the airbox and some insulation to the top. I think most of the air comes around the back.
OR
2: Get one of those funky cone filters that's totally boxed in and has a hose on the end. Duct the hose to the fresh air hole.

 Reply With Quote