


10-04-22, Mileage-131,282: About four weeks ago I started on my fender project which included: rolling the fenders, installed fender vents, install fender braces, remove fender well liners, coat inside of fenders with rubberized undercoating.
I started on the passenger side since its the biggest hassle due to more electrical items on that side. I started by removing the fenders, cleaning under them really well and then coating the frame with Duplicolor rubberized under coating(5-6 coats).
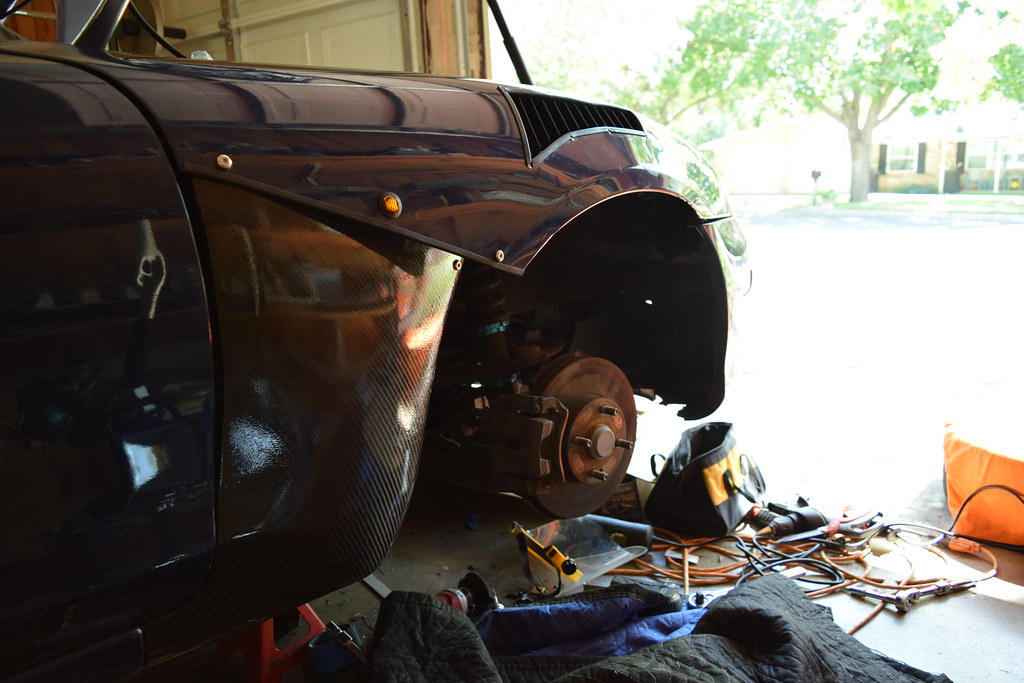
Next I installed the Paco Motorsports Strong arms which are very beefy and has more reinforcement than any other option that I have seen.
Next I figured out placement of the Spiked Performance fender vents(go above wheel well) and the Left Lane Motorsports NA version fender vents which went behind the wheel. I decided I wanted to do aero fenders, similar to these:
Well about 5+ hours into that endeavor I was conversing with Cameron with The Miata Fix and he told me that he had some custom carbon fiber fender caps, 2 sets in fact, one to use on his NB and a set to sell.
At first my pride got the best of me and I figured I was too far down the rabbit hole but after spending another few hours on my aero fender idea, I contacted Cameron and bought the custom carbon fiber fender caps.
They were made by a fellow Miata enthusiast that originally made them for his NB and Cameron asked if he'd be willing to make more, he agreed and made three more sets. One set for Cameron and two for two of his friends but fortunately for me one of the sold his NB before installing them.
This is the first carbon fiber body part I have had in my hand and installed and I must say that they had excellent fitment and pretty good finish(some small flaws here and there). The use of the cf fender caps meant the Left Lane Motorsports fender vents was out.
The cf fender caps originally had three holes, two on top in each corner and one on the bottom for the rear most bolt on the bottom of the sill. I decided to go ahead and add the second on the bottom which may have made it harder to get the panel fitment/gap right.
I cut the fenders using the provided stencil in addition to cutting out the area above the wheel for the Spiked Motorsports fender vents, which I purposely placed higher in case I decided to add flares later.
I then cleaned up the inside of the fenders, rubber down with alcohol and sprayed them with 5-6 coats of the rubberized under coating. Next I cut the rubber trim to fit the vent holes and rivet placement and then installed the rubber trim and fender vents.
To install the fender caps I used the top two holes that were present but added a rive nut for the front most hole, the rear one already had one. I then mocked up the cf cap by installing the fender and the cf cap by using the bottom two bolts to hold in place. Marked the fender where it seemed the holes in the cf cap lined up, drilled holes in the fender and test fitted.
Unfortunately the passenger side was off a bit but I made it work. Originally I drilled and tapped the Paco Motorsports Strong arm on the passenger side so the bolts with go into it but that caused too much panel misalignment...probably due to the hole in the strong arm being misaligned.
I then decided to use the factory mounting bracket that has a stud on it in the middle of the fender. I used aluminum angle, measured, cut and drilled holes to align the factory bracket and the holes in the fender and cap. The results of said effort.
The rive nut that was already installed on the cf cap was for M6x1.0 bolts. Ironically enough I had bought some stainless steel bolts in the size that were 90mm long for a previous taillight project that didn't happen. These were just a little too long for the rear most upper hole but after fully seating the bolt I simply measure to see how much I needed to remove off the end.
For the front of the fender cap I ended up using some scrap aluminum from the Warhorse rear diffuser I had on Warbird. I cut it about one inch wide and 6" long, bent, checked fitment and cut once more to the correct length. Then I marked the placement for the holes to align with the fender and cf fender cap. Drilled said holes and installed rive nuts.
You can see holes in the front of the fender brace that I was originally going to use to secure aluminum angle but unfortunately that would put the necessary hole for the aluminum angle too close to the fender brace.
I also purchased new 3/4'' led side markers to use so after figuring out where I wanted them, drilled the holes for them. Here are the results after 20+hrs of work.
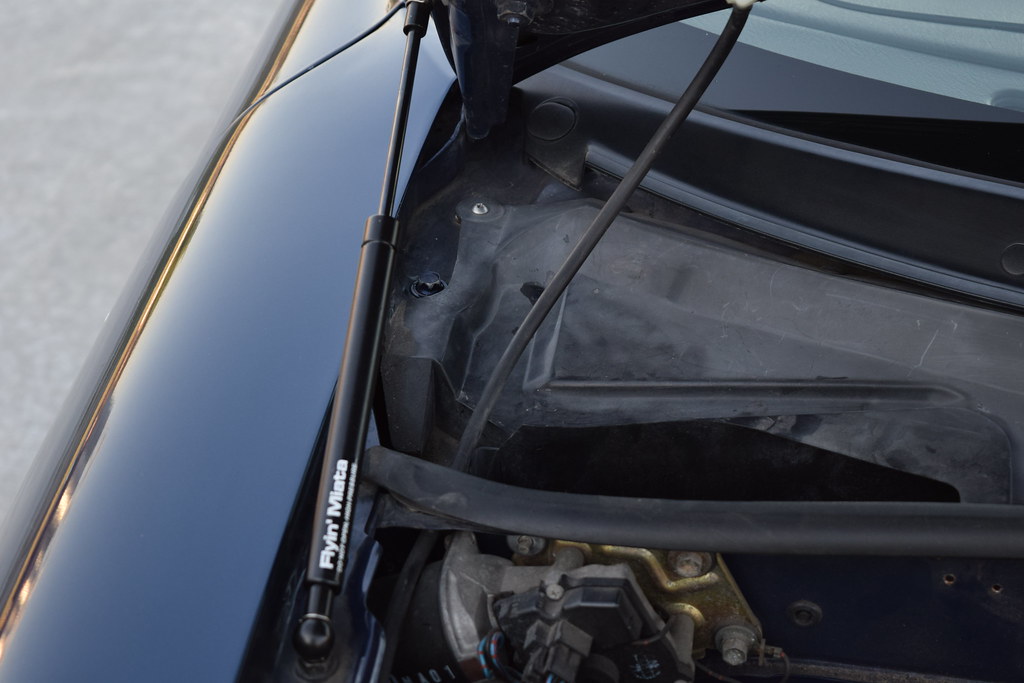
Panel gap to the doors isn't perfect but this is due to how I installed them, not the cf piece itself. Overall I am VERY happy with the results. I also decided to go ahead and install the Vors VR6 15x8 +20 wheels with 205/55/15 Yokohama Advan Fleva V701 tires, of course that called for some proper pics. Oh and I decided to replace the hood struts which worked fine but the plastic heads were faded so just ordered new ones from Flyin Miata.


 Reply With Quote