Page 1 of 2 12 LastLast
Results 1 to 15 of 22

Thread: DIY Zest-style Turn Signal Intakes

  1. #1
    Forum Sponsor revlimiter's Avatar
    Drives
    Sharka
    Location
    Revlimiter.net
    Join Date
    Dec 2011
    Posts
    3,199
    Thanks Given
    749
    Thanked 5,007 Times in 1,278 Posts

    DIY Zest-style Turn Signal Intakes

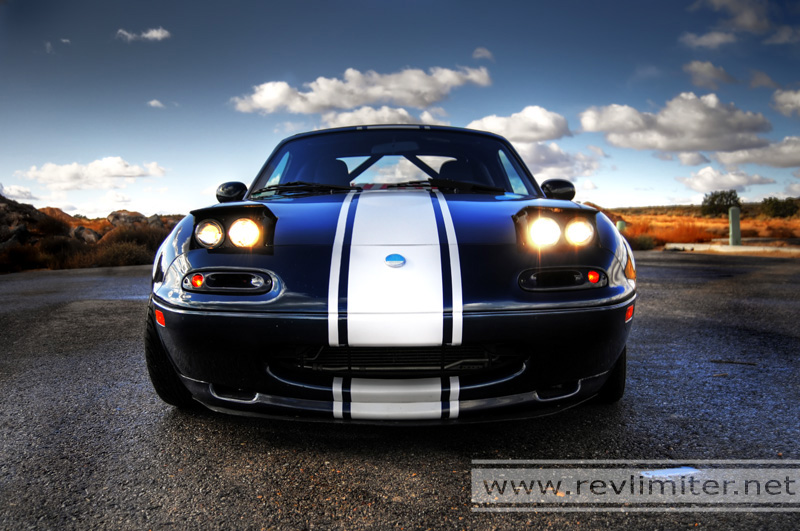
    Transforming burned-out TSIs into Zest-style Turn Signal Intakes


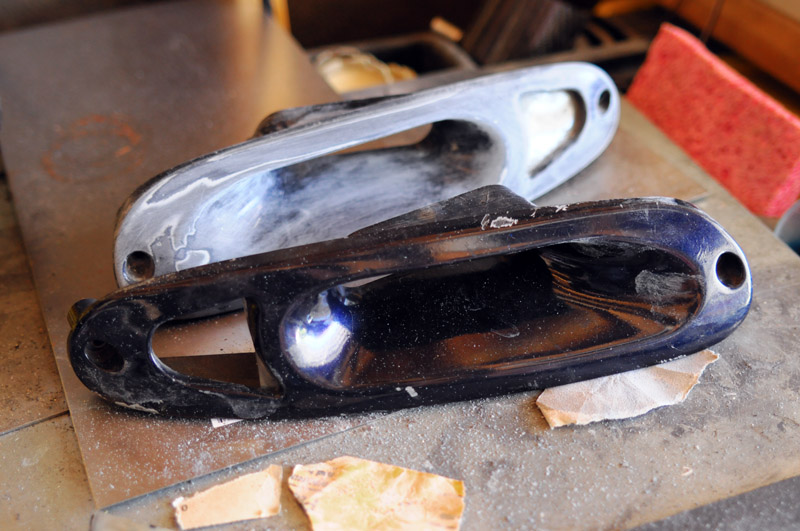
    I started out with these.


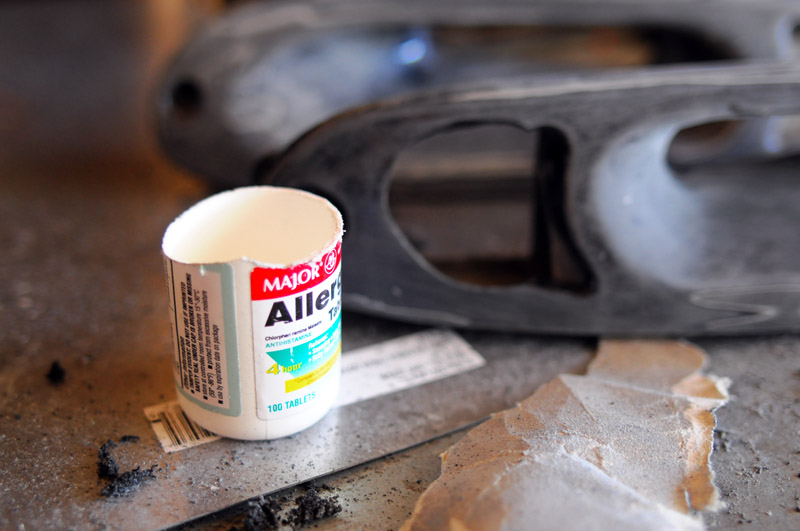
    I added a couple of these and some bondo....


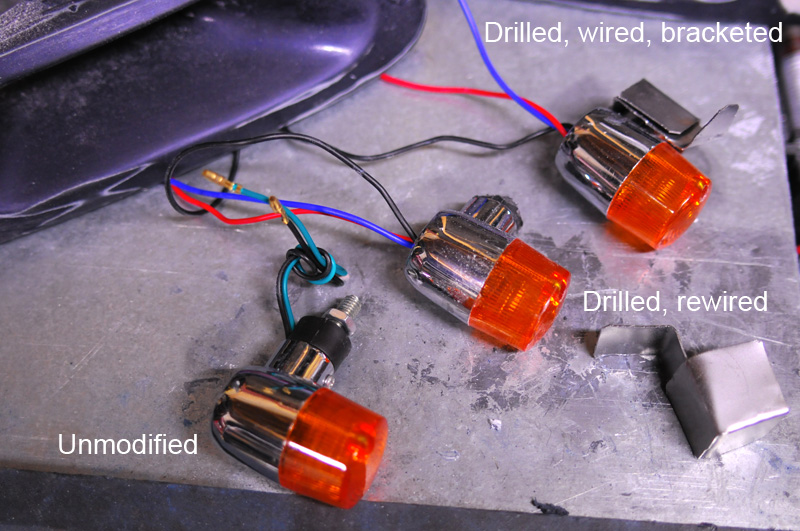
    ... stirred in a couple motorcycle marker lamps...


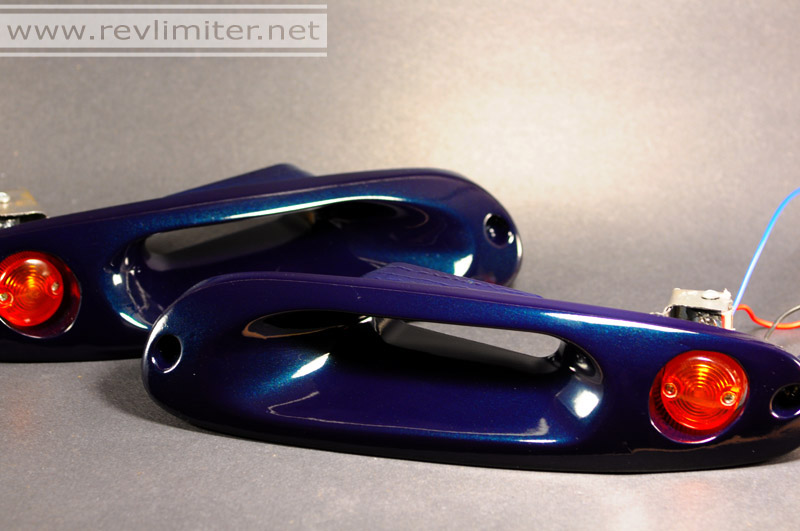
    painted and finished!


    Zest-style TSIs.


    http://revlimiter.net/blog/2009/10/turn-signal-intakes/

    Not quite a how-to, but this blog post should be able to help anyone make a set for themselves. The parts used are all in there. You just have to bring a little bondo experience to the table. Very little. I'm not any kind of bodywork master or anything.

  2. The Following User Says Thank You to revlimiter For This Useful Post:

    WASABI (04-02-2014)

  3. #2
    Individual-1 ☚ ☻ ☛ Agent☣Orange's Avatar
    Location
    🍊SWFL🏝
    Join Date
    Apr 2010
    Posts
    21,593
    Thanks Given
    4,766
    Thanked 4,321 Times in 2,545 Posts
    Any tips about the Bondo?

  4. #3
    Forum Sponsor revlimiter's Avatar
    Drives
    Sharka
    Location
    Revlimiter.net
    Join Date
    Dec 2011
    Posts
    3,199
    Thanks Given
    749
    Thanked 5,007 Times in 1,278 Posts
    Just get it smooth however you can. Sand, sand, sand. Then spray with primer and you'll see any spots that aren't smooth. So you sand some more. Then primer again.

  5. #4
    Individual-1 ☚ ☻ ☛ Agent☣Orange's Avatar
    Location
    🍊SWFL🏝
    Join Date
    Apr 2010
    Posts
    21,593
    Thanks Given
    4,766
    Thanked 4,321 Times in 2,545 Posts
    Just plain old Bondo or is there a different concotion for plastics?

  6. #5
    Forum Sponsor revlimiter's Avatar
    Drives
    Sharka
    Location
    Revlimiter.net
    Join Date
    Dec 2011
    Posts
    3,199
    Thanks Given
    749
    Thanked 5,007 Times in 1,278 Posts
    Plain ol' bondo. It's just a filler. It doesn't mind being shoved between a few pieces of plastic like I did here.

  7. #6
    Individual-1 ☚ ☻ ☛ Agent☣Orange's Avatar
    Location
    🍊SWFL🏝
    Join Date
    Apr 2010
    Posts
    21,593
    Thanks Given
    4,766
    Thanked 4,321 Times in 2,545 Posts
    Thanks! Good to know this stuff. I've been meaning to mount some PCV end caps on the gauge hood to use as gauge cups.
    Last edited by Agent☣Orange; 02-07-2012 at 02:33 PM.

  8. #7
    5,000 rpm - there be torque here! WASABI's Avatar
    Drives
    1991 British Racing Green
    Location
    Amesbury, MA
    Join Date
    Dec 2011
    Posts
    3,864
    Thanks Given
    6,206
    Thanked 1,464 Times in 795 Posts
    Adam, thanks for posting this. I read about it on your blog and I am doing the same mod this winter. One suggestion would be to make sure you point the pill bottle/round hole support, straight out the front. I did not do that, merely putting it in they way IT wanted to fit, which slants a little to the outside.


    I didn't notice it was tilted until I mocked it up on the car. I will grind it, and fill in a spot or two, so it sits correctly (forward).

  9. #8
    Super Moderator RotorNutFD3S's Avatar
    Drives
    '99 Brilliant Black Turbo
    Location
    Newnan, GA
    Join Date
    Dec 2011
    Posts
    1,885
    Thanks Given
    2,464
    Thanked 1,473 Times in 698 Posts
    Another great how-to from Adam!!!
    I've got a lot less horsepower - luckily they are Japanese horses - usually in better shape and more motivated.

  10. #9
    3,000 rpm - starting to feel the power George's Avatar
    Drives
    '98 Evolution orange NB6
    Location
    Third world
    Join Date
    Dec 2011
    Posts
    683
    Thanks Given
    10
    Thanked 195 Times in 90 Posts
    will definitely do something similar with my turn signals! nice one

  11. #10
    2,000 rpm - light wheelspin, no bog here! Frenchmanremy's Avatar
    Drives
    1997 Black Base
    Location
    Ottawa, Ontario, Canada
    Join Date
    Jan 2012
    Posts
    128
    Thanks Given
    0
    Thanked 1 Time in 1 Post
    What's that bracket for?

  12. #11
    Forum Sponsor revlimiter's Avatar
    Drives
    Sharka
    Location
    Revlimiter.net
    Join Date
    Dec 2011
    Posts
    3,199
    Thanks Given
    749
    Thanked 5,007 Times in 1,278 Posts
    The bracket is to keep the little screw holes in the lights horizontal rather than vertical.

  13. #12
    Idling - Listen to it purr... brian's Avatar
    Join Date
    Jan 2012
    Posts
    26
    Thanks Given
    0
    Thanked 0 Times in 0 Posts
    Love your how tos Adam! I'm going to attempt the NACA duct headlight lid this weekend. Wish me luck!

  14. #13
    6,000 rpm - mere mortals would shift theothersawyer's Avatar
    Drives
    1994 Classic Red
    Location
    Newnan, Ga
    Join Date
    Dec 2011
    Posts
    4,854
    Thanks Given
    1,167
    Thanked 1,498 Times in 734 Posts
    Looks great as always!!!

  15. #14
    Idling - Listen to it purr... shenanigan's Avatar
    Drives
    White '96 Miata
    Location
    Tampa, FL
    Join Date
    Dec 2011
    Posts
    48
    Thanks Given
    0
    Thanked 1 Time in 1 Post
    i agree! these look amazing

  16. #15
    Forum Sponsor revlimiter's Avatar
    Drives
    Sharka
    Location
    Revlimiter.net
    Join Date
    Dec 2011
    Posts
    3,199
    Thanks Given
    749
    Thanked 5,007 Times in 1,278 Posts
    Quote Originally Posted by brian View Post
    Love your how tos Adam! I'm going to attempt the NACA duct headlight lid this weekend. Wish me luck!
    I need to do that too. I've wanted to replace my slightly bent NACA duct lid with a fresh one for a while now. The one on Sharka now came out of the wreck.

    Luck!

Page 1 of 2 12 LastLast

Posting Permissions

  • You may not post new threads
  • You may not post replies
  • You may not post attachments
  • You may not edit your posts
  •