Nice work! Very clean install.


Nice work! Very clean install.

Good job! Did that on my dad's Miata while trying to nail down the gas smell.
No todo que es oro brilla.

One last important bit of MATG prep was finally installing the Reflectix.
Out came the interior for the third time this month:
20220730_104916 by Bryan Wyatt, on Flickr
The job was mostly measure, cut, trial fit, cut again, then tape.
First up was the section from the rear bulkhead to the ebrake handle:
20220730_111430 by Bryan Wyatt, on Flickr
From the other side. I went ahead and made sure to make holes for the carpet retainer and console screws:
20220730_112504 by Bryan Wyatt, on Flickr
Unfortunately, when I went to pull up the front end of the carpet, the footwell insulation came out in clumps:
20220730_113153 by Bryan Wyatt, on Flickr
20220730_113157 by Bryan Wyatt, on Flickr
I just threw it away and cut a piece of Reflectix to put in its place. I made a twin for the passenger side (whose insulation didn't come out, oddly):
20220730_113532 by Bryan Wyatt, on Flickr
20220730_114603 by Bryan Wyatt, on Flickr
Once I had the rear section taped down, I created a section that reached a little bit under the dash and on both sides of the tranny tunnel right below it:
20220730_115632 by Bryan Wyatt, on Flickr
I put one layer on top of this that fit around the widest part of the shift boot, then added one more that fit over the shifter:
20220730_121352 by Bryan Wyatt, on Flickr
20220730_122036 by Bryan Wyatt, on Flickr
As I started putting the car back together, I realized I needed to cut down some of the insulation when it poked through the carpet. There's still a little bit of crinkle every time I move the shifter to Reverse or when the ebrake handle is operated.
20220730_123531 by Bryan Wyatt, on Flickr
Aside from the slightly increased drag for the seats against the tranny tunnel when sliding forward and back, you'd never know I did anything:
20220730_130018 by Bryan Wyatt, on Flickr
The difference so far is astounding. I feel so dumb that I didn't do this years ago!
Originally Posted by DazedAndConfused
Agent☣Orange (08-01-2022),Greasemonkey2000 (08-01-2022),HarryB (08-02-2022),kung fu jesus (08-01-2022)
Great job!
Removing the old carpet should be any owners primary maintenance on an NA or NB, if only just to clean it and the tub.
The jute insulation should be replaced due to age and the drop top nature of these cars.
Hope this upgrade offers an enhanced enjoyment for years to come!
Definitely. I removed the carpet out of my dad's Miata and the floor was covered in some kind of white fungus with long veins. It was like a mushroom colony. Luckily there was no rust so we took the carpet to the car wash, hung it on the wall and blasted it clean. Even for a black carpet, the water came out equally black. All the factory jute when into the garbage although it should have gone into a red biohazard bag and burned. Factory jute in a Miata is really a sponge that holds water anyway. Did a layer of fatmat for vibration and foam/reflectix layers for sound and heat barriers.
No todo que es oro brilla.

This is a related question..
does anyone make a non-shit carpet for the MX5/Miata ? I mean, actually as good as the original mazda ones ?
HarryB (08-03-2022)
The loop pile on the early NAs? I would bet that would be a custom job, but none of "kits" I've seen were that great.
Update post MATG:
The insulation didn't help on a long enough trip. Within an hour or so, my right foot and hip were hot again
I could add something over the exhaust itself. I was trying to avoid trying to jack up the car and insulating from the underside. I might still have to or just live with it. Car was otherwise quite pleasant.
MATG XXVI was insanity. Fontana Village was without power for three straight days due to a storm that hit when I was north of Knoxville. It was huge: at the same time I was surging through 3" puddles on I-75, high winds blew over a tree, which, on its way to hitting one of the lodge buildings at Fontana, took out a pole with a transformer on it, which took out another 11 poles before all was said and done.
I'll make a long story very short: it was awesome. We welcomed 10 new vendors (for a total of 40) and even broke our own previous attendance record in the process. I feel like I could write a book, but I'll just drop some pics of the car instead
DSC_8964 by Bryan Wyatt, on Flickr
If you get a chance, let Lorie from Palm Breeze give your car a once over while you're at MATG. You won't regret it!
DSC_8952 by Bryan Wyatt, on Flickr
This was my view every morning from the porch of my non-AC cabin. Almost worth the previous night of sweating and bug bites.
DSC_8928 by Bryan Wyatt, on Flickr
Sadly, the only time I drove US129 in daylight was on my way home on Sunday. Other than that, I took 28 on two different nights to go to dinner. Those were the only times I left FVR all weekend.
Killboy's crew got these two:
3758333 Killboy by Bryan Wyatt, on Flickr
3758334 Killboy by Bryan Wyatt, on Flickr
Agent☣Orange (08-18-2022),Greasemonkey2000 (08-14-2022),HarryB (08-11-2022)
Took the car out for a short drive tonight.
I freaking love this car.
It's still slow, but moves quickly enough when I ask it to, the tires and suspension are more capable than I am, and yet the car soaks up bumps a lot better than I remember and just in general is more comfortable and quick.
Agent☣Orange (08-18-2022),HarryB (08-18-2022)
Christmas was good to me.
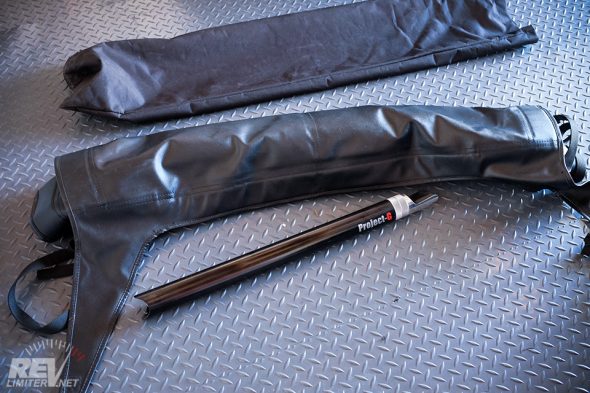
Just ordered a Project G G-String Bikini Top!
Time for a long, long, long overdue update!
First, the G-String. For an introduction, you can check out RevLimiter's article. The pics are so good that Project-G uses them for the instructions sent with every top. It basically allows you to enjoy (most of) the cover of driving top up with even better airflow than top-down. This will be absolutely crucial for my trip to Miatas at the Gap in August.
One of the most important items is to get the center post cut to shape and length. Ordinarily, you'd have to shape the nose so it perfectly latches into the location for the handhold used to flip the top up and down. I noticed in some of Adam's other posts that he had switched to Project-G's EZ Brace:
It allows a much more adjustable fit for the center brace and looks pretty nice.
Sadly, production difficulties ensured that this part would become complete Unobtainium. Sad trombone noises intensify.
Amazingly, I was able to find a company that had 3D printed the adjustable nose portion of the brace, which could then just be inserted into the black pipe that Project-G provides for you to cut and shape to size.
My biggest fear had [possibly] been allayed.
After ordering the top in January, it showed up at my house on my birthday at the end of February. I couldn't have planned it that way if I tried! It wasn't until late March that I actually attempted to install the top for the first time.
First task was to trim the header bar. Alex from SNS was able to send me one that was pre-cut, but there was still some extra I needed to remove. A little quality time with an angle grinder was needed--a first for me. I made sure I painted it and also attached the black acrylic plates that Project-G sends with the top to cover the now freshly cut metal. You'll see a pic of one of them later.
20230326_151936 by Bryan Wyatt, on Flickr
Image_20230326_1639547962004131901558521 by Bryan Wyatt, on Flickr
Once that was done, it was time to glue the header to the top. I can't tell you how many times I watched this install video trying to psych myself up. Finally went out on the front porch and just did it.
Mocked up:
20230415_143930 by Bryan Wyatt, on Flickr
Glued:
20230415_145859 by Bryan Wyatt, on Flickr
The only places that really need clamping down are the corners where you have to fold down a piece once you cut it. You can see where the cut is made here:
20230415_142945 by Bryan Wyatt, on Flickr
20230415_145905 by Bryan Wyatt, on Flickr
My little helper (who screwed the trim pieces and the latches in place for me):
20230415_152014 by Bryan Wyatt, on Flickr
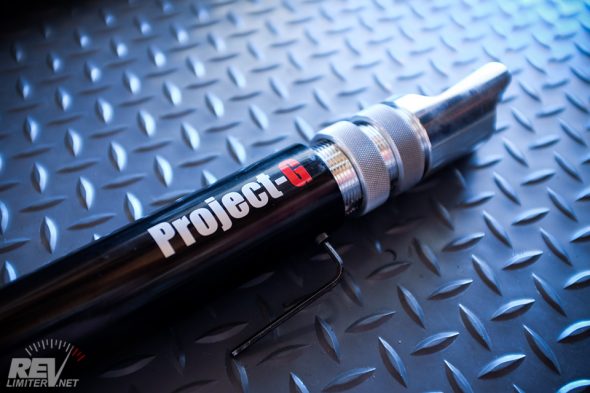
Here's the printed nose piece I mentioned earlier:
20230415_152902 by Bryan Wyatt, on Flickr
20230415_152905 by Bryan Wyatt, on Flickr
20230415_152931 by Bryan Wyatt, on Flickr
More in Part 2!
Once I had the top fitted to the header bar/frame, it was time to fit it to the car, which, of course, included making/modifying the center brace.
This video will give you the basic operation of fitting the top for the first time.
Here you can see one of the plates that I attached. Like the top itself, these were attached with some DAP Weldwood Contact Cement.
20230415_195441 by Bryan Wyatt, on Flickr
Now to the center brace!
This was probably the most labor intensive part of the job, honestly. I went through multiple evolutions and thankfully didn't have to buy a spare piece of pipe. Because I had the nose piece, I only had to cut out the notch for the brace to sit against my roll bar.
20230415_204928 by Bryan Wyatt, on Flickr
Since my bar has padding and vinyl cover, I decided to make an addition to spread the load. Basically, it meant I finished the notch to the size of a piece of the pipe that I'd cut off, JB welded the pipe to the end of the notch, then cut the attached piece of pipe in half. You can see in the pics that I tried to use the DAP, but it was too flexible under load.
20230415_204958 by Bryan Wyatt, on Flickr
20230415_205232 by Bryan Wyatt, on Flickr
20230416_134802 by Bryan Wyatt, on Flickr
20230416_134816 by Bryan Wyatt, on Flickr
As stated before, the DAP was too flexible, so out came my other best buddy for this mod, Mr. JB Weld.
20230416_142436 by Bryan Wyatt, on Flickr
20230416_142544 by Bryan Wyatt, on Flickr
In order to fit the secondary straps, Project-G supplies a pair of bolts each with a rubber sleeve to wrap the strap around. I decided instead to use them to attach the D-Rings that the kit is sent with. I had to shorten mine once to get them to fit the first time on the car, then a second time in order to fit my windblocker. If the sleeves were kept at the size they're sent with, the bolts couldn't even get a single thread of engagement, lol.
20230416_144540 by Bryan Wyatt, on Flickr
Here's what it looks like when you're done:
20230416_145054 by Bryan Wyatt, on Flickr
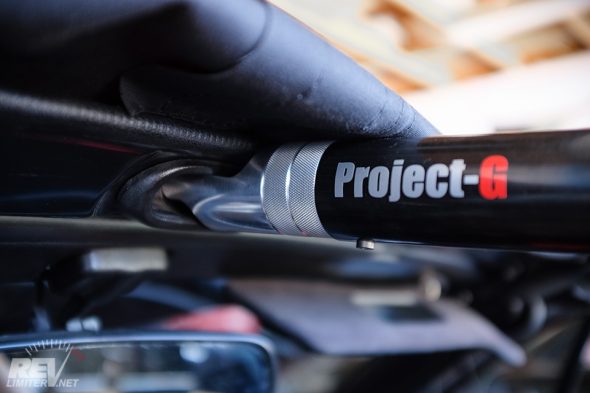
Once I got the nose portion adjusted using the twin locking collars, I rolled the car out to check out the initial fitment:
20230418_140911 by Bryan Wyatt, on Flickr
20230418_140818 by Bryan Wyatt, on Flickr
20230418_141141 by Bryan Wyatt, on Flickr
20230418_141001 by Bryan Wyatt, on Flickr
My soft top has a bigger gap at the windshield header than the bikini top!
20230418_140843 by Bryan Wyatt, on Flickr
After a week or so, I decided to do some more fiddling. I didn't like how short my bar was and how much I had to unthread the adjustable nose piece. I decided to take a piece of pipe that I'd cut off earlier while I was sizing the brace and JB Weld'ed it in place:
20230424_205009 by Bryan Wyatt, on Flickr
20230424_205032 by Bryan Wyatt, on Flickr
You can see that this let me run the nose piece at its longest length, which means less stress on all parts.
Once I was satisfied with the length, I finished the project by painting the whole thing black:
20230426_144803 by Bryan Wyatt, on Flickr
The last addendum was to modify the top boot. Well, actually, I didn't have to modify anything. I had already taken out one of the stitches to allow my boot to fit with the roll bar, and aside from stretching pretty hard, the boot fits with the bikini with no issues!
20230420_103938 by Bryan Wyatt, on Flickr
20230420_103947 by Bryan Wyatt, on Flickr
Demon I Am (07-14-2023),HarryB (07-06-2023),MaRcOp01o (07-06-2023),Martin (07-05-2023)
The top looks great, Bryan! Good work.
Free (child) labor for the win ;)

Nice work sir, I never knew ProjectG had an adjustable nose fitting, that was my main hurdle with that setup, wish they still made those, that looks amazing
I wish the EZ Brace still existed. It would have certainly been the most convenient setup. The Vernie piece has held up just fine, though, so far. I'm also impressed by JB Weld's structural capability because you have to have that center brace TIGHT to keep the header bar flush. Being able to custom fit it does make things a lot easier. I can do a video sometime if you guys want to see how I get it on and off sometime.
Turns out I'll have some time to do that because I picked up a lag bolt about the thickness of my finger as I was turning into my street yesterday...
Well, crap. by Bryan Wyatt, on Flickr
 Posting Permissions

 Reply With Quote