Page 1 of 2 12 LastLast
Results 1 to 15 of 16

Thread: Catalytic converter gasket

  1. #1
    2,000 rpm - light wheelspin, no bog here! moerdogg's Avatar
    Drives
    1992 Smurf
    Location
    Salem, MA
    Join Date
    Jan 2012
    Posts
    116
    Thanks Given
    0
    Thanked 1 Time in 1 Post

    Catalytic converter gasket

    Reader's Digest/ADD version: How do I make sure the catalytic converter gasket seals properly? Hey look, something shiny!

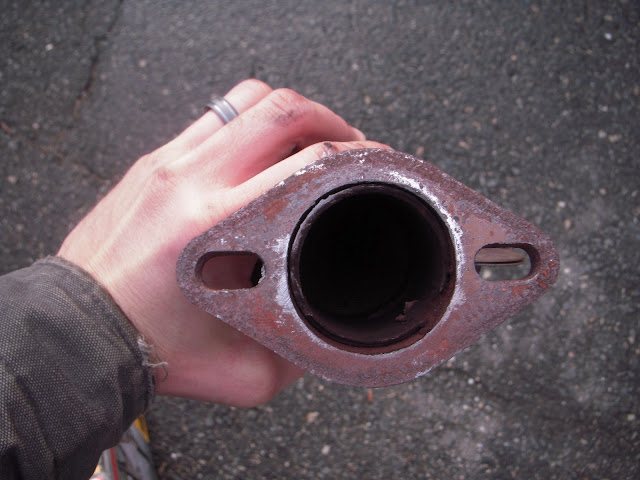
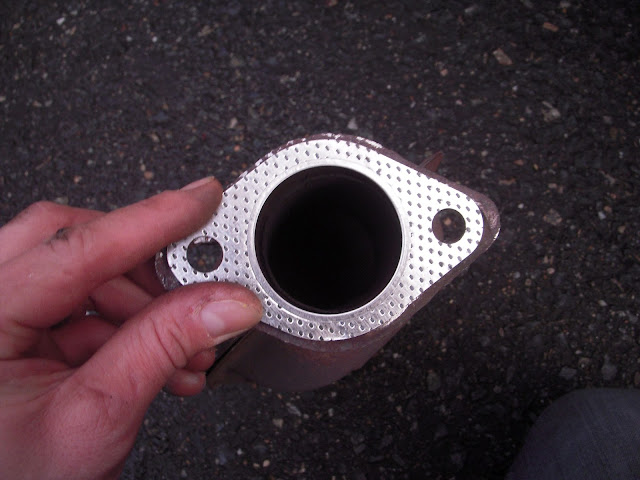
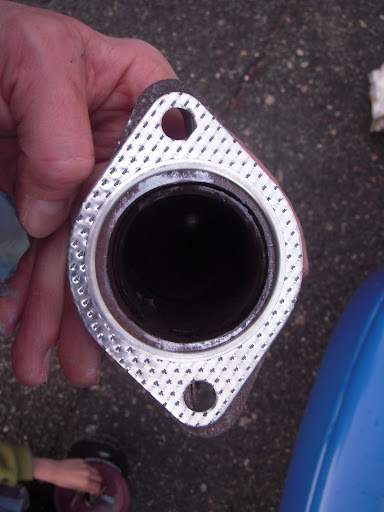
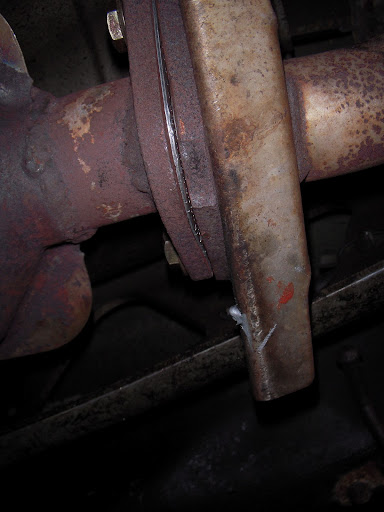
    Full version: Last year I pulled my header out to try and fix some heat shield rattling. When I re-installed, gave the flange surfaces at the cat a scrub with a wire brush and then put in a new gasket. Turns out I hadn't cleaned it off nearly well enough, there were exhaust gases pouring out of the joint. I ended up getting in there with a screwdriver and chipping away old gasket chunks. Then I tightened the bejesus out of the bolts and re-used the "new" gasket. That got the leak down to a very low level, but it's still there. I've put up with it for a little while, but I have my inspection coming up and would like to avoid flunking. Plus, I'm kind of anal-retentive. I pulled out the cat this weekend and took a bastard file to both flanges. The faces are clean now, and I purchased new hardware. Any other suggestions for making sure I don't get leaks? I saw one how-to that suggested hi-temp permatex sealant. Anyone use that with success? I have the orange stuff that is pretty robust, but I'm not sure it's rated for exhaust temps. I thought the gaskets themselves should be capable of sealing, but if the flanges are distorted from 20 year of heat/cool cycles, maybe they need a little something extra.

    If it helps, the car is a 1992, 1.6L.

  2. #2
    5,000 rpm - there be torque here! WASABI's Avatar
    Drives
    1991 British Racing Green
    Location
    Amesbury, MA
    Join Date
    Dec 2011
    Posts
    3,864
    Thanks Given
    6,206
    Thanked 1,464 Times in 795 Posts
    Are you running a stock set up? When I have done it...one of many times (8 or 9), I have found that there is some wiggle room for the gasket. I always try my best to center it with my fingers as I tighten the bolts. I wouldn't use the orange gasket stuff, it's a temporary fix at best, as it will eventually work it's way out...ask me how I know!!!

    I know that there are many different types/materials of gaskets, so I would look for one that has some dimension to it that you can squish down as you tighten it up.

    Good luck,

    -Jim

  3. #3
    5,000 rpm - there be torque here! psulja's Avatar
    Drives
    1999 Twilight Blue/1991 Mariner Blue
    Location
    Windsor, Ontario
    Join Date
    Mar 2011
    Posts
    2,583
    Thanks Given
    62
    Thanked 237 Times in 158 Posts
    I think if your flanges are clean and you have a new gasket you should be fine.

    I've also heard of using the sealant to make sure you don't get any leaks from a friend and he says it works great. I haven't gotten into a situation where I couldnt get the exhaust to seal with just a new gasket and clean flanges so I haven't had to use it yet.

    You can always put it together with the new gasket and cleaned flanges and see if it leaks. If it leaks try again with the silicone sealant.
    Paul | IG- @psulja
    Build thread:
    1991 Mariner Blue - Built 1.8 swap, EFR, Fab9Tuning, Tii drivetrain

  4. #4
    5,000 rpm - there be torque here! psulja's Avatar
    Drives
    1999 Twilight Blue/1991 Mariner Blue
    Location
    Windsor, Ontario
    Join Date
    Mar 2011
    Posts
    2,583
    Thanks Given
    62
    Thanked 237 Times in 158 Posts
    Quote Originally Posted by WASABI View Post
    I know that there are many different types/materials of gaskets, so I would look for one that has some dimension to it that you can squish down as you tighten it up.
    I think the oem type gaskets are pretty good, I think they are pretty much a ring that crushes as you tighten to make sure it is fully sealed. I posted a pic of one in my how to thread for an NC muffler. I forget if they are the same/would work. Worth a look.
    Paul | IG- @psulja
    Build thread:
    1991 Mariner Blue - Built 1.8 swap, EFR, Fab9Tuning, Tii drivetrain

  5. #5
    2,000 rpm - light wheelspin, no bog here! moerdogg's Avatar
    Drives
    1992 Smurf
    Location
    Salem, MA
    Join Date
    Jan 2012
    Posts
    116
    Thanks Given
    0
    Thanked 1 Time in 1 Post
    Quote Originally Posted by psulja View Post
    I think the oem type gaskets are pretty good, I think they are pretty much a ring that crushes as you tighten to make sure it is fully sealed. I posted a pic of one in my how to thread for an NC muffler. I forget if they are the same/would work. Worth a look.
    Great how-to! The OEM one looks like a spiral-wound gasket, those things are pretty nice. Based on what I pulled out, I am using the same as OEM on the older models, which looks like the dimpled sheet one you didn't like. My exhaust pipes don't have that piloting feature, so it would be very difficult to get the round gasket centered during install. The dimpled sheet I have at least has a ring on the ID. I'll try to take some pics and post up tonight.

    Quote Originally Posted by WASABI View Post
    Are you running a stock set up? When I have done it...one of many times (8 or 9), I have found that there is some wiggle room for the gasket. I always try my best to center it with my fingers as I tighten the bolts. I wouldn't use the orange gasket stuff, it's a temporary fix at best, as it will eventually work it's way out...ask me how I know!!!
    Stock header and muffler, not sure about the cat. I thought it was stock, but the exit end of the cat doesn't quite look like the right diameter for the gasket I got. The gasket is much larger in ID than the pipe. Again, I'll try to take some pics to illustrate.

  6. #6
    5,000 rpm - there be torque here! psulja's Avatar
    Drives
    1999 Twilight Blue/1991 Mariner Blue
    Location
    Windsor, Ontario
    Join Date
    Mar 2011
    Posts
    2,583
    Thanks Given
    62
    Thanked 237 Times in 158 Posts
    Quote Originally Posted by moerdogg View Post
    Great how-to! The OEM one looks like a spiral-wound gasket, those things are pretty nice. Based on what I pulled out, I am using the same as OEM on the older models, which looks like the dimpled sheet one you didn't like. My exhaust pipes don't have that piloting feature, so it would be very difficult to get the round gasket centered during install. The dimpled sheet I have at least has a ring on the ID. I'll try to take some pics and post up tonight.
    Oh too bad.. Well I guess you just need to get it centered as much as possible and check for leaks, if you have a minor leak try to loosen, reposition, and retighten. Good luck!
    Paul | IG- @psulja
    Build thread:
    1991 Mariner Blue - Built 1.8 swap, EFR, Fab9Tuning, Tii drivetrain

  7. #7
    2,000 rpm - light wheelspin, no bog here! cjsafski's Avatar
    Join Date
    Jan 2012
    Posts
    128
    Thanks Given
    0
    Thanked 1 Time in 1 Post
    On my volvo I just use red rtv by itself. As long as the flanges are fairly flat this seems to work well.
    1996 Montego Blue: Homebrew M62 Supercharger, MS2, rx7 460's, Tein Flex 9/6, 15x8 6ULs
    http://mazdaroadster.net/showthread....upercharged-NA
    1993 Volvo 940: b230ft with 16v, MS2, 57 Trim T3/T4, Yoshifab Intake Manifold, Ebay Intercooler , 3" Exhaust, Cut Springs

  8. #8
    5,000 rpm - there be torque here! WASABI's Avatar
    Drives
    1991 British Racing Green
    Location
    Amesbury, MA
    Join Date
    Dec 2011
    Posts
    3,864
    Thanks Given
    6,206
    Thanked 1,464 Times in 795 Posts
    Quote Originally Posted by cjsafski View Post
    On my volvo I just use red rtv by itself. As long as the flanges are fairly flat this seems to work well.
    It doesn't dry out, crack, and fall out? Mine did! I used in conjunction to the gasket, and after a year or so of hard driving (daily driver) I noticed it getting loud. When I checked on it, I saw the gasket but little sealant left.

    -Jim

  9. #9
    2,000 rpm - light wheelspin, no bog here! cjsafski's Avatar
    Join Date
    Jan 2012
    Posts
    128
    Thanks Given
    0
    Thanked 1 Time in 1 Post
    The flanges on my volvo are fairly new so they seal ok on their own. Also I tend to remove the exhaust more than once a year since I keep changing turbo sized on it. So the rtv is always fairly fresh.
    1996 Montego Blue: Homebrew M62 Supercharger, MS2, rx7 460's, Tein Flex 9/6, 15x8 6ULs
    http://mazdaroadster.net/showthread....upercharged-NA
    1993 Volvo 940: b230ft with 16v, MS2, 57 Trim T3/T4, Yoshifab Intake Manifold, Ebay Intercooler , 3" Exhaust, Cut Springs

  10. #10
    2,000 rpm - light wheelspin, no bog here! moerdogg's Avatar
    Drives
    1992 Smurf
    Location
    Salem, MA
    Join Date
    Jan 2012
    Posts
    116
    Thanks Given
    0
    Thanked 1 Time in 1 Post
    Okay, so some minor (well, major) frustration at this point. I cleaned up the flanges:

    Inlet
    DSCN1600.JPG

    Outlet


    And I cleaned up the mating flanges (not shown)

    Added the Gaskets
    Inlet


    Outlet


    The I bolted everything together:
    Inlet


    Outlet


    Aaand, it leaks like a damn sieve. I would have been far better leaving it alone. WTF am I doing wrong here? I got to the point on the outlet flange where I'm moderately sure I stripped the threads on the nut. It doesn't seem like it should be this difficult, but maybe that's the nature of 20-y-o exhaust flanges.

    \rant

  11. #11
    2,000 rpm - light wheelspin, no bog here! moerdogg's Avatar
    Drives
    1992 Smurf
    Location
    Salem, MA
    Join Date
    Jan 2012
    Posts
    116
    Thanks Given
    0
    Thanked 1 Time in 1 Post
    Should have started with: thanks for the great replies, I really appreciate the forum support!

    Too frustrated to think straight at the moment.

  12. #12
    5,000 rpm - there be torque here! WASABI's Avatar
    Drives
    1991 British Racing Green
    Location
    Amesbury, MA
    Join Date
    Dec 2011
    Posts
    3,864
    Thanks Given
    6,206
    Thanked 1,464 Times in 795 Posts
    Interesting, I encountered a similar situation when I first did mine. The flanges were never really flat, even though they were clean. I ended up grinding/filing them down first, and I believe, at one point I used two gaskets, just so there would be enough mass to take up the void when I squished everything together, tightening it up. Realistically I would love to get a 1/4 inch thick gasket. That would solve the problem.

    I have since, bought a new cat, and new header, and since the Borla was pretty new, everything goes together fine now. Good luck with yours.

    -Jim

  13. #13
    2,000 rpm - light wheelspin, no bog here! moerdogg's Avatar
    Drives
    1992 Smurf
    Location
    Salem, MA
    Join Date
    Jan 2012
    Posts
    116
    Thanks Given
    0
    Thanked 1 Time in 1 Post
    Jim - Thanks, I'll give the two-gasket method a try. Throwing wrenches didn't seem to seal any of the leaks

  14. #14
    5,000 rpm - there be torque here! psulja's Avatar
    Drives
    1999 Twilight Blue/1991 Mariner Blue
    Location
    Windsor, Ontario
    Join Date
    Mar 2011
    Posts
    2,583
    Thanks Given
    62
    Thanked 237 Times in 158 Posts
    i used to think it does, and then i lost a couple wrenches and sockets and realized it wasn't working.

    Goodluck getting it sorted out, I know how frustrating it can be when things just won't seal up.
    Paul | IG- @psulja
    Build thread:
    1991 Mariner Blue - Built 1.8 swap, EFR, Fab9Tuning, Tii drivetrain

  15. #15
    Ninja Messiah kung fu jesus's Avatar
    Drives
    1999 White
    Location
    Atlanta, GA
    Join Date
    Dec 2011
    Posts
    15,852
    Thanks Given
    2,791
    Thanked 7,202 Times in 3,433 Posts
    Those look like the wrong sized gaskets. The first pic looks like the gasket is in the exhaust stream, which it shouldn't. You may want to sand those flanges flat, too, looks like there is still stuff on the mating surfaces.

    Sometimes those flanges warp. Pro tip to check: put a sheet of sandpaper on a known flat surface, like a piece of glass or countertop. lay the flange onto the sandpaper flush. move the cat with the flange flat on the sandpaper in a circular or figure 8 pattern. Do this for about a minute. Look at the flange for high/low spots. Continue until the entire suface looks flat, unless you have big low spots on the holes of the flange (warped).

Page 1 of 2 12 LastLast

Posting Permissions

  • You may not post new threads
  • You may not post replies
  • You may not post attachments
  • You may not edit your posts
  •