Page 1 of 2 12 LastLast
Results 1 to 15 of 25

Thread: How-To: 99-00 Bi-Xenon Headlight Retrofit

  1. #1
    Super Moderator RotorNutFD3S's Avatar
    Drives
    '99 Brilliant Black Turbo
    Location
    Newnan, GA
    Join Date
    Dec 2011
    Posts
    1,885
    Thanks Given
    2,464
    Thanked 1,473 Times in 698 Posts

    How-To: 99-00 Bi-Xenon Headlight Retrofit

    This is a relative easy and inexpensive project to complete, however it does take some time and patience to do it properly. I highly recommend that you handle the parts while wearing latex gloves, especially the projector shrouds or any of the chrome pieces. They easily pick up oily fingerprints and when cleaned improperly, can lightly scratch, leaving a hazed finish.

    This setup is easy to complete (no cutting or modification to the housings or projectors required) and the parts are relatively inexpensive while being of very good quality.

    * I assume no responsibility for you screwing up your headlights, getting pulled over, or any other problematic issues you may encounter.

    For this project I'm using Morimoto Mini H1 Bi-Xenon projectors (with Mini Gatling shrouds) from theretrofitsource.com. These projectors have low-beam/high-beam capability and include parts to make the retrofit a mostly bolt-in affair.

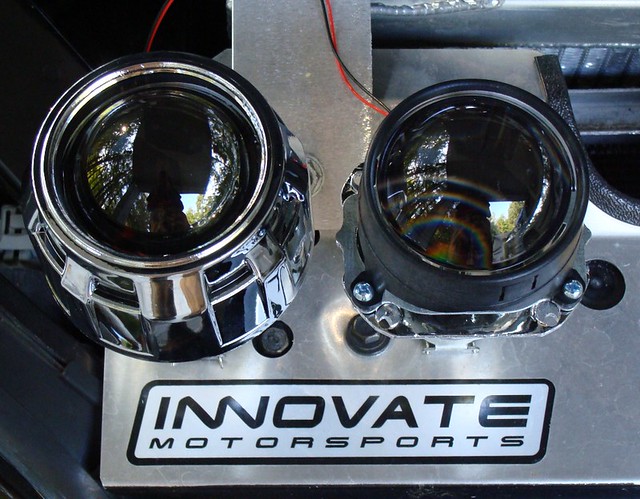
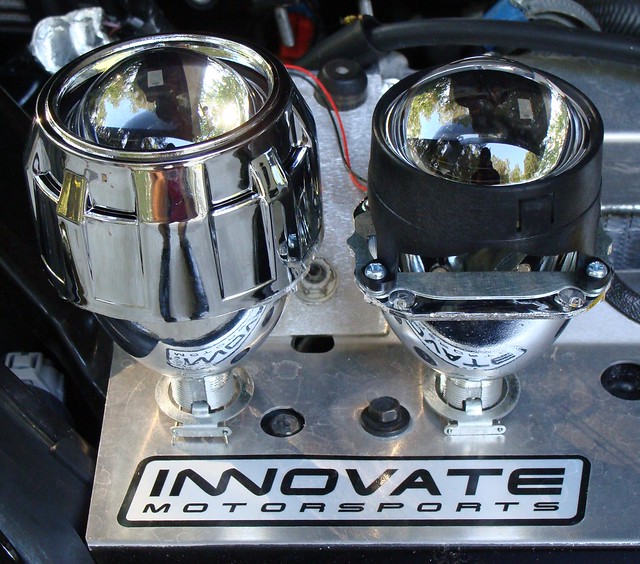
    First, we have the projectors:


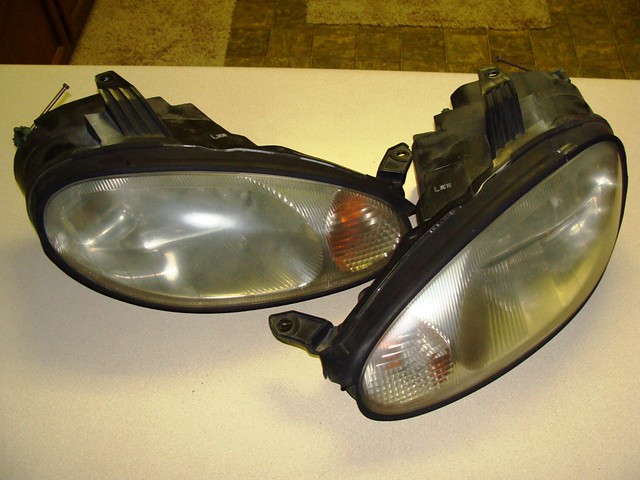
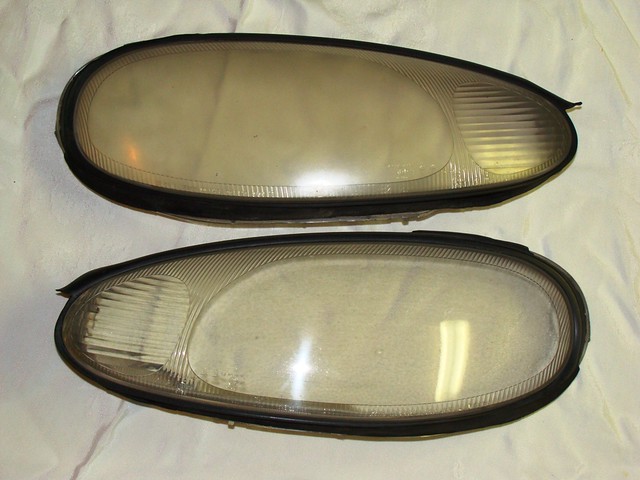
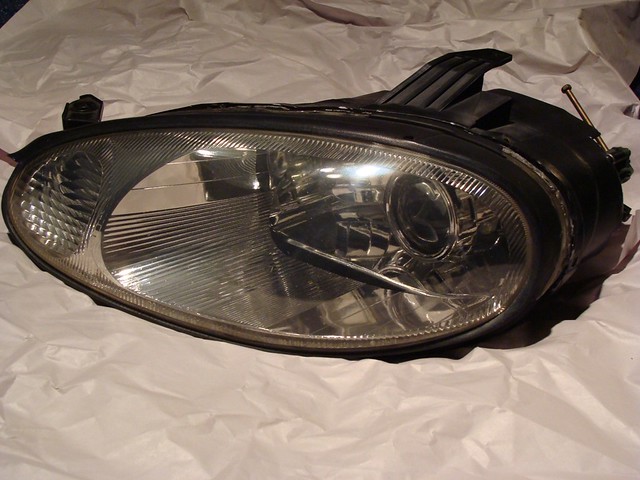
    Then we have our donor headlight assemblies: remove the rubber boot, bulbs, and unscrew/remove the clip that holds the main bulb in place:


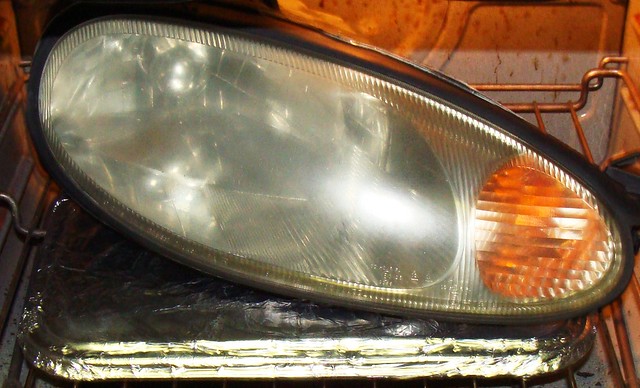
    Preheat the oven to 220°, while it's warming up, prepare a cookie pan by covering it with aluminum foil (helps prevent the pan from stinking of burnt plastic, although no odor is really produced). Place the headlight in the oven for 10-12 minutes, I found it worked best to use the rack in the middle. Time will depend on your oven obviously, less time is better.


    Put on a pair of soft leather or vinyl gloves and remove the headlights from the oven. Carefully use a flat head screwdriver and pry the lens from the housing, too hard and you'll damage the housing or lens, they're plastic so they get soft when hot. If the housing doesn't want to come apart easily, put it in the oven for a couple more minutes. When it's at the proper heat it will come apart easily with just a little assistance with a screwdriver. The sealant will stretch as you pull the two pieces apart, just let it break, making sure that the sealant doesn't get on the lenses. (Reinstalling the lenses is the opposite of these steps, heat and push back together, but we'll get to that later.)


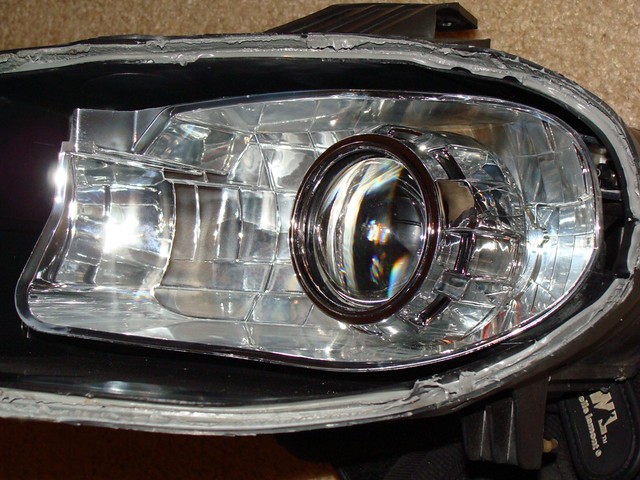
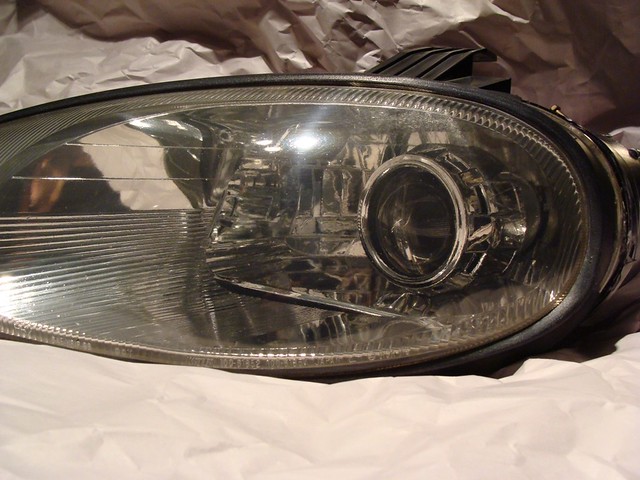
    After removing the reflector lens (it's clipped in) I loosely mounted the projectors in the housing to see what things will look like:


    My donor headlight lenses were a little foggy so I started some polishing work on them (3M Restoration Kit, goes in your drill, works really well):


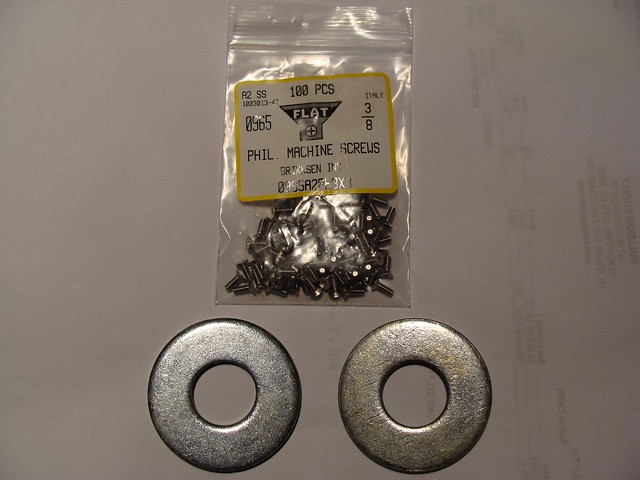
    Here's the hardware you'll need: very small M3x8mm flat-topped Philips head machine screws (in stainless) and 7/8" fender washers. The fender washers sit between the projector and the headlight reflector and seat the projector in the correct position. The screws hold the bulb retainer in place and need to be flat-topped so the bulb can be installed properly.


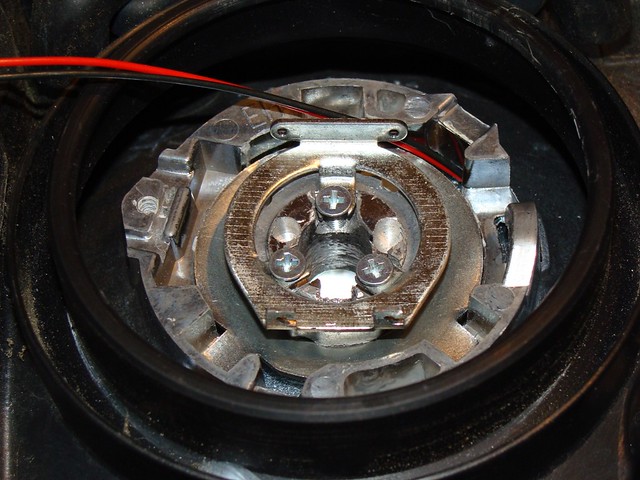
    The provided H4 adapter ensures that your projector is straight and level. Here's the back side with the hardware installed (note: the top of the screws may end up being slightly above the bulb mount platform, this is ok):


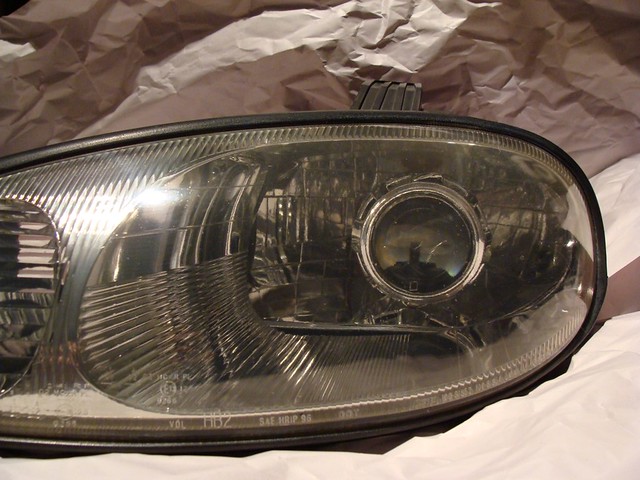
    So now your headlights should look something like this (lens on loosely):


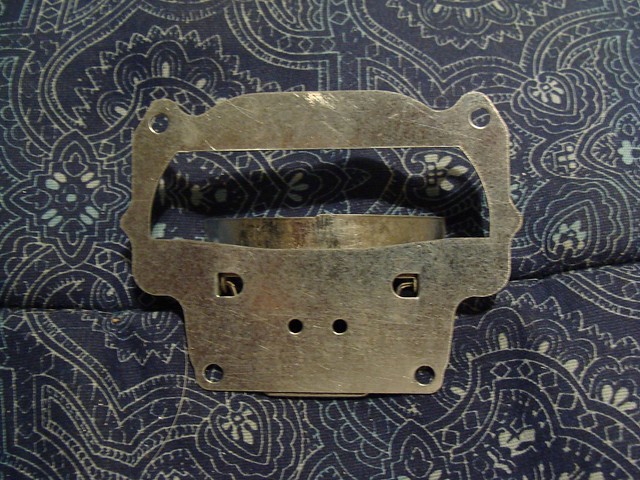
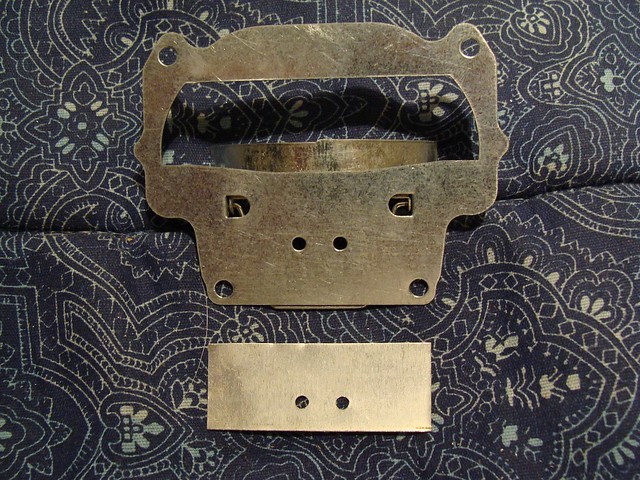
    Here are a couple modifications you should do and are recommended by some on HIDPlanet, but are not required (As of 12/2011: I was in The Retrofit Source's new store here in Atlanta the other day and they say these modifications are no longer needed with the newest offering of these projectors, so if you're the type to do things for peace of mind you might find yourself doing them anyway). First here's the cutoff shield as sent by TRS (make sure you do not ruin or change the bend in the actual cutoff shield):


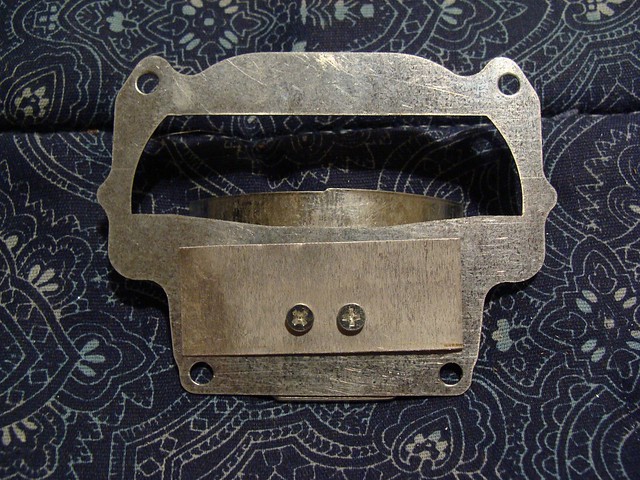
    Notice that there are 2 "D" shaped holes in the shield, these will throw some light up into the air, so if little things like that bother you, get some aluminum flash and make a block-off plate:


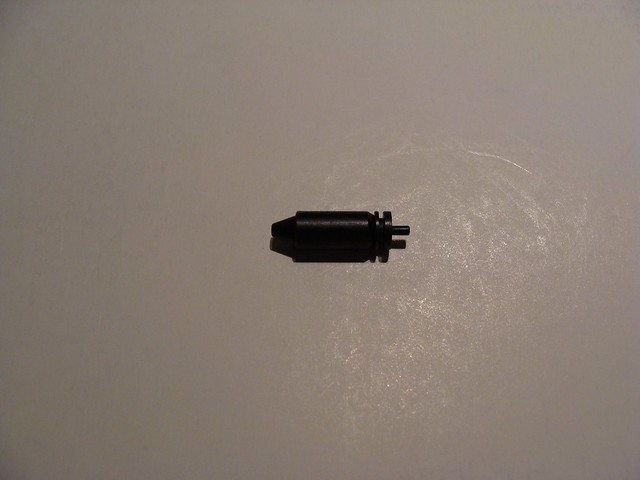
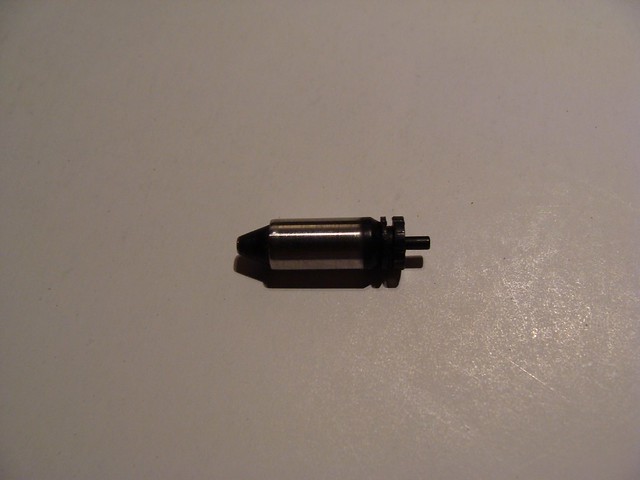
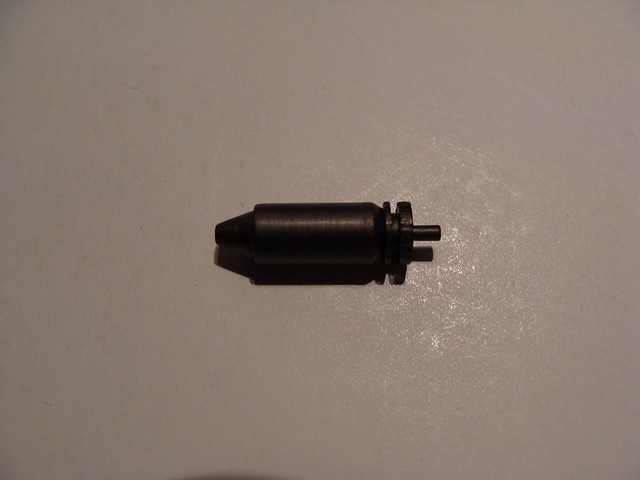
    Some people reported that most of the Gen I solenoids and some of the Gen II solenoids were sticking when alternating between low beams and high beams, (these projector units are Gen II and Gen III just came out), but preventative measures never hurt. Here's the solenoid plunger as sent:


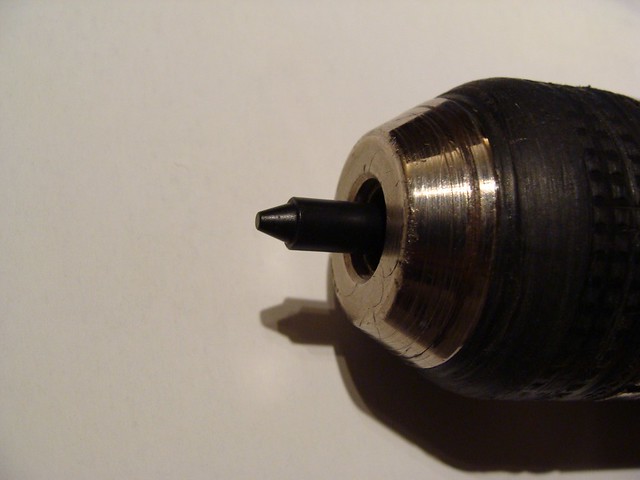
    Get your drill, both medium and fine grit sandpaper, and sand the tip just a bit, careful not to take too much material off:


    Then spray with graphite lube (which is for high-temp use, good here since HIDs create a ton of heat):
    I've got a lot less horsepower - luckily they are Japanese horses - usually in better shape and more motivated.

  2. #2
    Super Moderator RotorNutFD3S's Avatar
    Drives
    '99 Brilliant Black Turbo
    Location
    Newnan, GA
    Join Date
    Dec 2011
    Posts
    1,885
    Thanks Given
    2,464
    Thanked 1,473 Times in 698 Posts
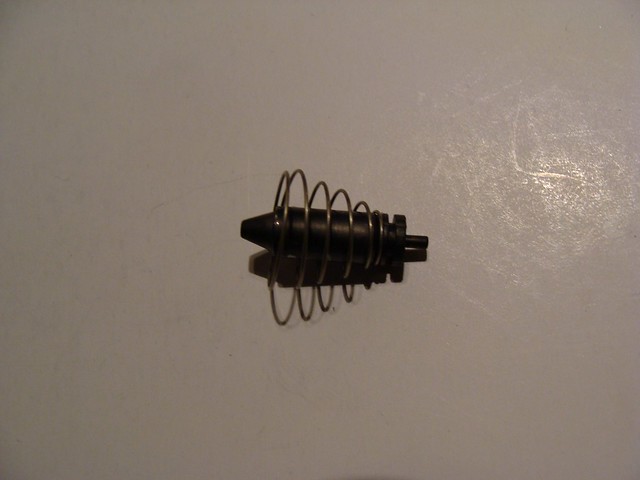
    Then reinstall the spring, after making sure to stretch it out some as well:


    Then reassemble everything. Basically put the fender washer in place behind the projector, put that into the headlight assembly, and tighten that down from the back with the threaded ring that came with the projector. Don't crack the reflector in the headlight assembly, but definitely get things very snug. (It wouldn't be a bad idea to use loctite here either, but I actually didn't and they've held up just fine.) Then the bulb holder goes into place.


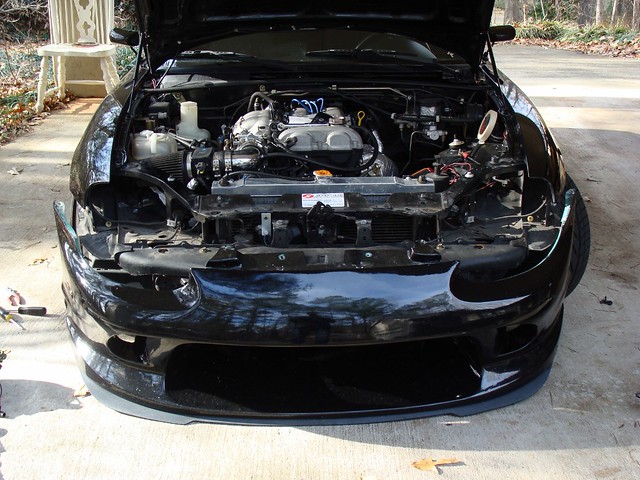
    Now, tear the front end off the car...


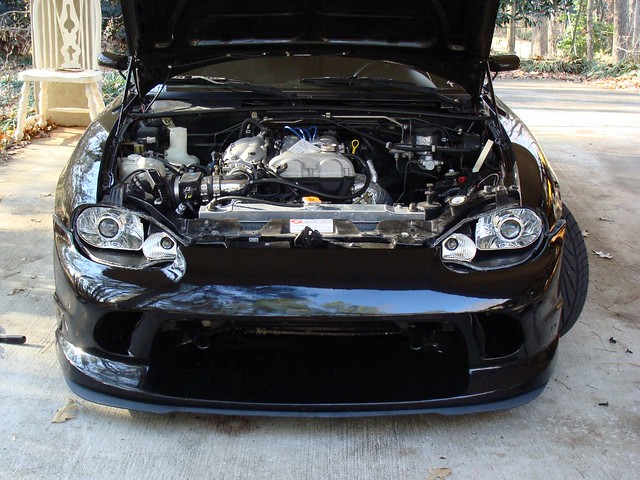
    ...and install the new headlights. The bumper is just loosely mounted and the lenses are not on the lights, so ignore the gaps and fitment.


    Here, the lenses are loosely mounted to see how the final product will look (I like these headlights a lot more without the amber cover for the turn signals):


    And here's the cutoff after installation, looks like this will work well when it's completed and adjusted properly:


    I personally didn't like how the shrouds I had attached to the projectors. They clipped on in three places, were hard to clip on, and seemed to pop off easily. People on HIDPlanet suggest using JB Weld, high temp silicone, or other methods to ensure they stayed on. I wasn't a fan of that, especially when it would be difficult to fix should one of those methods fail. However the most recent generation of these projectors include a revised shroud that attaches via four screws in existing holes in the projector, which is a lot more secure. I exchanged the current shrouds for the new style. I also took the easy way out and asked for a relay harness too, complete PnP.

    Old vs. New:


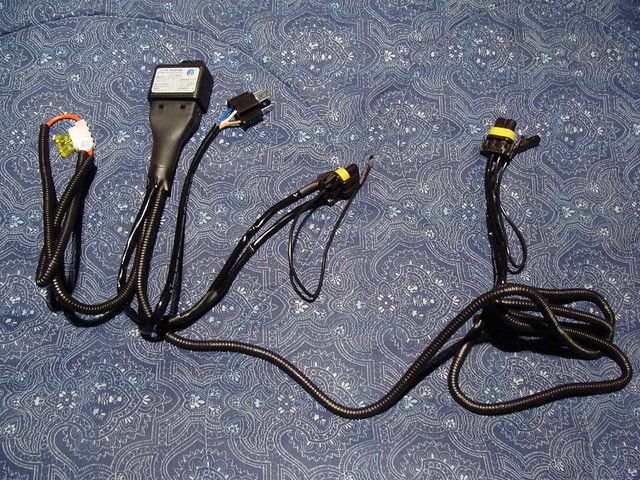
    Relay Harness for complete control over HIDs and bi-xenon solenoids:


    New shrouds installed, definitely a much better design for keeping them in place:


    Time to seal the rear rubber bulb cover. It's easy, stack three 5/8" rubber washers (find them on the plumbing aisle) onto the back of each bulb and then pop the cover into place:


    So now your headlights are ready to go back onto your car (check them one more time with the lenses off to make sure everything is still ok, such as having level cut off lines).


    After checking everything, return to the oven and bake the headlights back together. Loosely apply the lenses to the headlights and place one assembly at a time in the oven for 10-12 minutes. Then remove the assembly and push it together as firmly as you can. Be careful where you push as the plastic is now very soft. If you can't get it back together all the way, simply put it back in the oven for a few more minutes. Adding more sealant is not necessary.

    My relay is mounted on the passenger side behind that headlight and the main power source for the relay was taken from the fuse block up near the firewall. If you unbolt the box, there's a large red w/ black stripe wire that carries 12v+ when the key is in any position and that's the wire I used. Each ground wire is bolted to the ground distribution block underneath each headlight. Everything else simply plugs in.

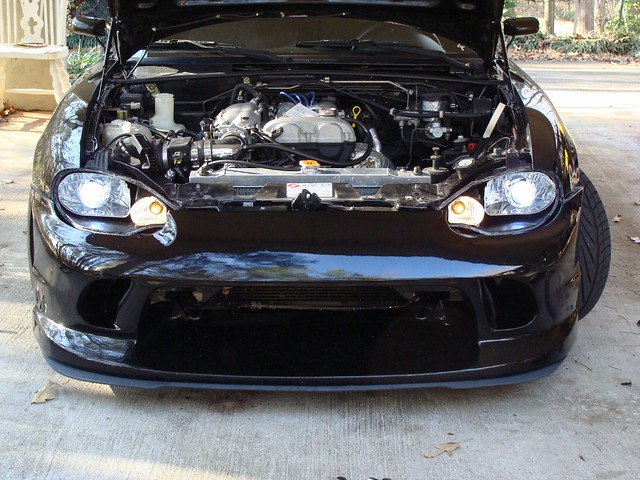
    I mounted the "slim" HID ballasts under each headlight to the flat portion of the car's body that's in the turn signal area, so this is all the wiring that you can see (excuse the daily-driver dirtiness):


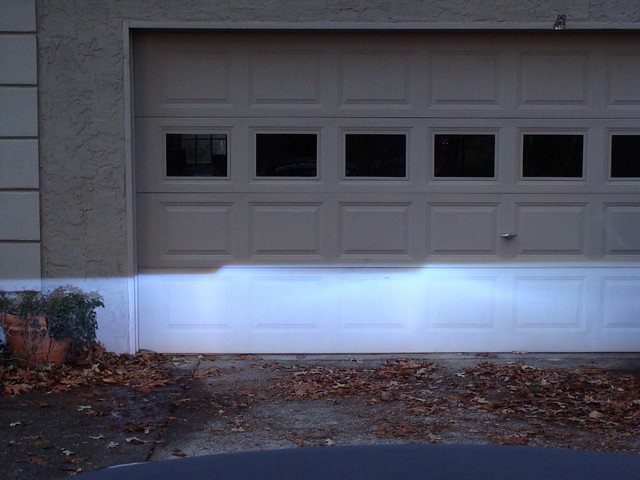
    Didn't have much light left for this, sorry for the blurry photo:


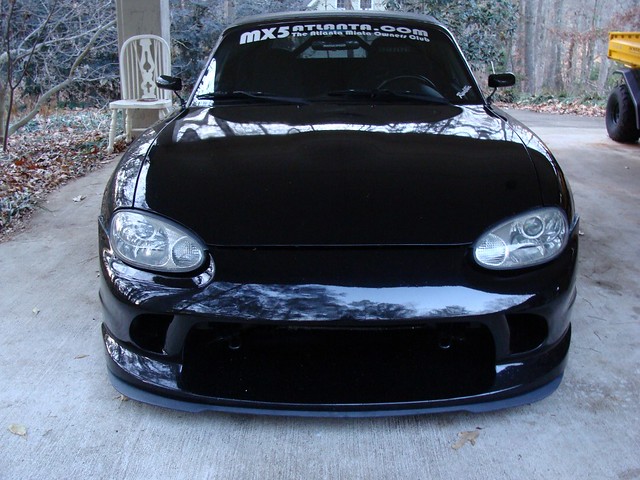
    And this is just a shot of my 4300k HIDs on at night:


    I still have yet to take some photos showing the cutoff line at a distance and the high beams, however, the cutoff is very sharp and the brights definitely do their job. This is a huge improvement over the halogen setup and I prefer these over swapping to NB2 assemblies.

    Good luck! Feel free to ask any questions as well!
    I've got a lot less horsepower - luckily they are Japanese horses - usually in better shape and more motivated.

  3. #3
    1,000 rpm - releasing the clutch Cny's Avatar
    Drives
    Silver 2000
    Location
    Slapping criminals in Western NY
    Join Date
    Jan 2012
    Posts
    92
    Thanks Given
    0
    Thanked 0 Times in 0 Posts
    This is something I really want to do myself or pay someone to do, lol because I am pretty lazy with my free time since my son came along.
    S/C'd 93 1.6......my other wife, the Old love
    00 1.8............the current sammich maker


    Quote Originally Posted by adamvanxxx View Post
    Hang out with CNY, by far the COOLEST dude I have ever met off of the internet.

    Cause he didn't rape me.

  4. #4
    2,000 rpm - light wheelspin, no bog here! phrenetiK's Avatar
    Location
    Houston, TX
    Join Date
    Jan 2012
    Posts
    180
    Thanks Given
    0
    Thanked 0 Times in 0 Posts
    fellow retrofit buddy


    do you have any idea where moisture would be coming in from though? i have rebaked them open 3 times and even added more sealant and I still get it.

  5. #5
    Individual-1 ☚ ☻ ☛ Agent☣Orange's Avatar
    Location
    🍊SWFL🏝
    Join Date
    Apr 2010
    Posts
    21,593
    Thanks Given
    4,766
    Thanked 4,321 Times in 2,545 Posts
    Aww yeeeah. Been waiting for this. Sub'd! Thank you RotorNut.

  6. #6
    Super Moderator RotorNutFD3S's Avatar
    Drives
    '99 Brilliant Black Turbo
    Location
    Newnan, GA
    Join Date
    Dec 2011
    Posts
    1,885
    Thanks Given
    2,464
    Thanked 1,473 Times in 698 Posts
    Quote Originally Posted by phrenetiK View Post
    do you have any idea where moisture would be coming in from though? i have rebaked them open 3 times and even added more sealant and I still get it.
    I can't tell from your picture if those are the same projectors I used or not, but the place that comes to mind immediately is the gap that's left at the rear of the housings where the projectors and bulbs were inserted, did you happen to seal that area up? That's where I used the orange rubber washers and the OEM boot. Also, are the air vents still intact with their covers (a couple with rubber tubes IIRC)? Since it sounds like the lenses are well sealed to the housings, I'm thinking the problem is somewhere on the back of the housings.
    I've got a lot less horsepower - luckily they are Japanese horses - usually in better shape and more motivated.

  7. #7
    2,000 rpm - light wheelspin, no bog here! phrenetiK's Avatar
    Location
    Houston, TX
    Join Date
    Jan 2012
    Posts
    180
    Thanks Given
    0
    Thanked 0 Times in 0 Posts
    rubber air drains are intact still, but the boot at the rear of the housings is exposed i believe. brb going to check. i did notice that when reading your write up. oh and yes we are using the same projectors and i had the same problem with the shrouds not sticking even with high temp silicone they fell off again so i just took them out.

  8. #8
    2,000 rpm - light wheelspin, no bog here! phrenetiK's Avatar
    Location
    Houston, TX
    Join Date
    Jan 2012
    Posts
    180
    Thanks Given
    0
    Thanked 0 Times in 0 Posts
    I sent mx-p5 the old headlights back so I'm not sure where to source a boot now...but looks like i need one..


  9. #9
    Super Moderator RotorNutFD3S's Avatar
    Drives
    '99 Brilliant Black Turbo
    Location
    Newnan, GA
    Join Date
    Dec 2011
    Posts
    1,885
    Thanks Given
    2,464
    Thanked 1,473 Times in 698 Posts
    Quote Originally Posted by phrenetiK View Post
    rubber air drains are intact still, but the boot at the rear of the housings is exposed i believe. brb going to check. i did notice that when reading your write up. oh and yes we are using the same projectors and i had the same problem with the shrouds not sticking even with high temp silicone they fell off again so i just took them out.
    Yeah, definitely check that, if the bulb area is still exposed that's likely your culprit.

    I hated those shrouds, they were very smart to change the design and I was glad I didn't have to use the old version shroud. Just FYI, you can order the screw-on type shrouds if you wanted to, they work with the earlier gen Mini-H1 projectors.

    I'll be pulling this setup out at some point, I went up to TheRetrofitSource's new shop here in Atlanta in mid-December and for some reason walked out with the newest gen Mini H1 with the clear/graphite shrouds and angel eyes. lol

    Quote Originally Posted by phrenetiK View Post
    I sent mx-p5 the old headlights back so I'm not sure where to source a boot now...but looks like i need one..
    Yeah, that'll do it. Check with PartsGroup or Panic Motorsports, I bet either of them have them.
    I've got a lot less horsepower - luckily they are Japanese horses - usually in better shape and more motivated.

  10. #10
    2,000 rpm - light wheelspin, no bog here! phrenetiK's Avatar
    Location
    Houston, TX
    Join Date
    Jan 2012
    Posts
    180
    Thanks Given
    0
    Thanked 0 Times in 0 Posts
    the funny part is this kit was ordered from them less than 2 months ago. i wanted angel eyes by my roommate with a beamer wouldn't let me and said it was too ricer :[

  11. #11
    Super Moderator RotorNutFD3S's Avatar
    Drives
    '99 Brilliant Black Turbo
    Location
    Newnan, GA
    Join Date
    Dec 2011
    Posts
    1,885
    Thanks Given
    2,464
    Thanked 1,473 Times in 698 Posts
    That's odd, I did my retrofit in late 2010 and that's when they switched to sending the screw-on type shrouds. They said I got one of the last orders with the clip on type and happily exchanged them. Did you get the kit from TRS and send it to MattV or did he provide the kit? lol @ your roommate, I've had one person tell me that too, but the whole angel eye thing has really died out where I am (unless it's OEM) so I'm ok with it.
    I've got a lot less horsepower - luckily they are Japanese horses - usually in better shape and more motivated.

  12. #12
    2,000 rpm - light wheelspin, no bog here! phrenetiK's Avatar
    Location
    Houston, TX
    Join Date
    Jan 2012
    Posts
    180
    Thanks Given
    0
    Thanked 0 Times in 0 Posts
    Nah his name is mx-p5 on clubroadster not mattv but he ordered it from TRS. i think it was his first NB retrofit which might explain the lack of the boot and even not knowing the shrouds were screw in. i will check and make sure they have no holes or anything that can be screwed in but i don't recall them having clips either.

  13. #13
    Super Moderator RotorNutFD3S's Avatar
    Drives
    '99 Brilliant Black Turbo
    Location
    Newnan, GA
    Join Date
    Dec 2011
    Posts
    1,885
    Thanks Given
    2,464
    Thanked 1,473 Times in 698 Posts
    My bad, I saw the SN you wrote but I was using a message from Matt as a date reference, I blame it on work. lol To figure the shrouds out, use this picture:


    On the left is the old shroud, there are three clips in those. On the right is the new shroud and it has provisions for four small screws.
    I've got a lot less horsepower - luckily they are Japanese horses - usually in better shape and more motivated.

  14. #14
    Nukuler banned! chiefmg's Avatar
    Location
    N KY
    Join Date
    Jan 2012
    Posts
    1,433
    Thanks Given
    188
    Thanked 1,233 Times in 531 Posts
    I recently did this to mine. I ended up buying the complete retrofit kit from TRS. Initially I had an issue with only having low or high beams. After switching the provided relay harness with one of their newer ones I had no problems (once I swapped over the blue and orange wires in their headlight connector). I currently don't have the high beam indication on the dash, I have an idea how to correct this but I need to look at my wiring diagrams. One thing to note is that if you remove the fuse box, there is a rectangular door on the fender side which accesses a 10mm head bolt which holds positive leads. You can connect the HID positive lead there, no muss no fuss.

  15. #15
    Super Moderator RotorNutFD3S's Avatar
    Drives
    '99 Brilliant Black Turbo
    Location
    Newnan, GA
    Join Date
    Dec 2011
    Posts
    1,885
    Thanks Given
    2,464
    Thanked 1,473 Times in 698 Posts
    Good to know about the +12V bolt hiding back there! Please update if you find a workaround with the high beam indicator, it's the same for me too, but I like I told you I haven't worried about it because it's hard to miss the brights being on out where I am.
    I've got a lot less horsepower - luckily they are Japanese horses - usually in better shape and more motivated.

Page 1 of 2 12 LastLast

Posting Permissions

  • You may not post new threads
  • You may not post replies
  • You may not post attachments
  • You may not edit your posts
  •