Page 74 of 75 FirstFirst ... 2464676869707172737475 LastLast
Results 1,096 to 1,110 of 1120

Thread: This ain't no build thread!

Hybrid View

Previous Post Previous Post   Next Post Next Post
  1. #1
    Nukuler banned! chiefmg's Avatar
    Location
    N KY
    Join Date
    Jan 2012
    Posts
    1,433
    Thanks Given
    188
    Thanked 1,233 Times in 531 Posts
    I see I forgot to go over what I did with the throttle cable. As mentioned I moved it around a little, but it was still having a high idle after driven a bit and things were hot. I popped the hood after a drive and checked, the cable was tight and holding the throttle off the stop. I loosened the cable a bit and fixed that. I will say that apparently Mazda’s idea of 3mm slack and mine differ greatly.

    Today after helping my oldest change his oil (I supervised and gave him grief after he missed the drain pan for the umpteenth time) I ran to Ace and got some more appropriately sized ring terminals so I could redo the one end of the coolant sensor ground wire. Measured the bolt threads and ended up with 3/8” being the size:


    I got the bigger terminal off with no problem, went to put on the smaller one and the fun began. Went through four trying to get them to grab the wire good enough but they kept coming off. Cheap StaKons was the reason, and trying to work in a confined space. Finally got one on, then managed to drop the bolt as I was putting that in. Searched and searched with no luck, finally found it lying on top of the starter. Got that fished out and went to put it in only to have that ring terminal come off. Grrr. After some more gnashing of teeth I got that all done, so now I feel better about it.

    Hoisted her up in the air and went underneath to figure out how I was going to install the heat shield on the exhaust. Found out I should have bought a two foot piece instead of the three foot one. I marked it and then cut it down:


    Not quite cricket but should do for me. I’ll keep an eye on it to make sure it doesn’t start unraveling. Put the hose clamps in and then placed it where I wanted it. I couldn’t place it directly on top of the exhaust due to the location of the O2 sensor but I have it over the section that is closest to the transmission tunnel side. That ended up like so:


    Time will tell how well that works.

    I gave the youngest grandkid his first ride in her, put him in the passenger seat while I was jockeying her around to her place in the garage. He thought that was pretty neat. Of course I had to give him a shot in the hot seat:


  2. #2
    Nukuler banned! chiefmg's Avatar
    Location
    N KY
    Join Date
    Jan 2012
    Posts
    1,433
    Thanks Given
    188
    Thanked 1,233 Times in 531 Posts
    Have just taken a short drive (plus the temps here have dropped) so can’t say yet how the exhaust shielding is working. Nothing fell off at least!

    I ordered one of the Flyin’ Miata shifter insulation kits. Should have bought one during MATG and saved shipping, but oh well. That arrived today so I pulled the center console to install it. My old insulation had seen better days:


    There are no instructions for the kit. The only real question I had was which side to install up? There are four pieces, two with large openings and angles on two sides (for the bottom), and two donuts which lay on top. After looking at the cabin insulation kits FM sells that are the same DEI material, I decided that the white side would be installed down. Slipped the first two pieces on:


    You can put the angled sides however you want, I decided to have them facing to the rear.

    The two top pieces were next:


    I finished up by putting the stock foam cylinder back in the center.

    While I had the console out I did some cleaning and decided to see if I could figure out where I went wrong when I install the new lid a while back. The spring wasn’t functioning correctly and the lid wouldn’t hit the detent that keeps it open. The shop manual was no help so I removed the small metal plate at the back of the hinge area. There is a small plastic piece with two hooks on it, one of the metal piece’s screws go through this piece. I had a look at that and figured that maybe one end of the spring was to go under the hook piece. Reworked that and voila! The problem is when you remove that metal piece and there is tension on the spring, the spring pops out before you have time to see where it went. In any event my lid now jumps a bit from the spring pressure when unlatching it, and it locks open as it should. No pictures because I didn’t have enough hands.

  3. The Following User Says Thank You to chiefmg For This Useful Post:

    Bryan (10-12-2023)

  4. #3
    Nukuler banned! chiefmg's Avatar
    Location
    N KY
    Join Date
    Jan 2012
    Posts
    1,433
    Thanks Given
    188
    Thanked 1,233 Times in 531 Posts
    I’ve been doing some research and thinking about my AFR issues. I finally decided to just swap back to the Innovate MTX-L wideband I was using to see if that fixed things. Did that over the past two days (I was pacing myself ��). Got everything connected, calibrated and fired her up. Started right up and did not see any of the same weirdness with the AFRs bouncing around that I was with the AEM unit. Too her out for a short drive after also swapping to my silver wheels with S-Drives (temps have been lower here and figured I’d go ahead and do that. I don’t mind sliding around but the police don’t seem to like it when your tail is hanging out around a corner). Things seem to be back to normal with none of the problems I was having with idle etc once warm. I’ll be going out for some tuning once I get some other jobs done.

    I did notice a slight coolant leak coming from somewhere underneath on the driver’s side. Couldn’t see it with a cursory look so will have to drop the undertray.

  5. The Following User Says Thank You to chiefmg For This Useful Post:

    Bryan (11-05-2023)

  6. #4
    Super Moderator Bryan's Avatar
    Drives
    '02 Laser Blue Mica
    Location
    Cincinnati, OH
    Join Date
    Dec 2011
    Posts
    6,259
    Thanks Given
    1,040
    Thanked 2,613 Times in 1,406 Posts
    I'm curious how the heat shield and insulation worked out for you. Probably have to give it more time.
    Quote Originally Posted by DazedAndConfused
    I dont know a word you just said, but that **** sounded COOL.

  7. #5
    Nukuler banned! chiefmg's Avatar
    Location
    N KY
    Join Date
    Jan 2012
    Posts
    1,433
    Thanks Given
    188
    Thanked 1,233 Times in 531 Posts
    Given our temps around here now, probably won't be able to really tell until next summer.

  8. The Following User Says Thank You to chiefmg For This Useful Post:

    oldgrayleather (11-06-2023)

  9. #6
    Nukuler banned! chiefmg's Avatar
    Location
    N KY
    Join Date
    Jan 2012
    Posts
    1,433
    Thanks Given
    188
    Thanked 1,233 Times in 531 Posts
    Coolant leak didn’t show up again for a bit so I thought it had maybe migrated from when I did something with the temperature sensor. Of course then it did show up again. Haven’t felt like pursuing that since I’m headed back to work soon.

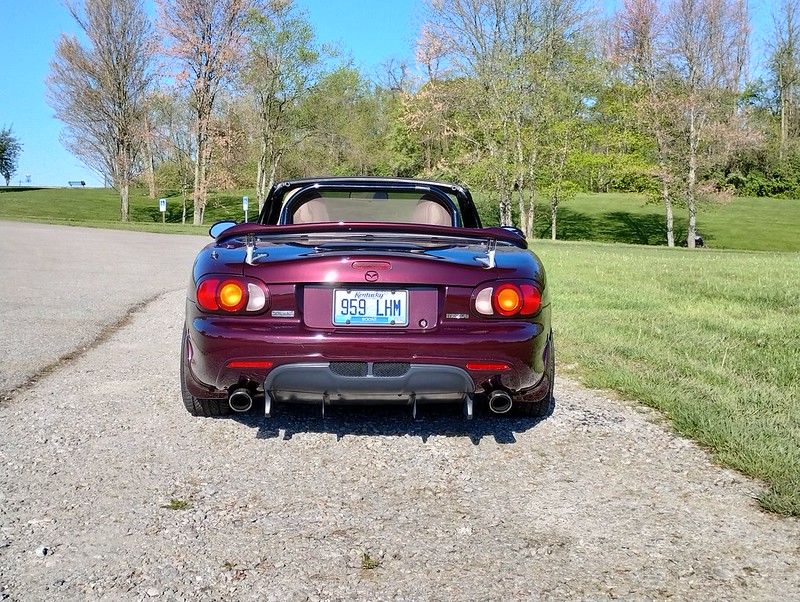
    I did pick up a slightly used Boundary Engineering Stage 1 oil pump, just have to figure out when I will install it. I also just bought a set of extended risers from DCBE Tech for my JDM Mazdaspeed rear spoiler. They will move the spoiler up and back by an inch. Unfortunately those won’t arrive before I leave, so everyone will have to wait until spring for me to install and take pictures of same.

  10. The Following User Says Thank You to chiefmg For This Useful Post:

    Bryan (12-06-2023)

  11. #7
    6,000 rpm - mere mortals would shift HarryB's Avatar
    Drives
    '04 Strato Blue NB2
    Location
    Greece
    Join Date
    Jun 2015
    Posts
    5,944
    Thanks Given
    6,678
    Thanked 2,275 Times in 1,332 Posts
    Guess the easiest way to install the oil pump would be to drop the subframe, which can be done even on jackstands. Bit of a pain to clean/seal when upside down but still easier than pulling the engine.

    And thanks a lot for your business; eager to see the risers on the car!

  12. The Following 2 Users Say Thank You to HarryB For This Useful Post:

    Bryan (12-08-2023),chiefmg (12-09-2023)

  13. #8
    Nukuler banned! chiefmg's Avatar
    Location
    N KY
    Join Date
    Jan 2012
    Posts
    1,433
    Thanks Given
    188
    Thanked 1,233 Times in 531 Posts
    Thanks Harry. That is kind of what I was thinking too, although I'm going to exercise my unused compression tester next time home to see how the internals are holding up. If need be I'll yank the engine and rebuild.

    I'll be sure to provide you with some comparison pictures (you know, in case you don't already have enough!).

  14. The Following User Says Thank You to chiefmg For This Useful Post:

    HarryB (12-12-2023)

  15. #9
    Nukuler banned! chiefmg's Avatar
    Location
    N KY
    Join Date
    Jan 2012
    Posts
    1,433
    Thanks Given
    188
    Thanked 1,233 Times in 531 Posts
    Finally back home. One of the first things I did was to find and open my package with the risers. They were packed very nicely with bubble wrap in between so there was no chaffing. I went with having them powdercoated to match how the factory risers are. After removing the wing and the stock risers, I took a couple of pictures comparing the two risers. See them here:


    It’s easy to see the difference with them side-by-side. I installed the extended risers, the only thing to note was putting the screws into them to connect to the trunk mounts there was some reluctance for the screws to go in. I put this down to a slight reduction in the hole diameter due to the powdercoating of the risers. All I had to do was screw them in as opposed to pushing them straight in. Not a big deal and if I had thought of it I would have run the screws in before I mounted them. At some point I will have to repaint the trunk mounts as there was some wear showing once I removed the factory risers but it isn’t too bad. I’m jet lagged eight ways to Sunday so didn’t get out to take final pictures, I’ll do that in the next couple of days so everyone can see how it looks. I like it.

  16. The Following 2 Users Say Thank You to chiefmg For This Useful Post:

    Bryan (04-22-2024),HarryB (04-26-2024)

  17. #10
    Super Moderator Bryan's Avatar
    Drives
    '02 Laser Blue Mica
    Location
    Cincinnati, OH
    Join Date
    Dec 2011
    Posts
    6,259
    Thanks Given
    1,040
    Thanked 2,613 Times in 1,406 Posts
    Welcome back on dry land
    Quote Originally Posted by DazedAndConfused
    I dont know a word you just said, but that **** sounded COOL.

  18. The Following User Says Thank You to Bryan For This Useful Post:

    chiefmg (04-22-2024)

  19. #11
    Nukuler banned! chiefmg's Avatar
    Location
    N KY
    Join Date
    Jan 2012
    Posts
    1,433
    Thanks Given
    188
    Thanked 1,233 Times in 531 Posts
    Washed her garage dirty butt yesterday and took some pictures today. I went to the same place I have used in the past so if anyone so desires, they can compare similar pictures with the different risers installed. Here ‘ya go:


    Harry, if you want to use any of these pictures let me know, I can send you the originals.

  20. The Following 2 Users Say Thank You to chiefmg For This Useful Post:

    Bryan (04-22-2024),HarryB (04-26-2024)

  21. #12
    6,000 rpm - mere mortals would shift Demon I Am's Avatar
    Drives
    No-ata
    Location
    Raleigh, NC
    Join Date
    Jan 2012
    Posts
    7,337
    Thanks Given
    2,207
    Thanked 1,398 Times in 851 Posts
    Still looking fine after all these years

  22. The Following 2 Users Say Thank You to Demon I Am For This Useful Post:

    Bryan (04-23-2024),chiefmg (04-22-2024)

  23. #13
    Nukuler banned! chiefmg's Avatar
    Location
    N KY
    Join Date
    Jan 2012
    Posts
    1,433
    Thanks Given
    188
    Thanked 1,233 Times in 531 Posts
    The new risers are thinner in cross-section than the factory ones. This meant my screws were a bit too long. This bothered me, so after checking on the size I had in there (M5 X 35) I headed to Ace to see if they had something I could use. I picked up a couple of choices, ended up using socket head cap screws in M5 X 30. I also removed the washer I used under the head of the old screws. This gave me a nice flush fit with the end of the nyloc nut, see picture:


    I’m happier with this look, and there’s less chance of me cutting my hand while washing around the brackets.
    '00 SE, intercooled BRP MP62, Reverant MS2, Ohlins DFV, Konig Flatout (now X 2)
    __________________________________________________ ____________
    This ain't no build thread!

  24. The Following 2 Users Say Thank You to chiefmg For This Useful Post:

    Bryan (04-23-2024),HarryB (04-26-2024)

  25. #14
    Super Moderator Bryan's Avatar
    Drives
    '02 Laser Blue Mica
    Location
    Cincinnati, OH
    Join Date
    Dec 2011
    Posts
    6,259
    Thanks Given
    1,040
    Thanked 2,613 Times in 1,406 Posts
    Quote Originally Posted by chiefmg View Post
    I’m happier with this look, and there’s less chance of me cutting my hand while washing around the brackets.
    The struggle is real there. I could see myself getting cut every time my hand went anywhere near the trunk knowing my luck
    Quote Originally Posted by DazedAndConfused
    I dont know a word you just said, but that **** sounded COOL.

  26. #15
    Nukuler banned! chiefmg's Avatar
    Location
    N KY
    Join Date
    Jan 2012
    Posts
    1,433
    Thanks Given
    188
    Thanked 1,233 Times in 531 Posts
    I can guarantee you would only do it once.

    Got some good news today. Back on Saturday after getting home, I packaged up my supercharger to send off for overhaul. Went to the local UPS Store to ship it, only to find out their system was down. I was told this only affected them being able to accept credit for payment, which wasn’t an issue for me. I was also told it would be picked up on Monday so the tracking number wouldn’t go live until then. Fast forward to Monday and when I checked the number, I saw it said the package was delivered TO THE STORE that morning. After checking again the next morning I went back to the store to find out what was up. The manager got involved, I’ll spare the gory details but I was assured everything was ok and it was en route to the destination. This morning I checked again and saw the same notation, so back to the store I went. Turns out the system screw-up was such that they couldn’t fix the tracking but it was supposedly out for delivery. Finally this afternoon I heard from the rebuilder with confirmation they had gotten the package. I do hope this doesn’t happen again because I am not sure my nerves would handle it.

Page 74 of 75 FirstFirst ... 2464676869707172737475 LastLast

Posting Permissions

  • You may not post new threads
  • You may not post replies
  • You may not post attachments
  • You may not edit your posts
  •