What kinda dumbass would forget thatOriginally Posted by Titus


What kinda dumbass would forget that
1992 BnT, 93LE #737, 94M, 95M, 96M, 97PEP, and a few 90s

Bwahahaha!
'92 Sunburst- www.v6miata.com
'93 LE- officially the wife's car, but usually my daily driver
Sorry for the lack of updates lately. Progress has been made slowly, but not as much as I would have liked. I was sick for over a week, and we have been hit with constant thunderstorms here in Texas and I don't like hanging out in a Metal building when it's storming.
Rogue made it back out with the needed painting supplies. Here it is after the primer and first coat of color was down.
And here it is after the second coat of color and the clear went down.

'92 Sunburst- www.v6miata.com
'93 LE- officially the wife's car, but usually my daily driver
WASABI (05-11-2015)
After the paint had cured for a few days, I decided to try to install the front subframe. As I had mentioned before, I had pre-assembled the suspension on the subframe a few weeks earlier. I don't recommend this, as it adds a lot of weight and makes it much more difficult to maneuver. When I first tried the install it, I was sick, and didn't have any help. With much cursing, I managed to get it in place and get 6 of the 8 bolts on, but I couldn't get the far back 2 bolts in and it appeared to me that the sub-frame was out of spec. I contacted Minitec, and they checked the jig and a few of the other recently completed subframes and said they couldn't see any cause for the issue. Frustrated and sick, I let it sit for about a week. Once I was feeling better, I removed all of the suspension from it to make it easier to maneuver and tried again. It bolted right up. I then re-installed the suspension and got to put it back on it's wheels for the first time in a while.

'92 Sunburst- www.v6miata.com
'93 LE- officially the wife's car, but usually my daily driver
Agent☣Orange (06-23-2015),jux (05-14-2015),WASABI (05-11-2015)
Next I wanted to test fit the engine in the car. With the help of a friend, we got the engine bolted in. It will come out again later for some other work, but it felt good to see it in the car.
The next thing I wanted to do was bolt the transmission in and hook up the PPF, so I could see the final positioning of the engine to test clearances. The kit calls for the re-use of the Mazda transmission alignment dowels. Mine have spent the last 23+ years stuck in the 1.6l Miata engine and seemed to be happy where they were. I tried my best to get them out without damaging them, but they are now completely mangled and still in the old engine. I have a new pair on order.
'92 Sunburst- www.v6miata.com
'93 LE- officially the wife's car, but usually my daily driver
Agent☣Orange (06-23-2015),Phatmiata (05-12-2015),TNRooster3 (05-12-2015),WASABI (05-11-2015)


wow looks right at home in there!!!

Haven't seen anything for a bit, anything new from the Rotten Banana?
WASABI (06-22-2015)

Such a beautiful miata with fantastic body work!Going to be awesome with the j swap! Any chance the m45 is still lying around?
OK... Sorry guys. As you may have guessed, I took much of the summer off from the project. Between business trips, vacation, doing stuff with the kid and wife, and the fact that a metal shop in Texas spends most of the summer north of 120*, I had very little interest in the car. Now that school has started back up and cooler weather is on the horizon, I have started to get back in to the swing of things. I have several new pictures and progress reports to post so i will try to make several updates over the next few days. I have also taken every 3rd Friday off through the end of the year, so hopefully we can expect to see regular progress.
To start things off, I will post about the one time I actually spent a little time in the shop: It took a few months, but I finally got my valve covers back from the powder coater. They are done is 15% gloss black, which is the same as what the Harddog rollbar comes in and what I did my door handles in. I got them installed with new gaskets, and while I was there I installed new OEM spec NGK PZFR6E11 spark plugs (expensive buggers) and reinstalled the coils.
More posts to come.
'92 Sunburst- www.v6miata.com
'93 LE- officially the wife's car, but usually my daily driver
Agent☣Orange (09-12-2015),Phatmiata (02-15-2016)
ECU and Wiring.
I believe I explained early on that I was going to run a stock ECU with the immobilizer removed and I was going to pay a company to modify the harness and add circuitry to trick the ECU in to thinking the AT was there (to keep it out of limp mode). I have been watching a few other builds take this route over the last 4 months. While they have been successful, there are issues I am less than pleased with. Some are having to add an APEXI piggyback unit to get fuel and VTEC engagement adjusted, and they are not able to reach the 7k rev limit that is stock to my engine. The formula is evolving and improving, but will take more time before it is to my liking. While watching and waiting, I noticed a vendor put the PnP AEM Series II on sale, so I jumped out of the stock ECU boat.
Here is the brand spanking new AEM Series II 30-6051 I purchased, along with the AEM 30-4110 wideband I picked up to go along with it.
While the AEM plugs right in to the harness for my engine, there is still a lot of unused wires and plugs in it, and there are outside connections to the Chassis that need to be made. I could still pay one of a few companies to modify the harness to deal with this stuff, but I choose not to for 3 reasons:
1) There is no trick circuitry needed... If you can trace wires, read a wiring diagram, and solder a little, it can be done on your own.
2) Doing the work myself forces me to learn how it all works and allows me to build out a spreadsheet that identifies everything there, what it is for, and where it goes to. This will be important if I ever need to troubleshoot an issue in the future.
3) The purchase of the AEM was a big chunk of money that wasn't planned in my initial build, so modifying the harness myself saves money in another area of the budget to get my net increase down under $600.
The first thing I did was to start a spreadsheet with a tab for each ECU plug. I listed out all of the pins for the given plug, and then I utilized the AEM manual and a factory Acura manual to identified the wire color, the use of the pin in stock form, if the AEM uses it, and if so then how it uses it. From there, I traced every wire that the AEM uses from ECU pin to plug and labeled the plug. Next, I traced any wires to labeled plugs that had not come from the ECU (mostly grounds and power from chassis). This information was noted for future use in connecting the harness to the chassis.
Once I was confident in my understanding of the wiring and what was and wasn't needed, I started removing everything that was not used. This is what was removed:
Next up was working on the connections to the chassis. I considered using the Honda chassis plugs, but had issues sourcing new matching halves. In the end, I decided to purchase several sets of new waterproof 8 pin connectors. I took the 8 remaining wires off of the old Honda chassis pugs and got them setup on a new plug.
Soldering is fun!
All wired up.
The next item on the list is the A plug into the ECU. This plug is not from engine harness... it comes from the Honda dash harness. Given I didn't have that, I sourced a new one along with some new pins.
Next up will be soldering wires to the new pins, plugging them into the A connector where needed, and then running them out to a second new 8 pin connector for chassis connections.
Also on the list is adding the wires to the harness for the Miata temperature and oil pressure sensors that I am adapting to the engine for use of the Miata gauges. After that, I need to continue pouring over the Miata wiring diagrams to make final decisions on where all of the chassis connection wires need to go so I can wire in the chassis side plugs that will connect to the engine harness. Does your head hurt? Mine does.
'92 Sunburst- www.v6miata.com
'93 LE- officially the wife's car, but usually my daily driver
The Water Passage. This is going to be a long post.... On the back of the J series motor, there is a coolant manifold that Honda refers to as the water passage. Water coming out from the water pump passes through one middle of the water passage, through the thermostat, and out to the radiator, and then it comes back in to another section of the manifold from the radiator return where it is routed in to the back of each head. It also contains EGR passages that run from the head to Intake, the EGR valve mounts to it, The Air-Assist valve is mounted to it, it holds a temp sensor, and it has misc coolant input/output connections for Heater core, transmission cooler, and IAC valve.
This is what a stock one looks like off the motor (not mine)
While not really mandatory, there are several things that I am changing about my water passage. First was the replacement of the EGR valve with a blockoff plate. (This was shown back near the beginning, but here it is again to show all related things together:
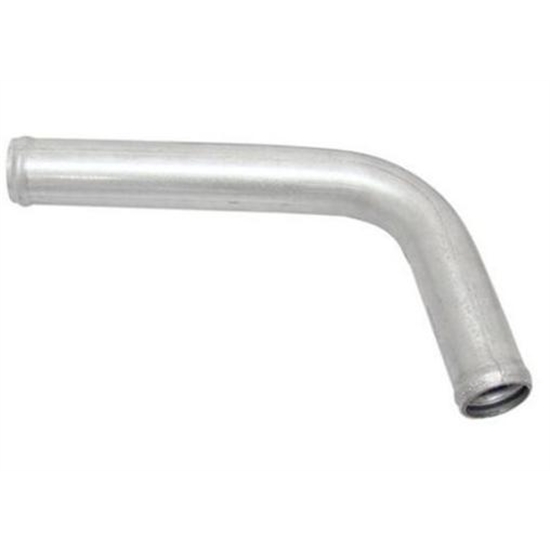
The second change relates to the big coolant return pipe seen in the top right of the stock part photo. It is pointed back toward the firewall. While there is clearance between the firewall and pipe itself, it doesn't really leave the room needed to get a hose on there. Given that the Minitech kit is budget minded, the instructions call for you to "massage" the firewall with a body hammer to create needed room. This didn't sit well with me, so I picked up a new pipe. Speedway motors had what looked to be exactly what it needed, so I ordered it:
It was exactly what I was looking for. Given my welding is limited to ugly steel welds with my Harbor Freight flux wire welder, I took it to a welder near me with aluminum TIG experience. a Day later and the wallet a little lighter, The old pipe was removed and my new one was cut to size and welded on:
Once it was back, I did a quick test fit. The bend of the pipe is more than 1/2" off the firewall, and now there is plenty of room to easily get a hose on there.
Next up was deleting the air assist valve. It is mounted to the top of the water passage and is designed to let extra air in around the fuel injectors when cold to improve emissions during warm-up. Not needed. Prank parts makes a nice blockoff plate for it.
Here it is alongside the factory part:
And here it is installed.
Now I need to cap off unneeded coolant nipples. I got some silicon blanking caps and some Gates Powergrip shrink to fit hose clamps and capped them all off.
While I was at it, I capped off the line intended for the transmission cooler that comes off the water pipe between the pump and passage.
Also of note since I brought up the Gates Powergrips, I picked up enough to do all of the radiator and heater hoses too, and a bunch extra for on hand spares. Zoro.com is really the place to get them, as they charge about half what autoparts stores and places like jegs charge, plus free shipping when you spend $49.
Last up is dealing with the Temp gauge sensor. Honda has a temperature sensor that feeds the ECU, and then the ECU feeds the gauge, but that doesn't work for the Miata gauge. An easy fix is simply bringing over the Miata gauge sensor and finding a good place to install it.
The water passage has a nice spot for it that is tapped on some J series engines, but not mine.
The Miata sensor is 1/8" BSP tapered thread, so I picked up a tap and went to town. A few minutes later, we had this:
Also done but not photographed was the addition of a new thermostat and gasket. You may have noticed from a prior pic that the thermostat housing bolts were making contact with the water passage. The long bolts are made to work with the OEM thermostat cover, but are just way to long for the Minitech one. I turned to my bin of old Miata nuts and bolts and found some shorter ones that worked perfectly. *Side note- I have come to the conclusion that the biggest benefit to parting out a Miata is the wonderful supply of metric hardware it gives you. It saves me from a trip to the store and a regular basis.
I need to go back and add some PTFE tape to the sensor threads, but other than that, the water passage is ready to be reinstalled on the engine.
All done!

'92 Sunburst- www.v6miata.com
'93 LE- officially the wife's car, but usually my daily driver
Driftdevil (09-18-2015),Greasemonkey2000 (09-18-2015),jux (09-20-2015),WASABI (09-19-2015)

What is that long black line between the temp sending unit and the egr plate? It looks like a huge crack, but maybe rtv? Very interesting build that I'm enjoying watching.
Black sharpie lol. Another guy with the kit had the whole egr portion of the water passage cut off and the egr passages welded up. It looked nice and created more room for plumbing. I marked off the area to be removed and got a quote from the welder, but he gave me an "I don't want to do it" price. I had another guy I could have taken to, but decided to just slap the plate on it and move on.
'92 Sunburst- www.v6miata.com
'93 LE- officially the wife's car, but usually my daily driver
Driftdevil (09-19-2015),riefdaddy (09-20-2015)
OK, It is time to get this thread caught up.
Crimping
Not long after I posted about my soldering of connector pins, It was pointed out that I really should be crimping them with a proper crimper. I picked up this Eclipse Tools 300-005 Ratcheted Crimper from Amazon.
It handles 10-20 gauge pins and does a double crimp. Here is what the teeth look like up close.
It does a really great job. All of the pins I had soldered were cut off and replaced with properly crimped pins.

'92 Sunburst- www.v6miata.com
'93 LE- officially the wife's car, but usually my daily driver
Phatmiata (02-15-2016)
Clutch work
I went to install the Clutch, pressure plate, throwout bearing, and pilot bearing next. This lead to an imediate issue, as it turns out that the pilot bearing installs from the back of the flywheel. The Flywheel was removed, pilot bearing was installed, flywheel was reinstalled, clutch disk was installed, and pressure plate was installed. The clutch disk is for a 1.8 Miata, while the flywheel and pressure plate are Honda B Series.
Next the new throwout bearing was installed. I believe it is also from a Honda B Series. The tabs need to be bent in a little to work with the Miata transmission.
Prior transmission test fits were done without the water manifold in place. Now that it is installed, I needed to trim the top of the Miata transmission to clear the bottom of the thermostat housing.
The Clutch slave install in the stock location on the transmission, but you need to use 2 spacer provided with the kit to clear the engine. I had to also pick up a pair of longer bolts (not included with kit) to get it to bolt on.
The Clutch and brake masters were reinstalled and the clutch system was bled.

'92 Sunburst- www.v6miata.com
'93 LE- officially the wife's car, but usually my daily driver
Phatmiata (02-15-2016)
 Posting Permissions

 Reply With Quote