Neat idea, but I think I'd rather go for the HUD (on the windshield) look.


Neat idea, but I think I'd rather go for the HUD (on the windshield) look.
Originally Posted by DazedAndConfused
Greasemonkey2000 (04-13-2018)


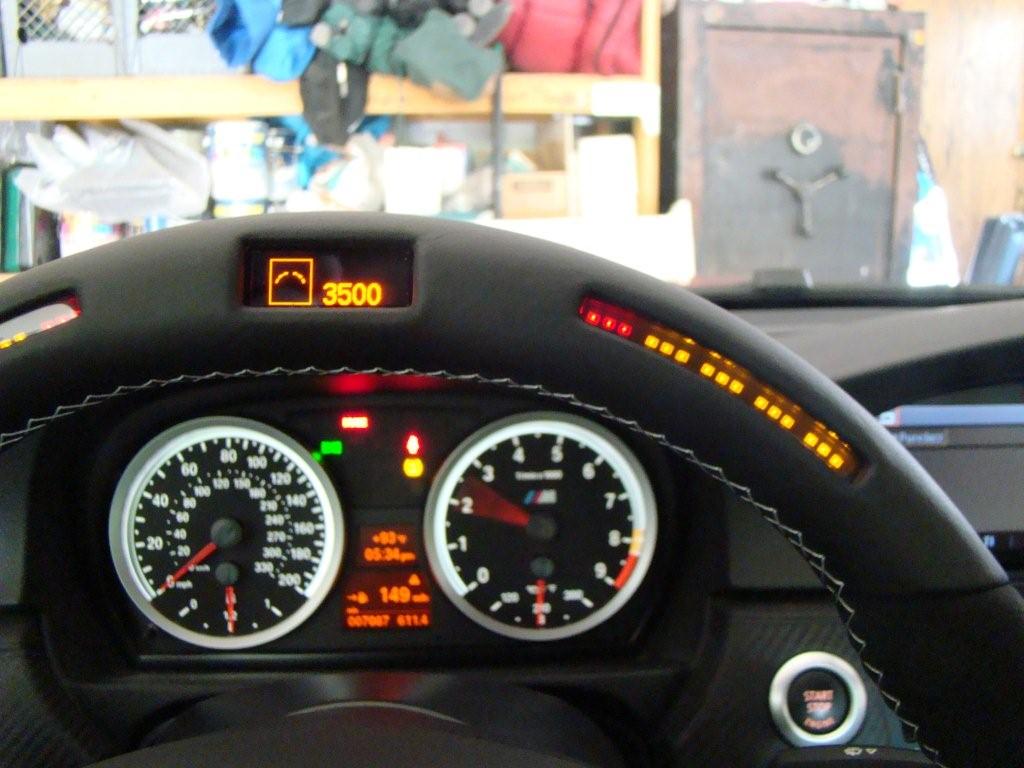
Pretty cool idea! I had a Shift-I tach light that I molded into the upper column clamshell.
No todo que es oro brilla.
Greasemonkey2000 (04-13-2018),tsingson (04-13-2018)

I really like the concept. If you can get another gauge cluster surround and refine the hole locations and the holes themselves it would be awesome. Maybe you can get the LED bulbs to poke out of the holes???
Return of the Manticore build: http://mazdaroadster.net/showthread....-4-engine-swap
Greasemonkey2000 (04-13-2018)
I think the hood is still workable. I’d use a Dremmel routing bit and create one continuous opening instead. Besides, the holes are already there so the job would be easier now.
No todo que es oro brilla.
Greasemonkey2000 (04-13-2018)

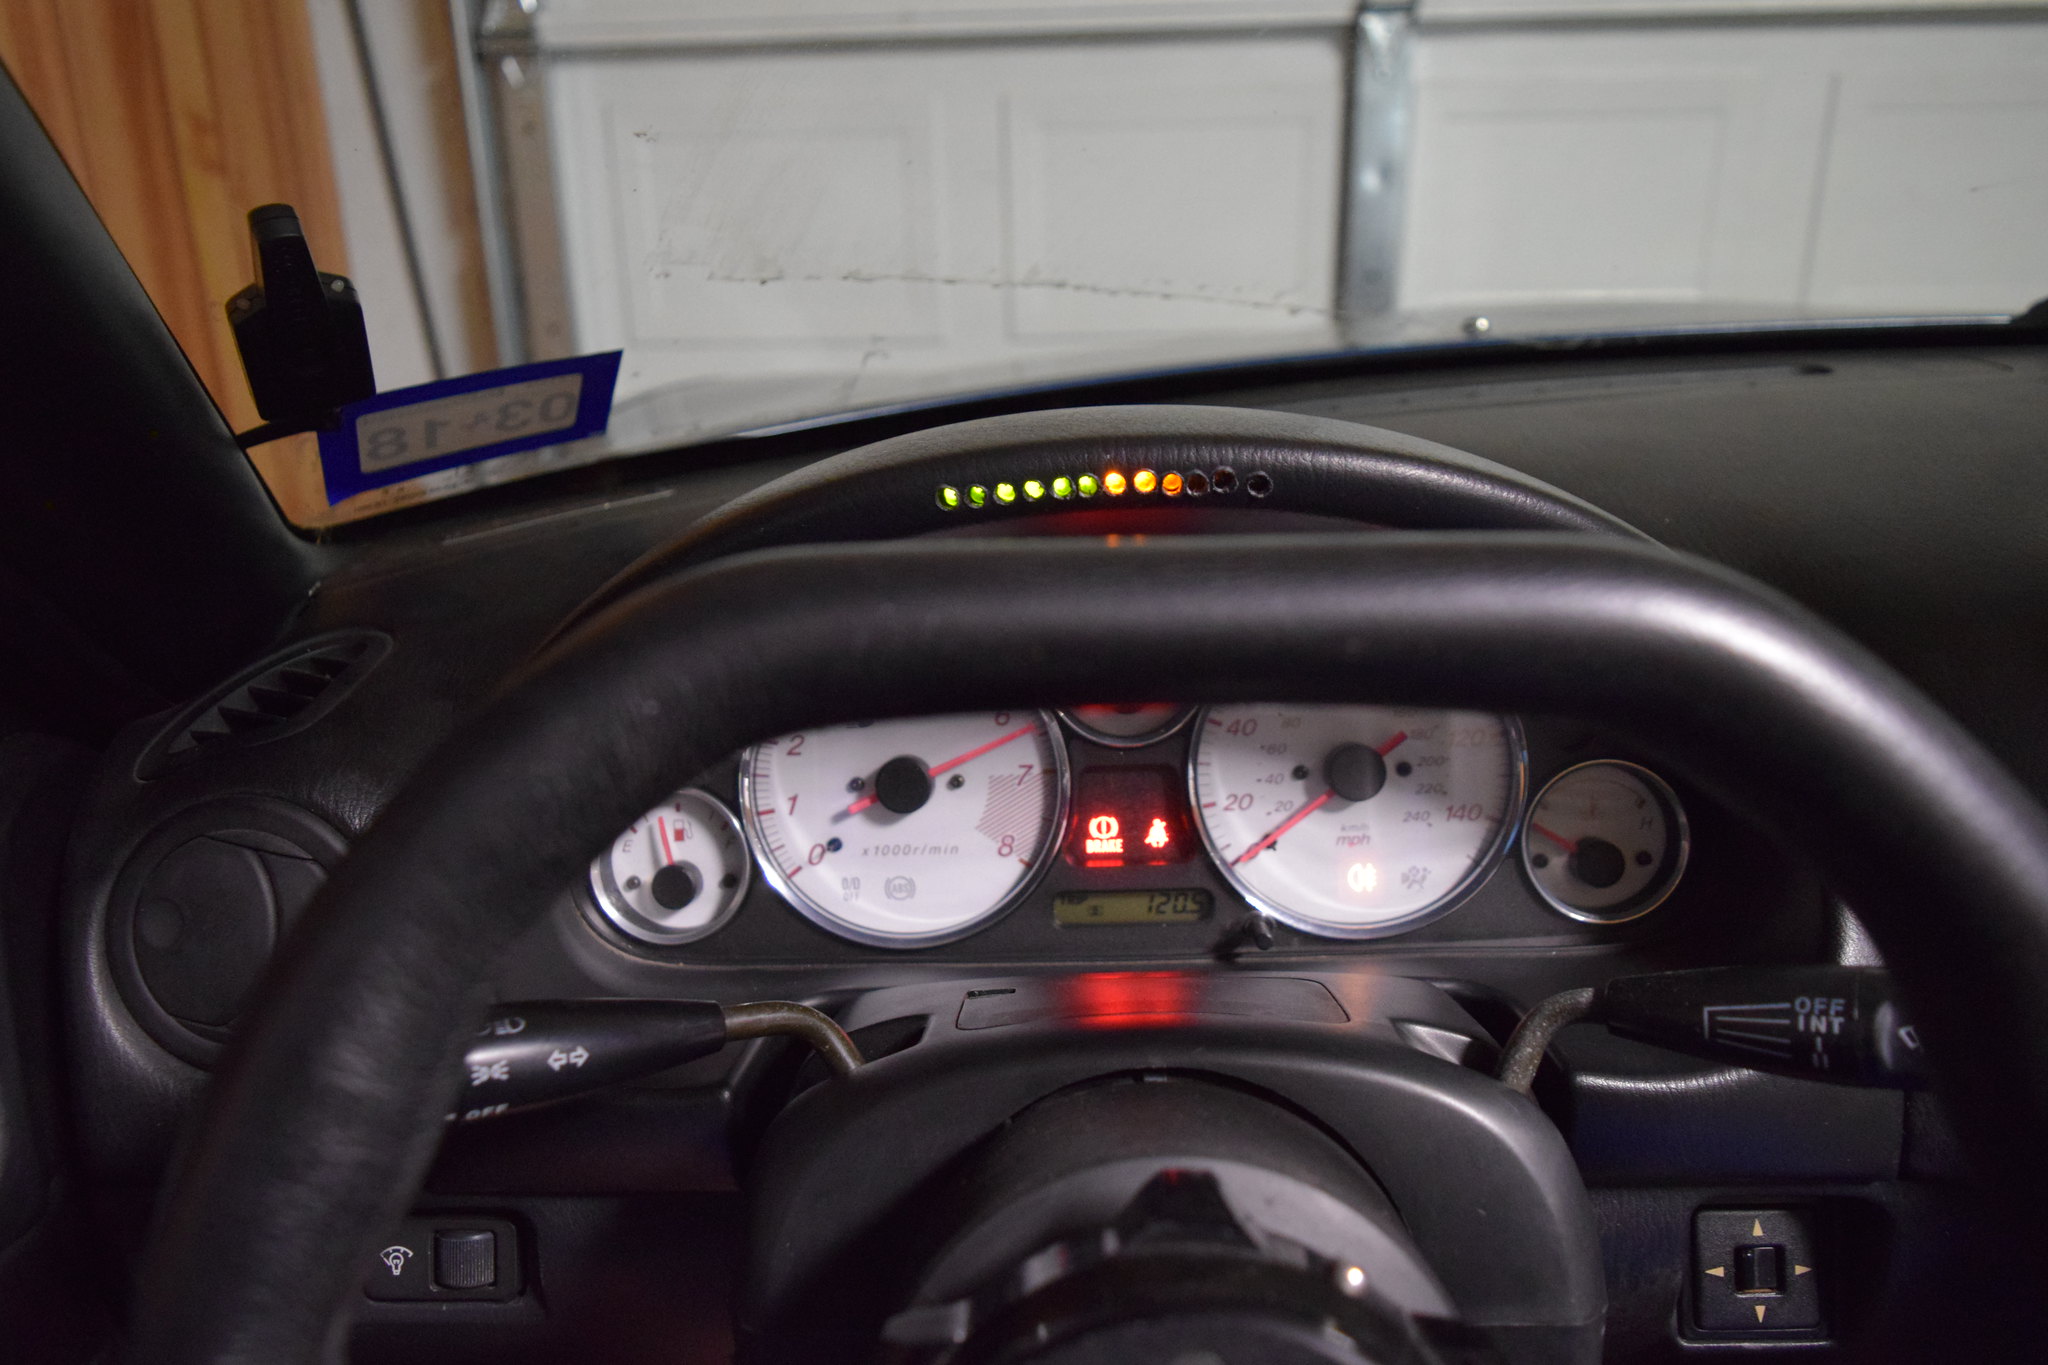
I hear you but those aren't cheap and just working with what I already had but I prefer this. Ideally I would have it on(in) the top of the steering wheel, like so:
Thanks!
Appreciate it Rene, agreed. The LEDs are in a clear flexible mold with dimples above each LED.
Workable yes but my expectations and even skills are better than the current state as the holes are more straight than I wanted, I want to have them follow the gauge hood curve. I just wanted to see if it would fit in the hood and how it would look when driving and I LOVE IT!
So version 2.0 will happen sooner than later. I will still try to clean up the holes but the spacing isn't consistent and some don't have much material between holes.
'01 NB2 aka MisF1re: http://mazdaroadster.net/showthread....218#post207218
'97 M aka Warbird, gone but not forgotten: http://mazdaroadster.net/showthread....B&goto=newpost
Instagram: @greasemonkey2000
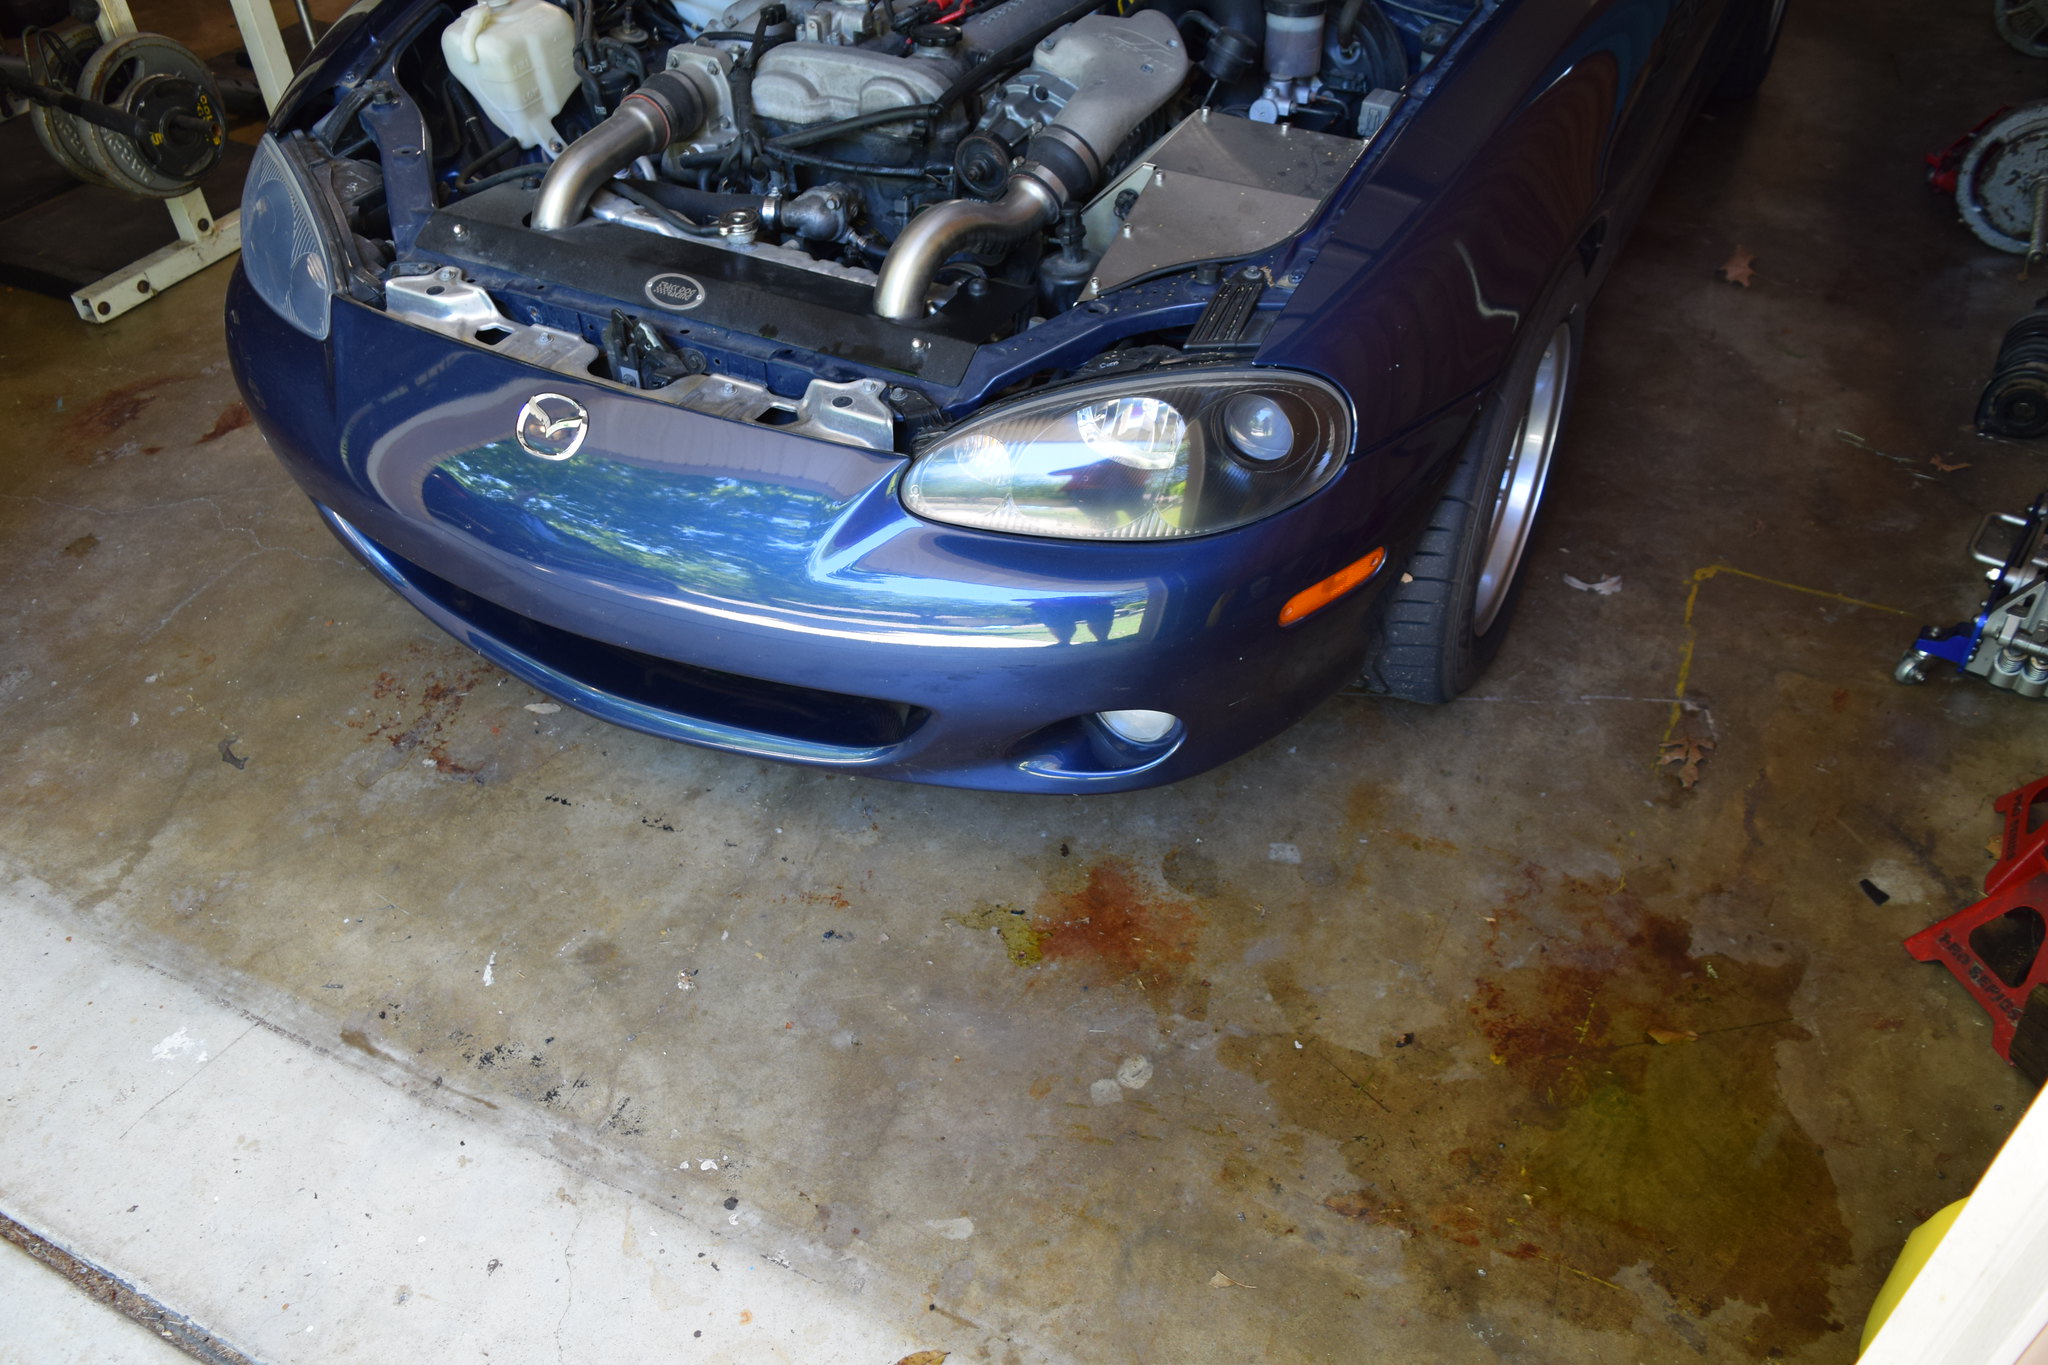
05-06-18: Friday morning I go out to the garage to get Misfire out of the garage and head to work only to find Misfire had an accident, again....
....found the puddle of coolant on the driver side so i popped the hood. Found coolant on top of the radiator panel, undertray, in the bumper mouth and looked like some on top of the radiator cap that i replaced about 6 months ago.
Didn't have time to investigate further but yesterday when i was at work i went ahead and bought a new radiator cap hoping it was something that simple. I decided i did not want to mess with it yesterday when i got off work so took Misfire out of the garage and let him run. It didn't take but a few minutes for the real culprit to reveal itself....
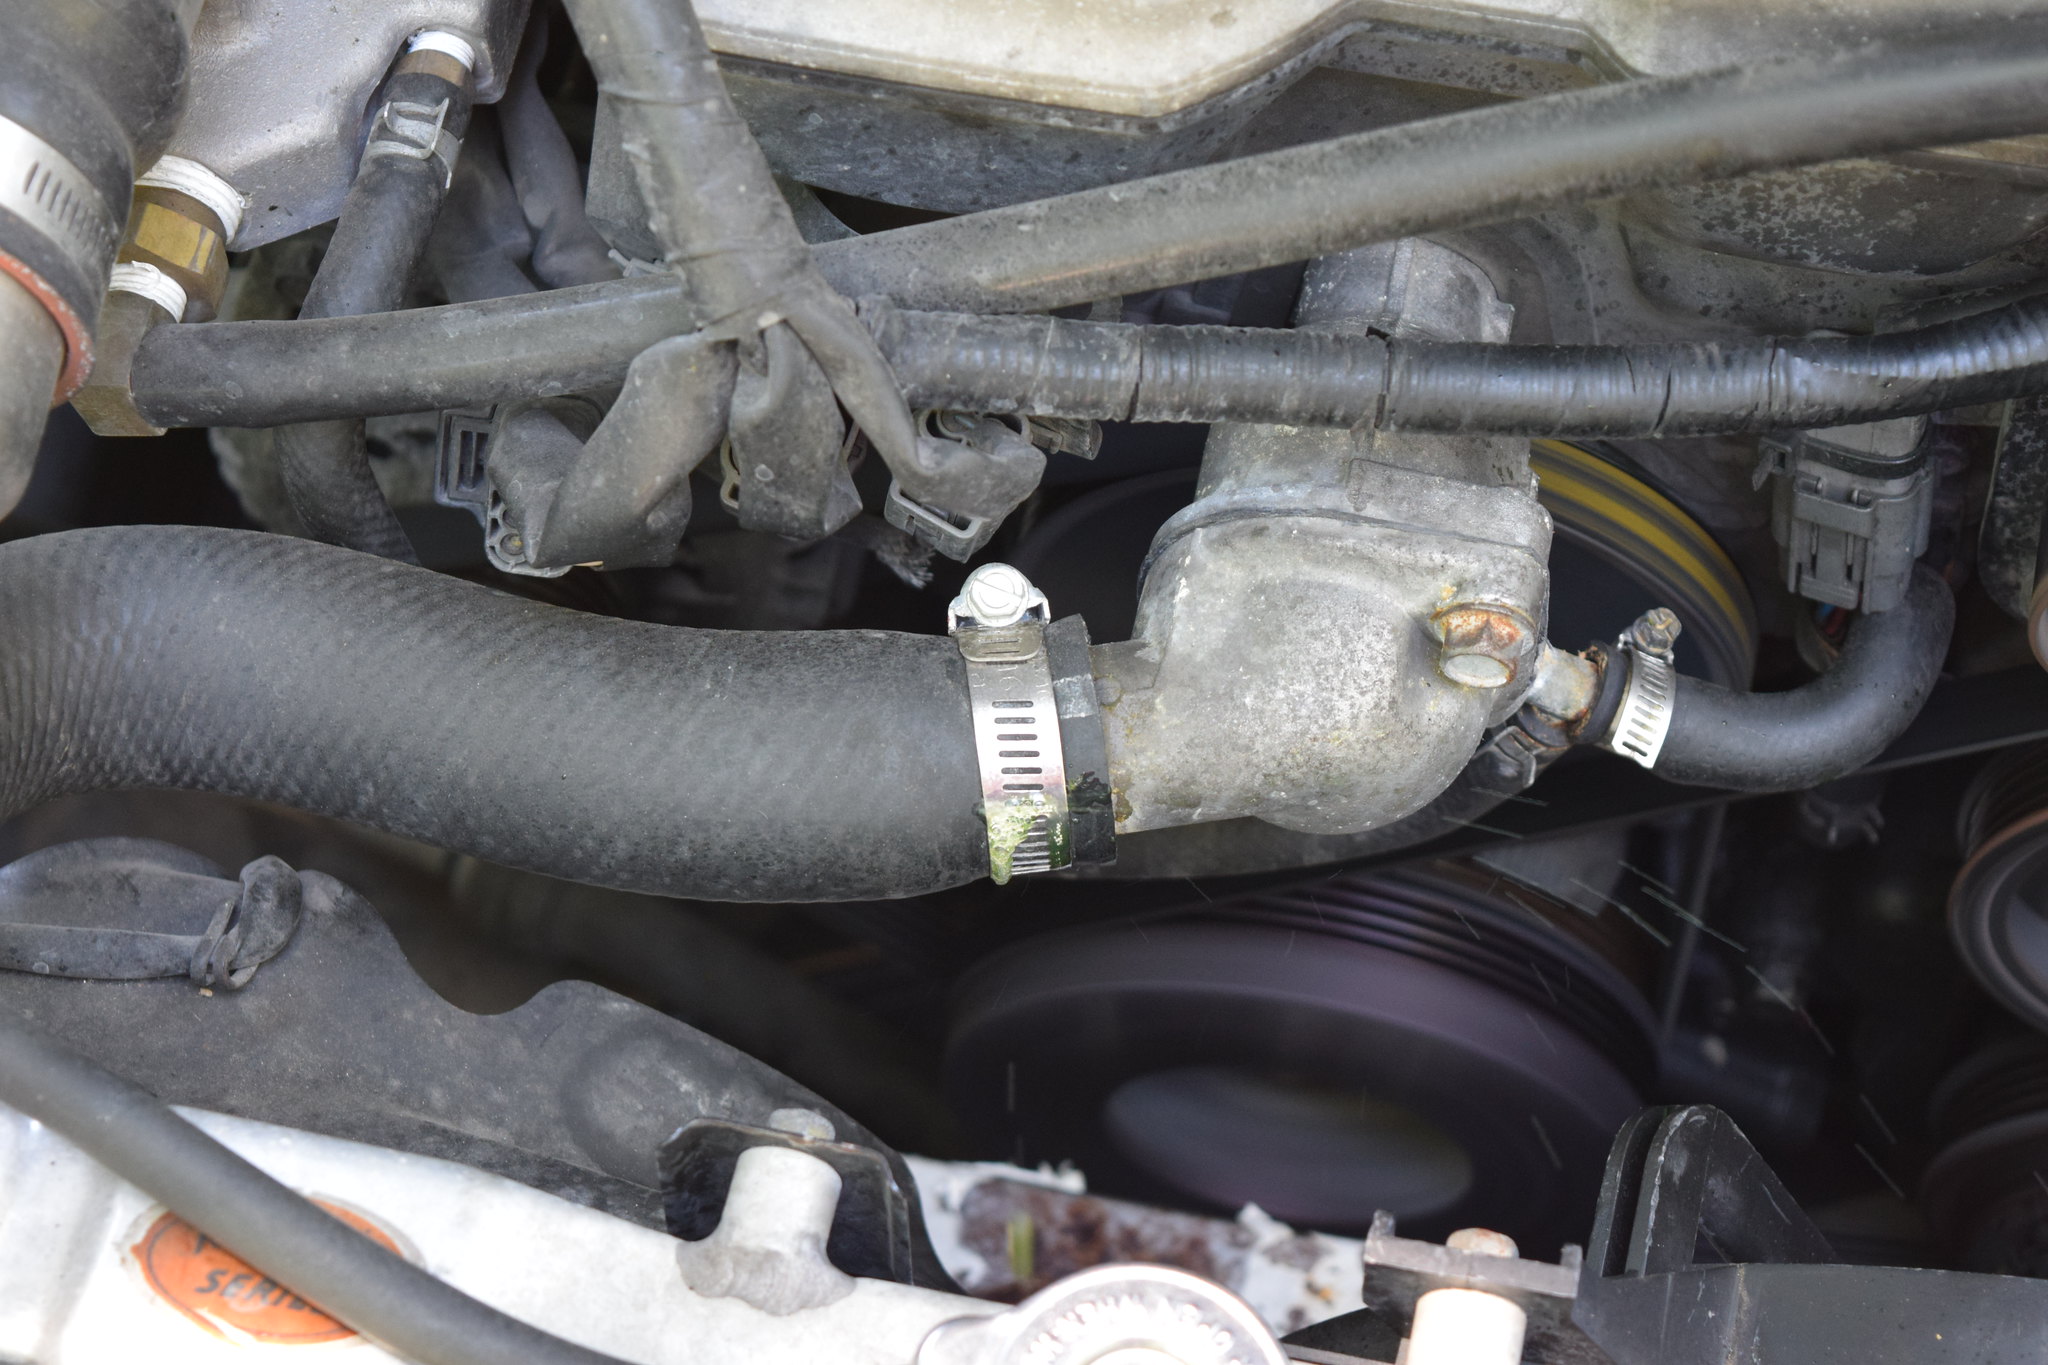
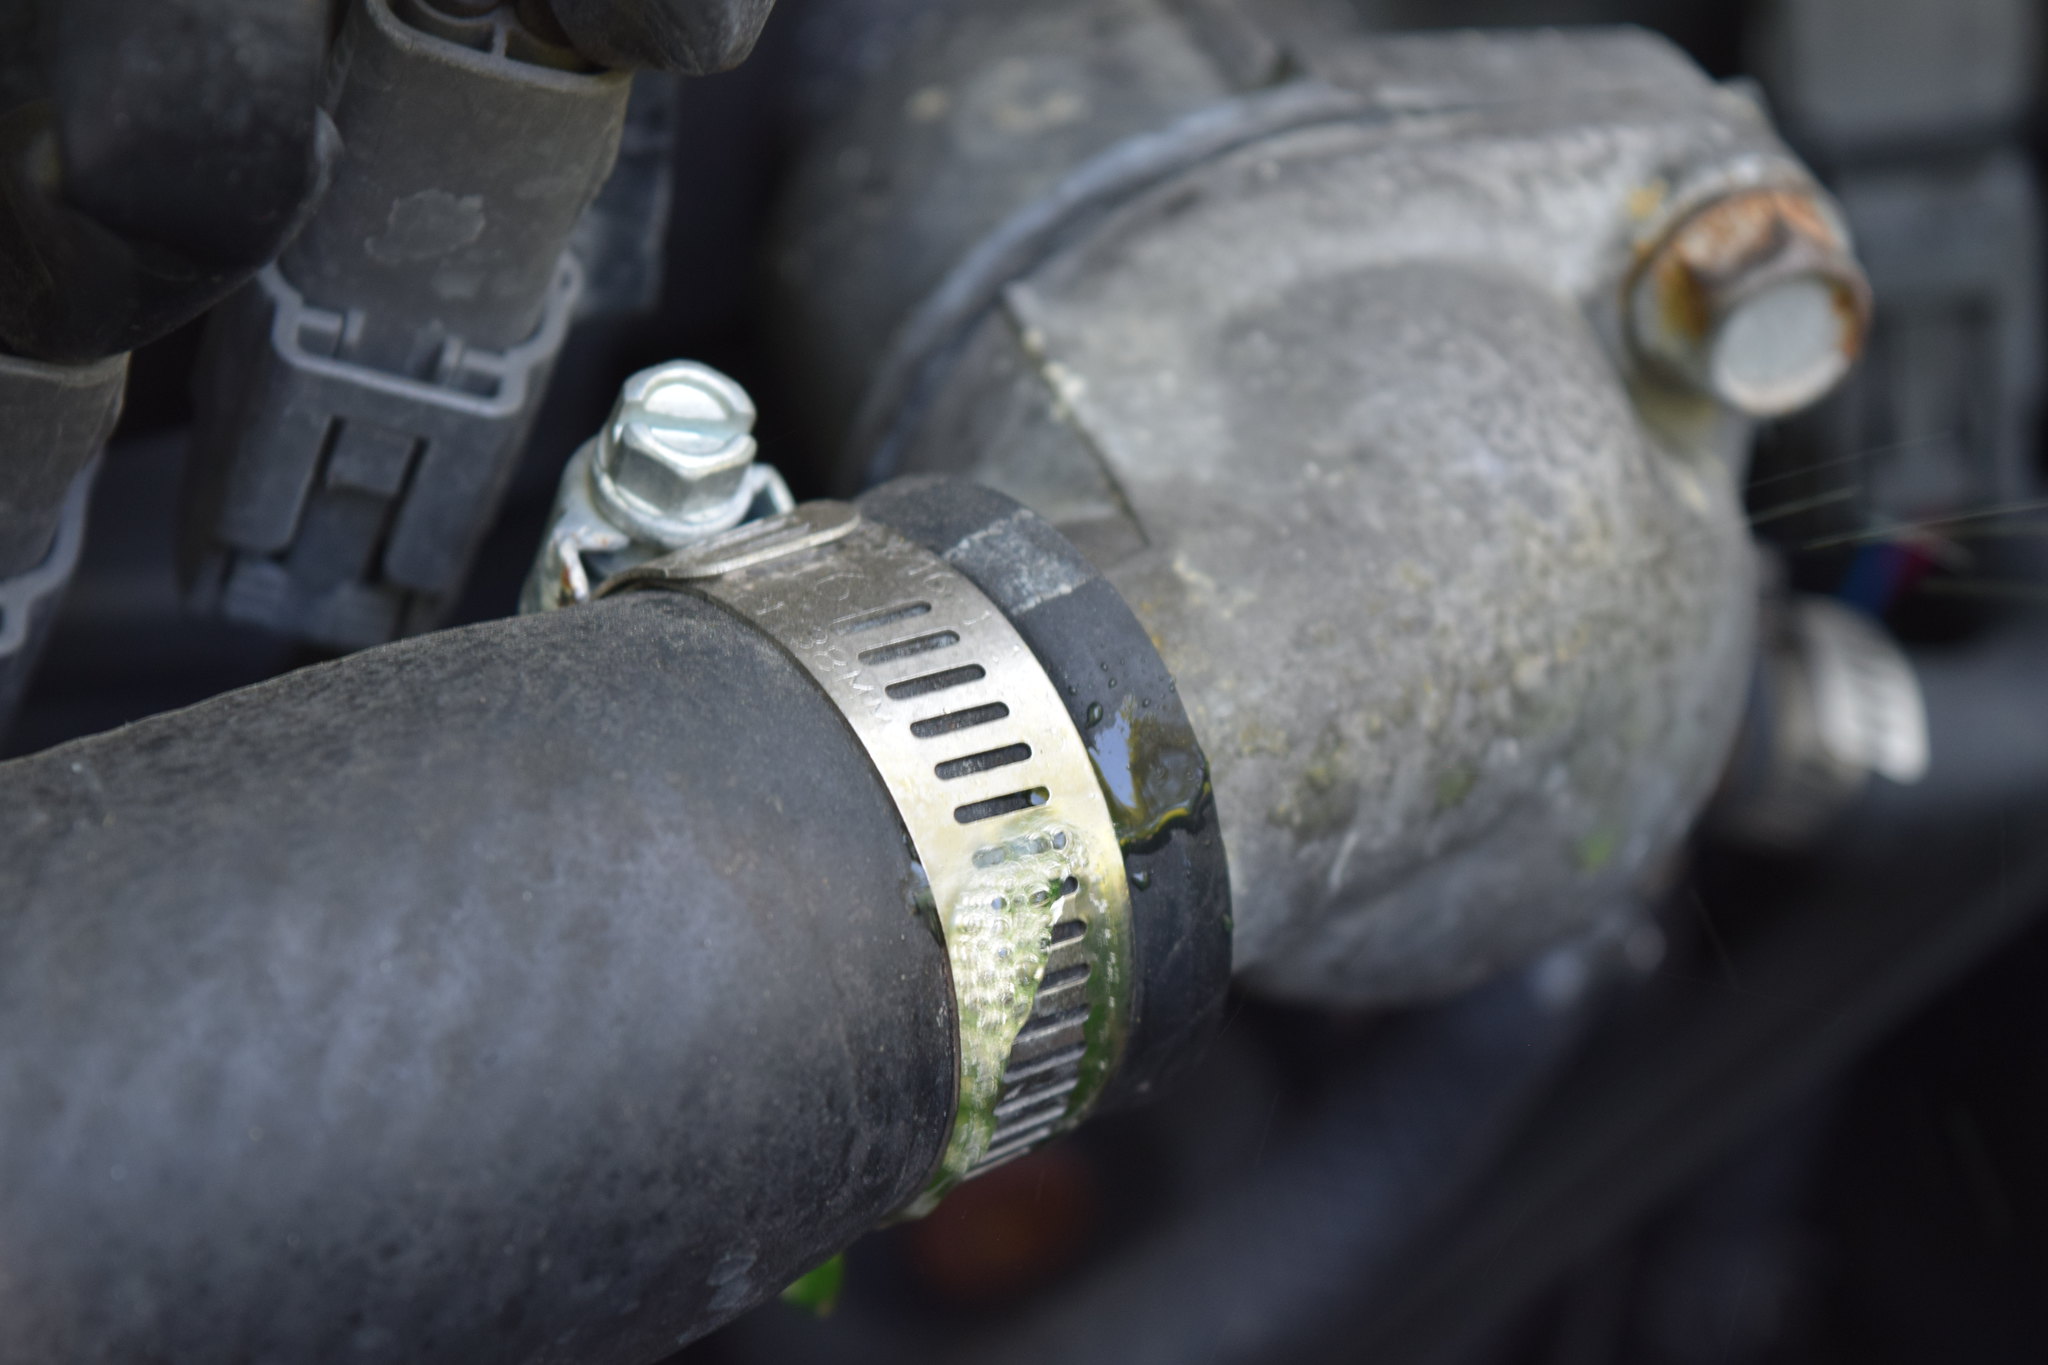
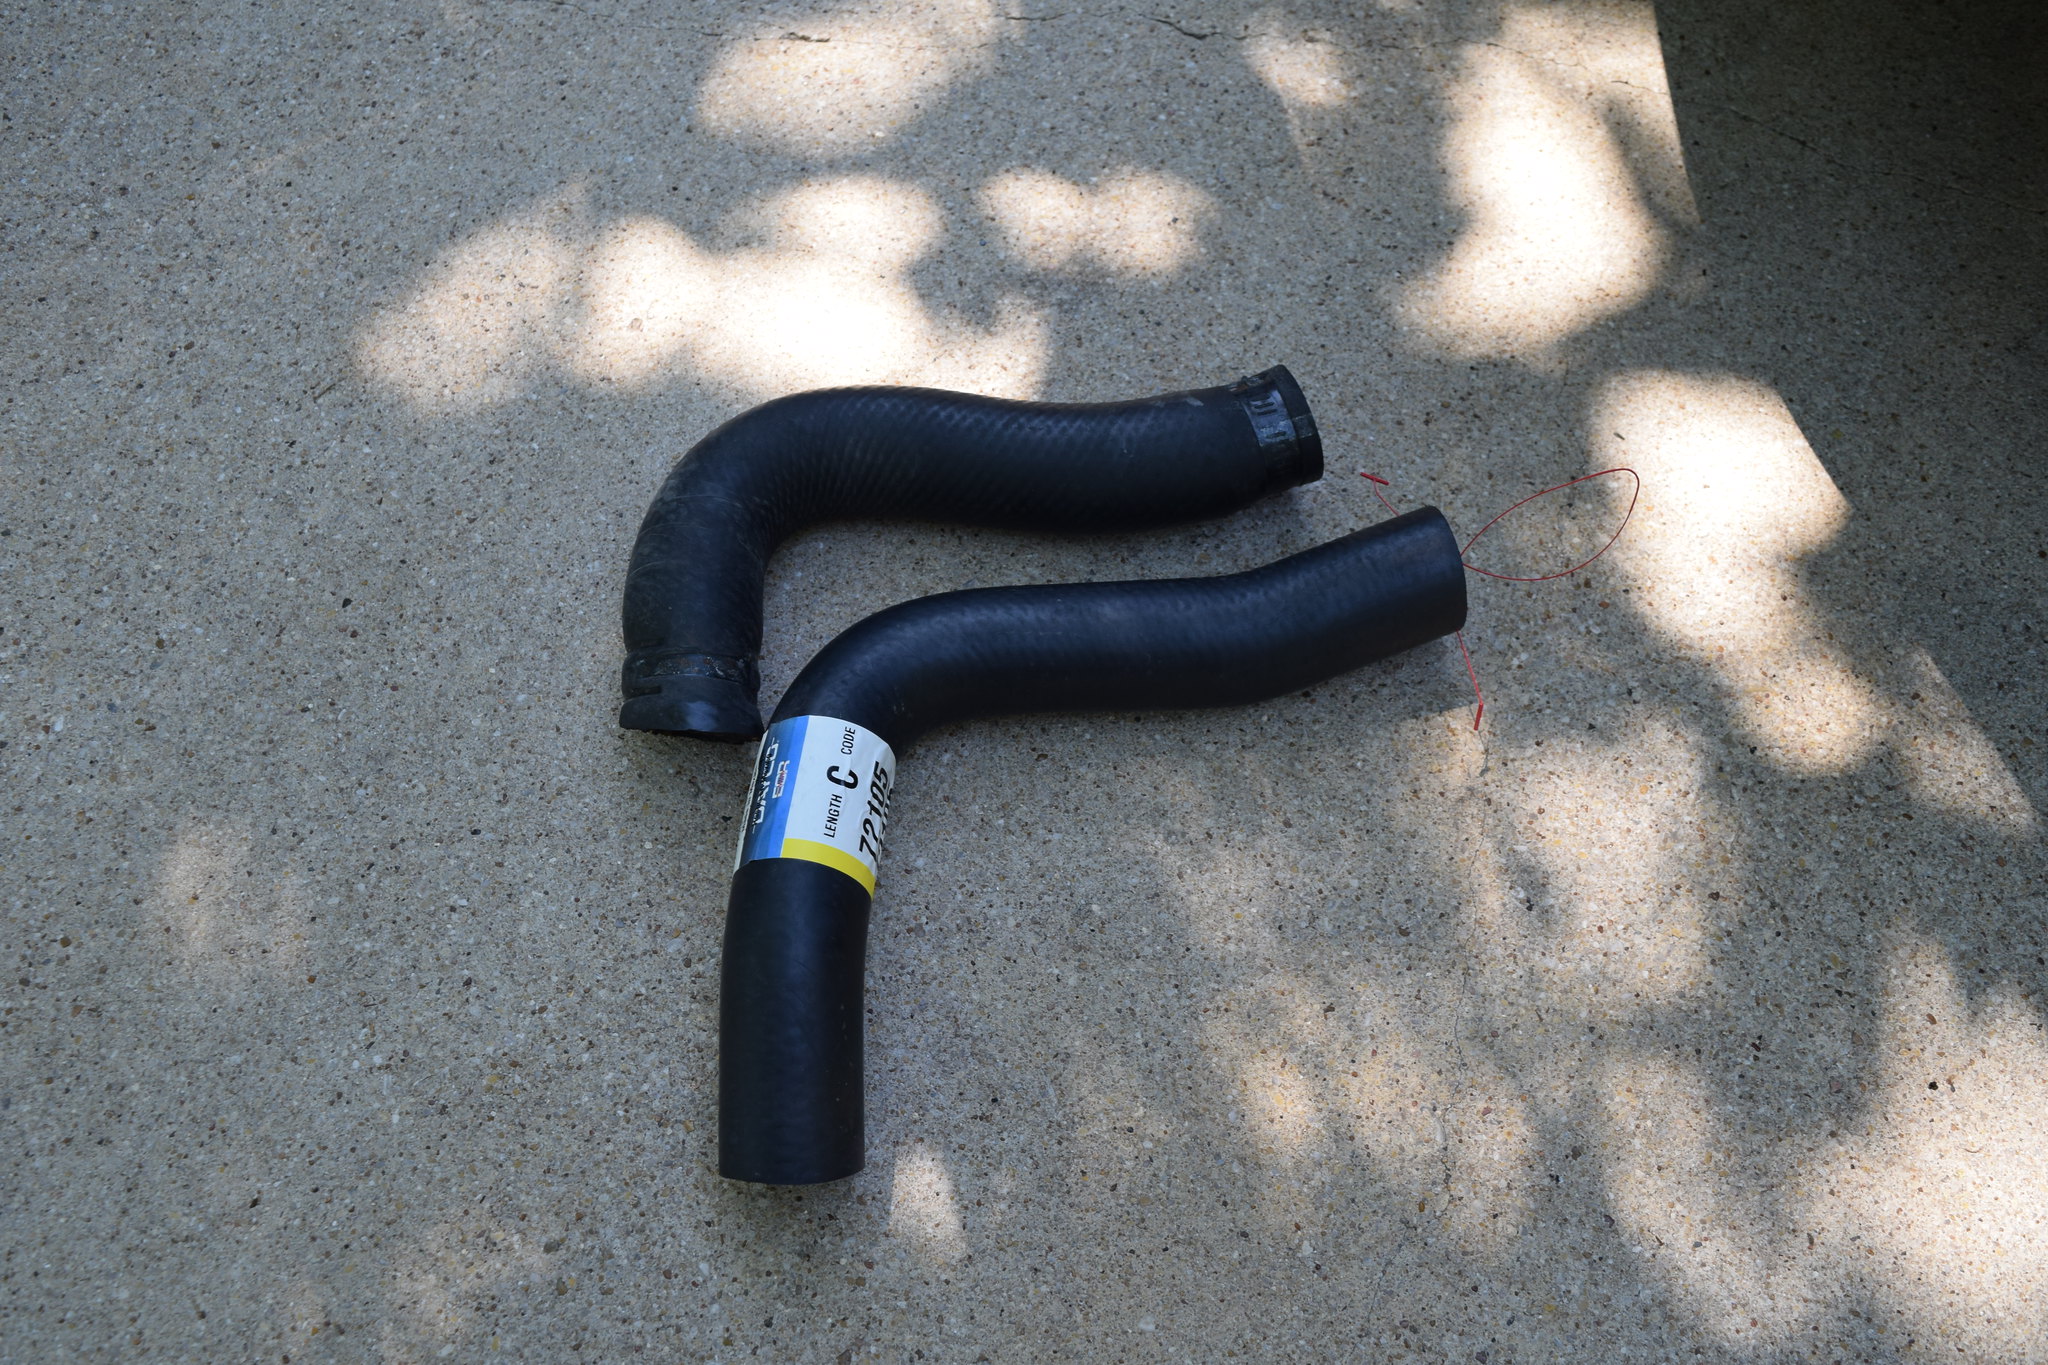
...well not as easy as a radiator cap but the upper radiator hose is definitely the next easiest/cheapest fix. Turned off Misfire and opened the radiator cap to depressurize the system(was on less than 2 minutes). Removed the hose and found the failure....
....a pin hole about half way down next to the hose clamp. Also found another issue that was bound to cause a leak...
....so some sandpaper and a few minutes later and it was all cleaned up.
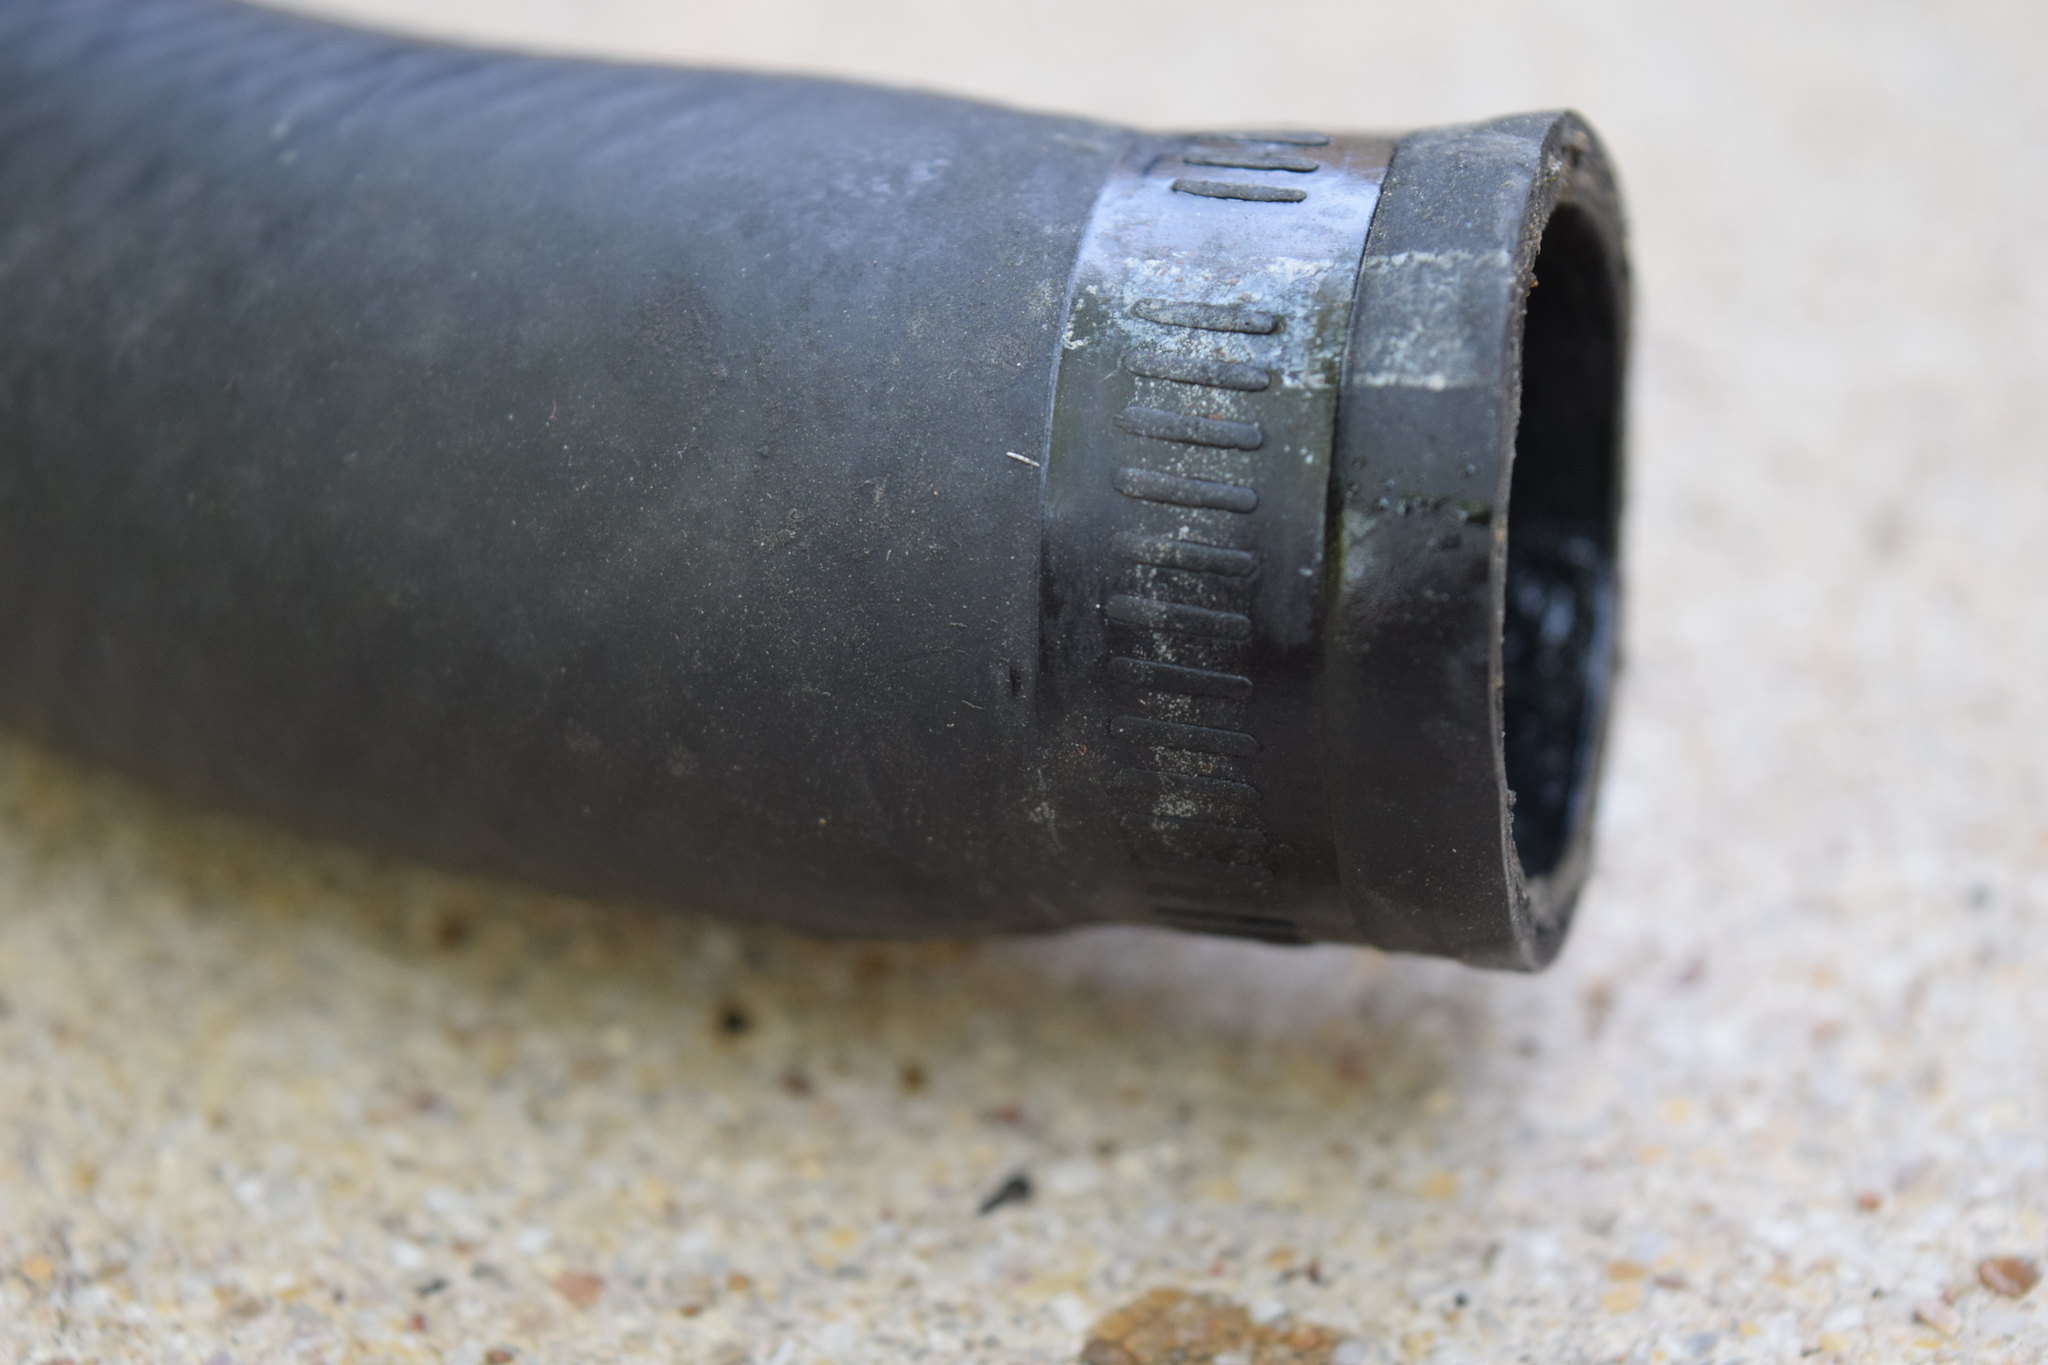
I jumped in my wife's Dodge Dart and went to my work to pick up a new radiator hose, a Dayco C72105 to be specific and return the radiator cap i didn't need. Upon getting back home it was clear the Dayco was longer than the old hose which i was fairly confident of when i got it but too long is ok and easily fixed.
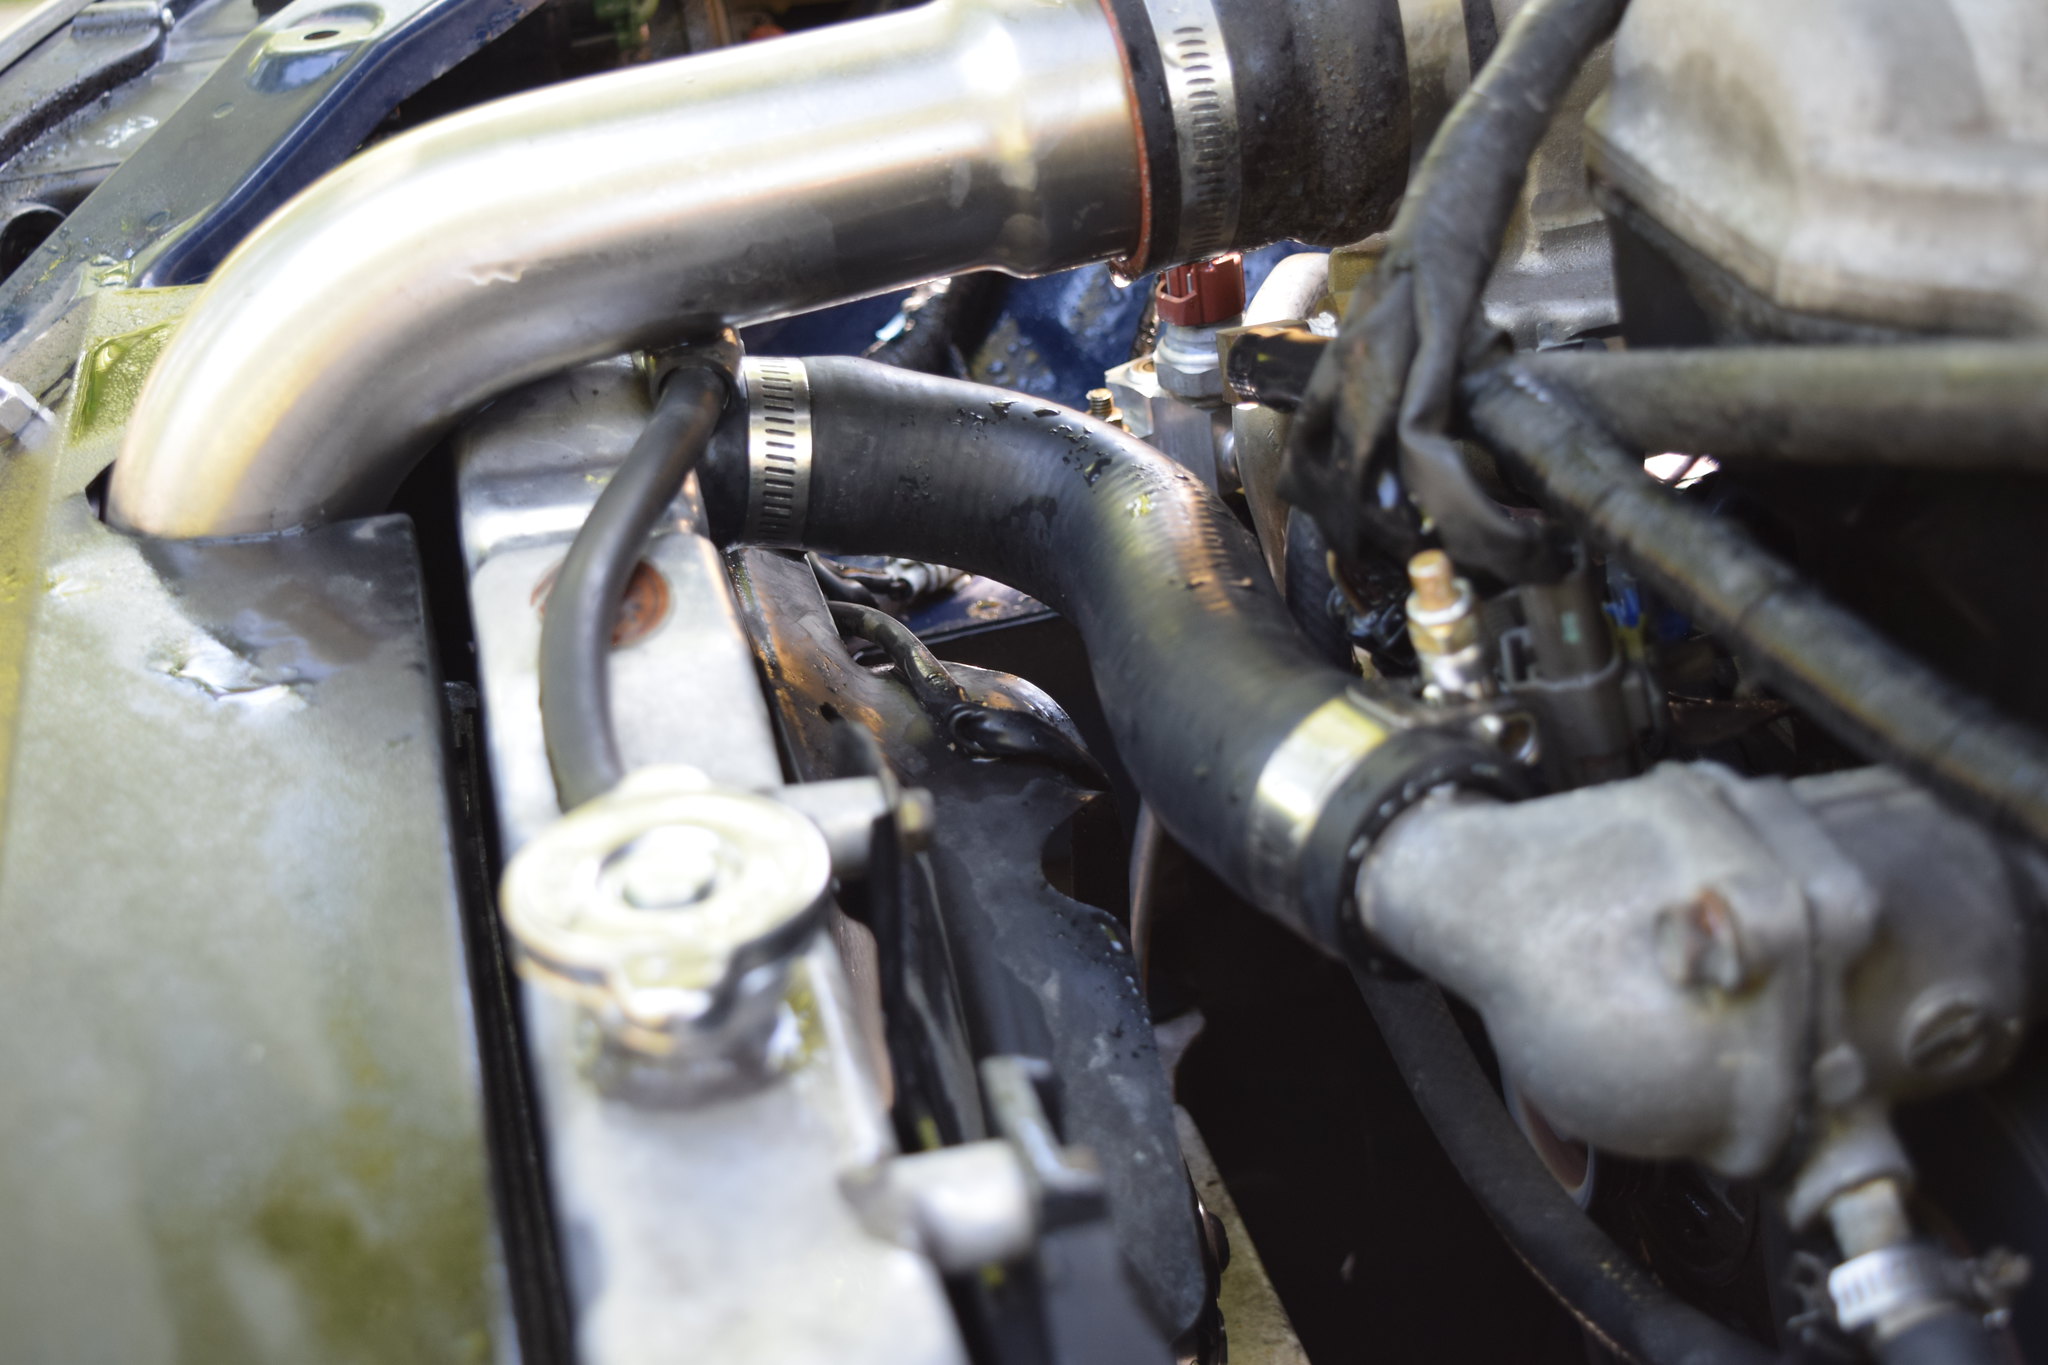
Test fitted and just as i figured i needed to trim the radiator outlet side, about 2"+. Not sure if this is due to the aftermarket aluminum CSF radiator(which will get replaced with probably another newer CSF radiator) or what. Installed it and started up Misfire, plugged in the OBDII dongle and used the Torque app to monitor temps while watching for leaks.
Let Misfire idle for 15 minutes or so, turned on the a/c and everything was good, no leaks! I am so grateful it was such a easy and inexpensive fix.
'01 NB2 aka MisF1re: http://mazdaroadster.net/showthread....218#post207218
'97 M aka Warbird, gone but not forgotten: http://mazdaroadster.net/showthread....B&goto=newpost
Instagram: @greasemonkey2000
Demon I Am (05-07-2018),MiataQuest (05-07-2018),tsingson (05-14-2018)

Difference in hose length might be due to the radiator position (moved rearwards) in order to allow the s/c pipes to pass to your FMIC; guess the old one has been modified too. Also, I would suspect your clamp in partially causing that failure; would replace with OEM style hose clamp
@HarryB: Ben aka concealer404 said most aftermarket hoses are long and after thinking about it, I'm pretty sure every aftermarket radiator hose I have bought I had to shorten. It doesn't appear the radiator has been moved and the TDR intercooler kit doesn't require it to be, iirc.
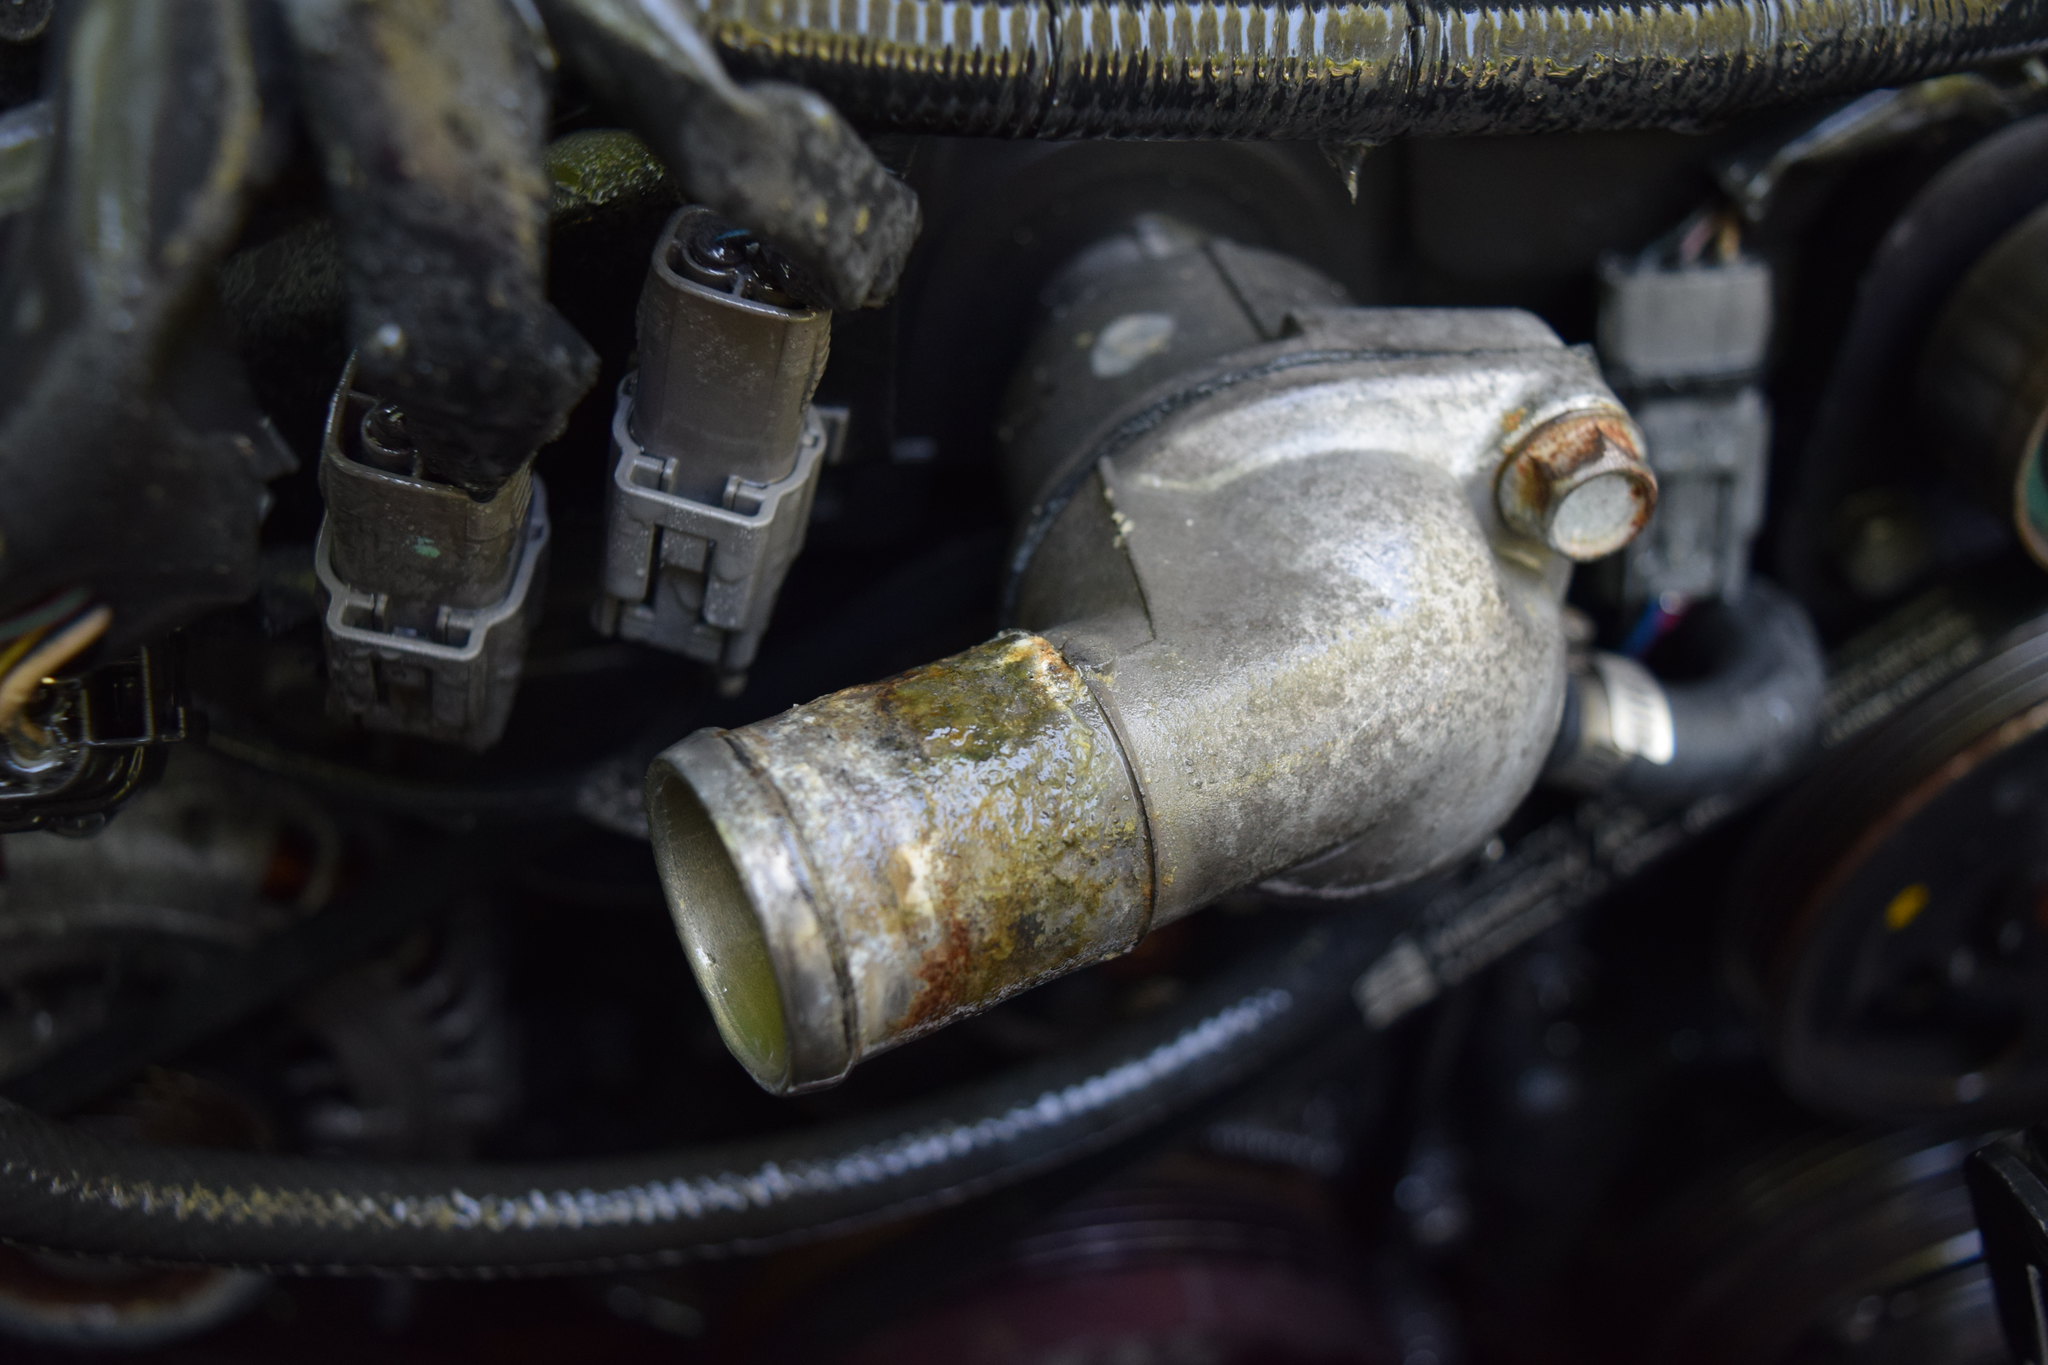
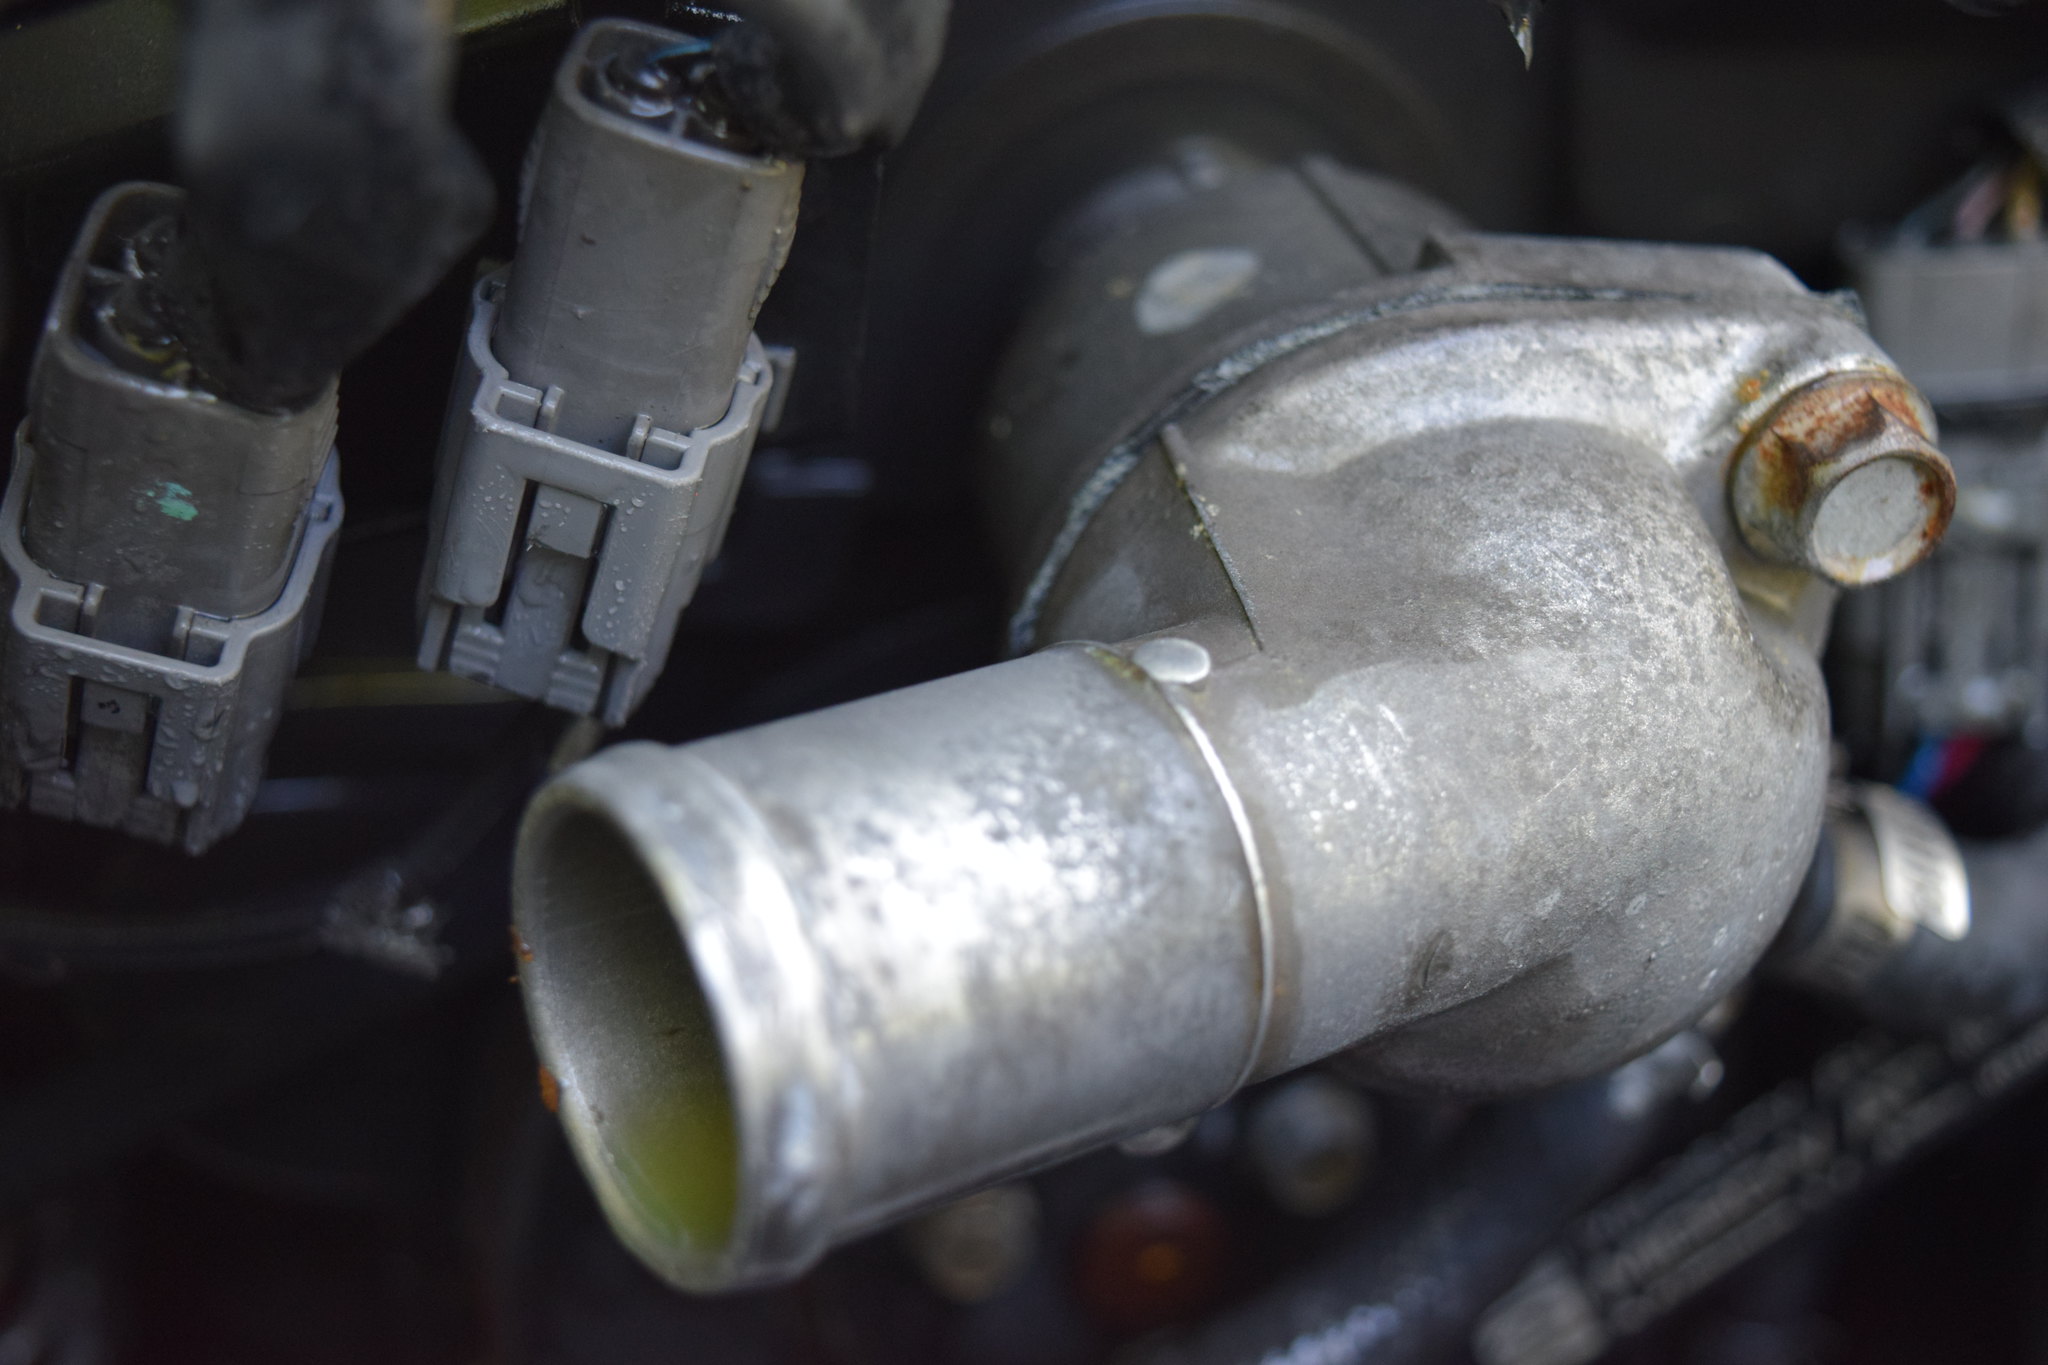
As far as the hose clamp, there was one OEM clamp on the radiator side but with the new hose(obviously thicker) it would not go over the lip so I used the worm clamp on the radiator side and the fancy hose clamp I had left over from Warbird's reroute for the thermostat inlet. I'd all but guarantee the radiator hose was the original.
'01 NB2 aka MisF1re: http://mazdaroadster.net/showthread....218#post207218
'97 M aka Warbird, gone but not forgotten: http://mazdaroadster.net/showthread....B&goto=newpost
Instagram: @greasemonkey2000
Ah, I see. I was under the impression that the TDR kit moved the radiator to make the ic piping work, but it seems I was wrong! BTW there's a special breed of fancy jubilee clamps designed not to cut through hoses, not sure how these are called. Glad you got it all resolved Chad!
Disclaimer: Just another boring maintenance related post so if you desire exciting updates including JDM swag, etc. then just keep browsing because this isn't it.(Those will come eventually though)
05-14-18, mileage- 114,328: Yesterday at work a customer came in saying they were having problems with their battery. So i went to check it out and it was a red top Optima(34R) which i informed them they seem to have a high failure rate since they were bought out.
Checked it out and the voltage(just under 12v) and cold cranking amps(771CCA with a rating of 800CCA) was a little low so it needed to be recharged before determining if it was good/bad. They just wanted to get a new battery, even though this was under warranty.
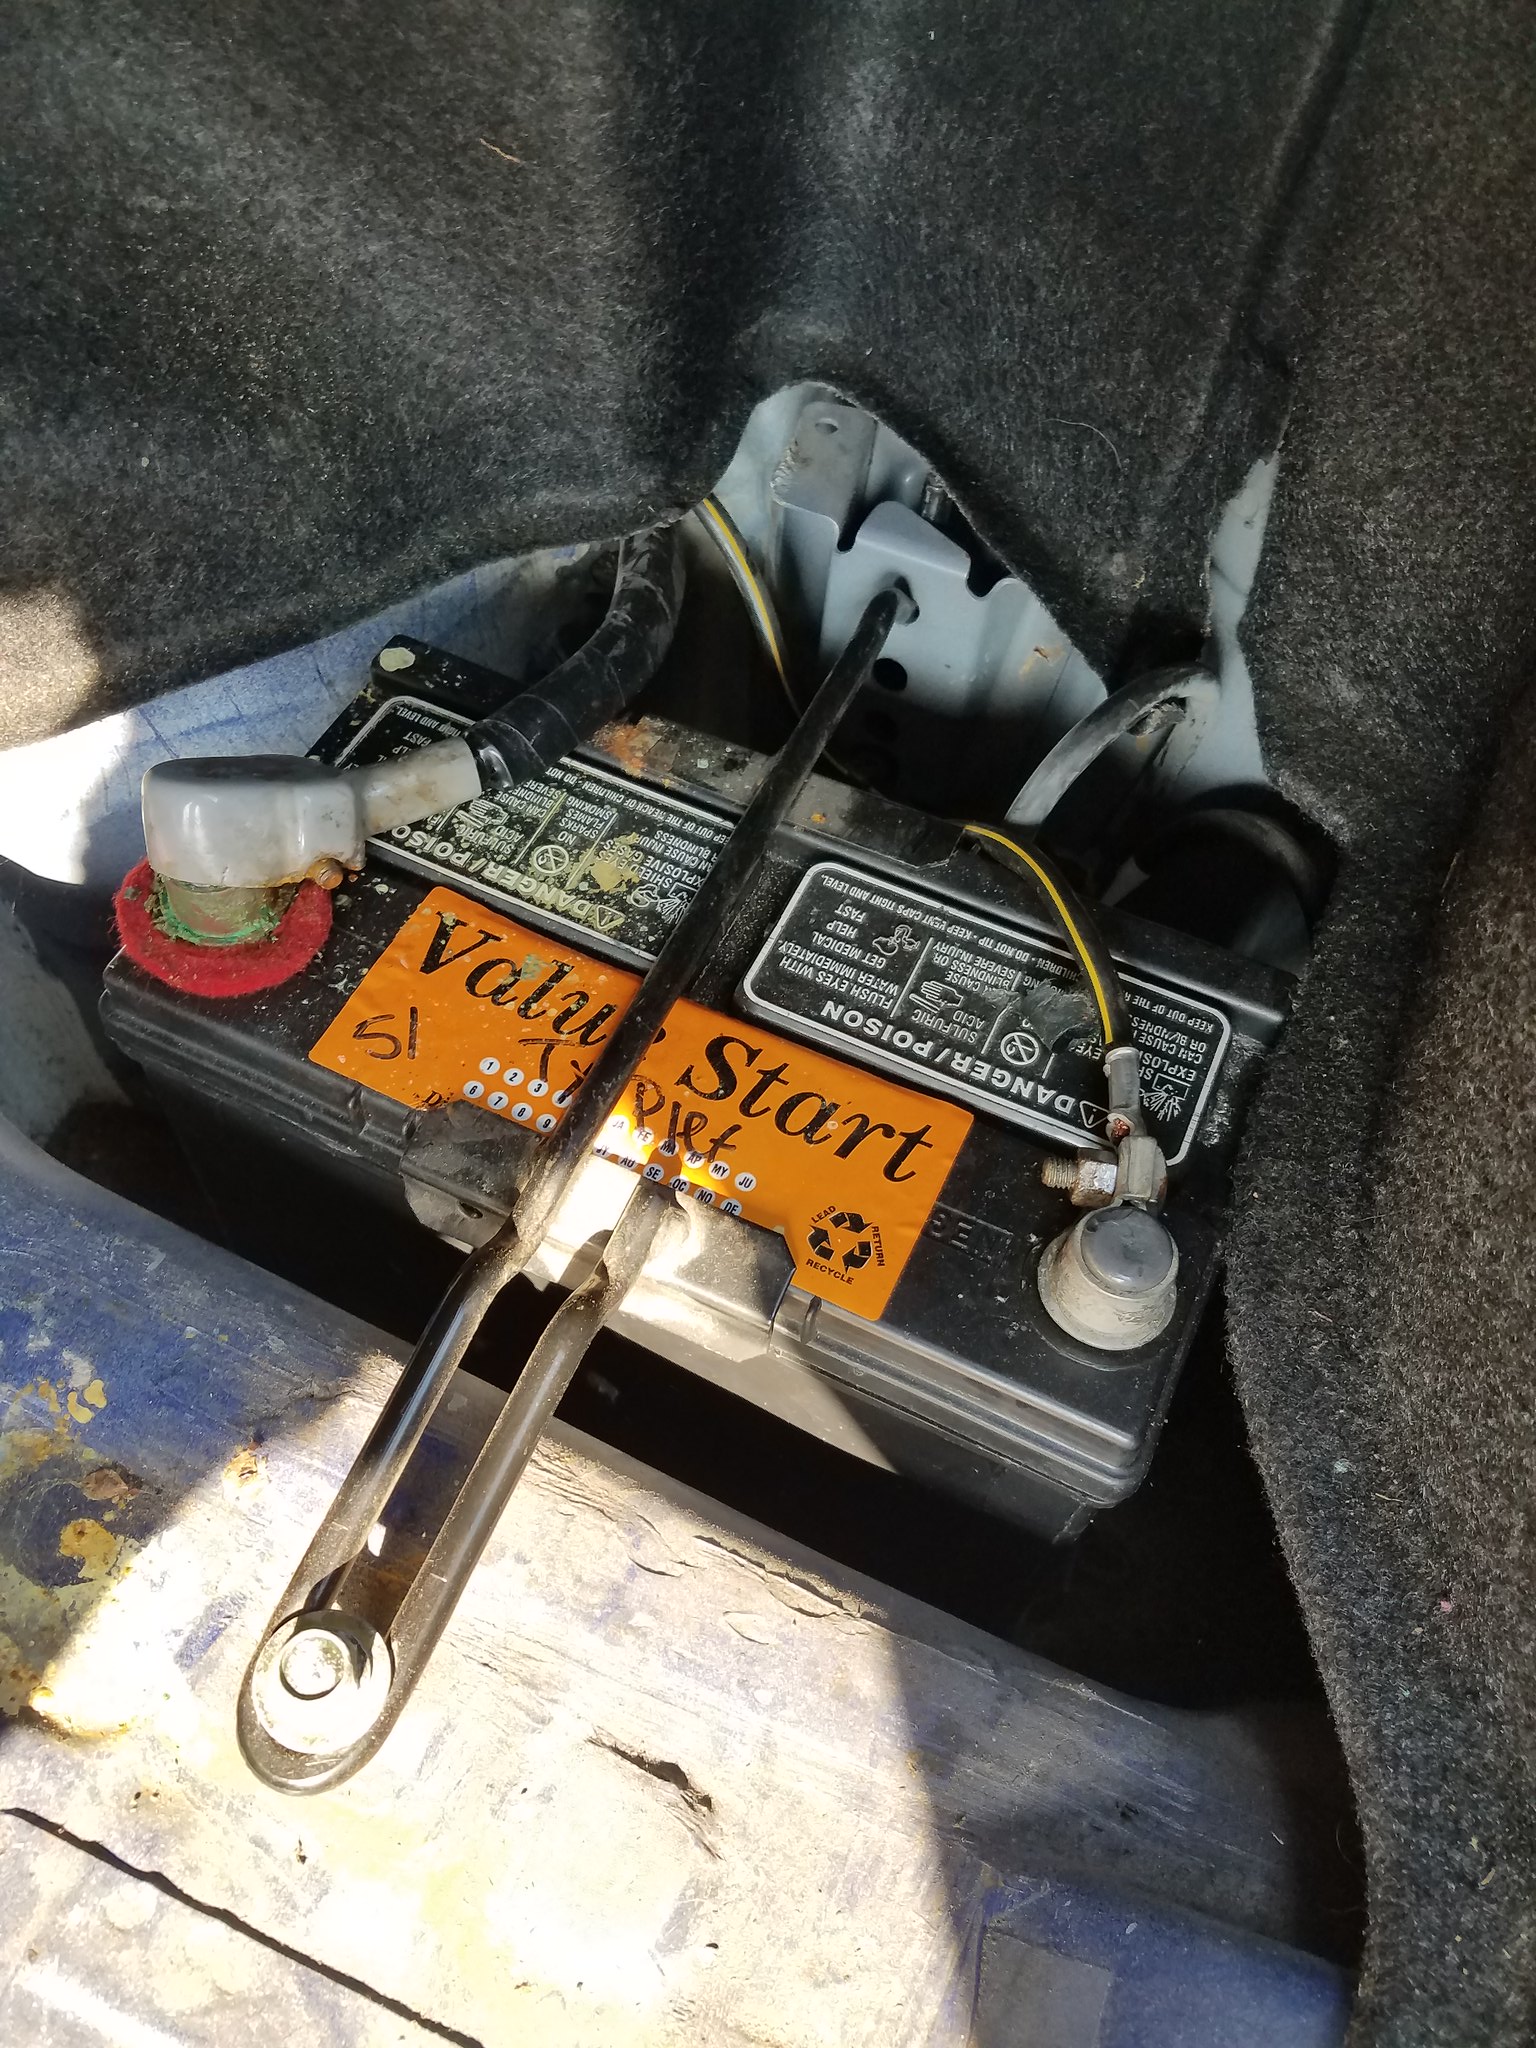
So i took the Optima and put it on a charger and 35 minutes later it showed over 1100CCA and that it was good. Well Misfire's battery was a used battery that looked terrible...
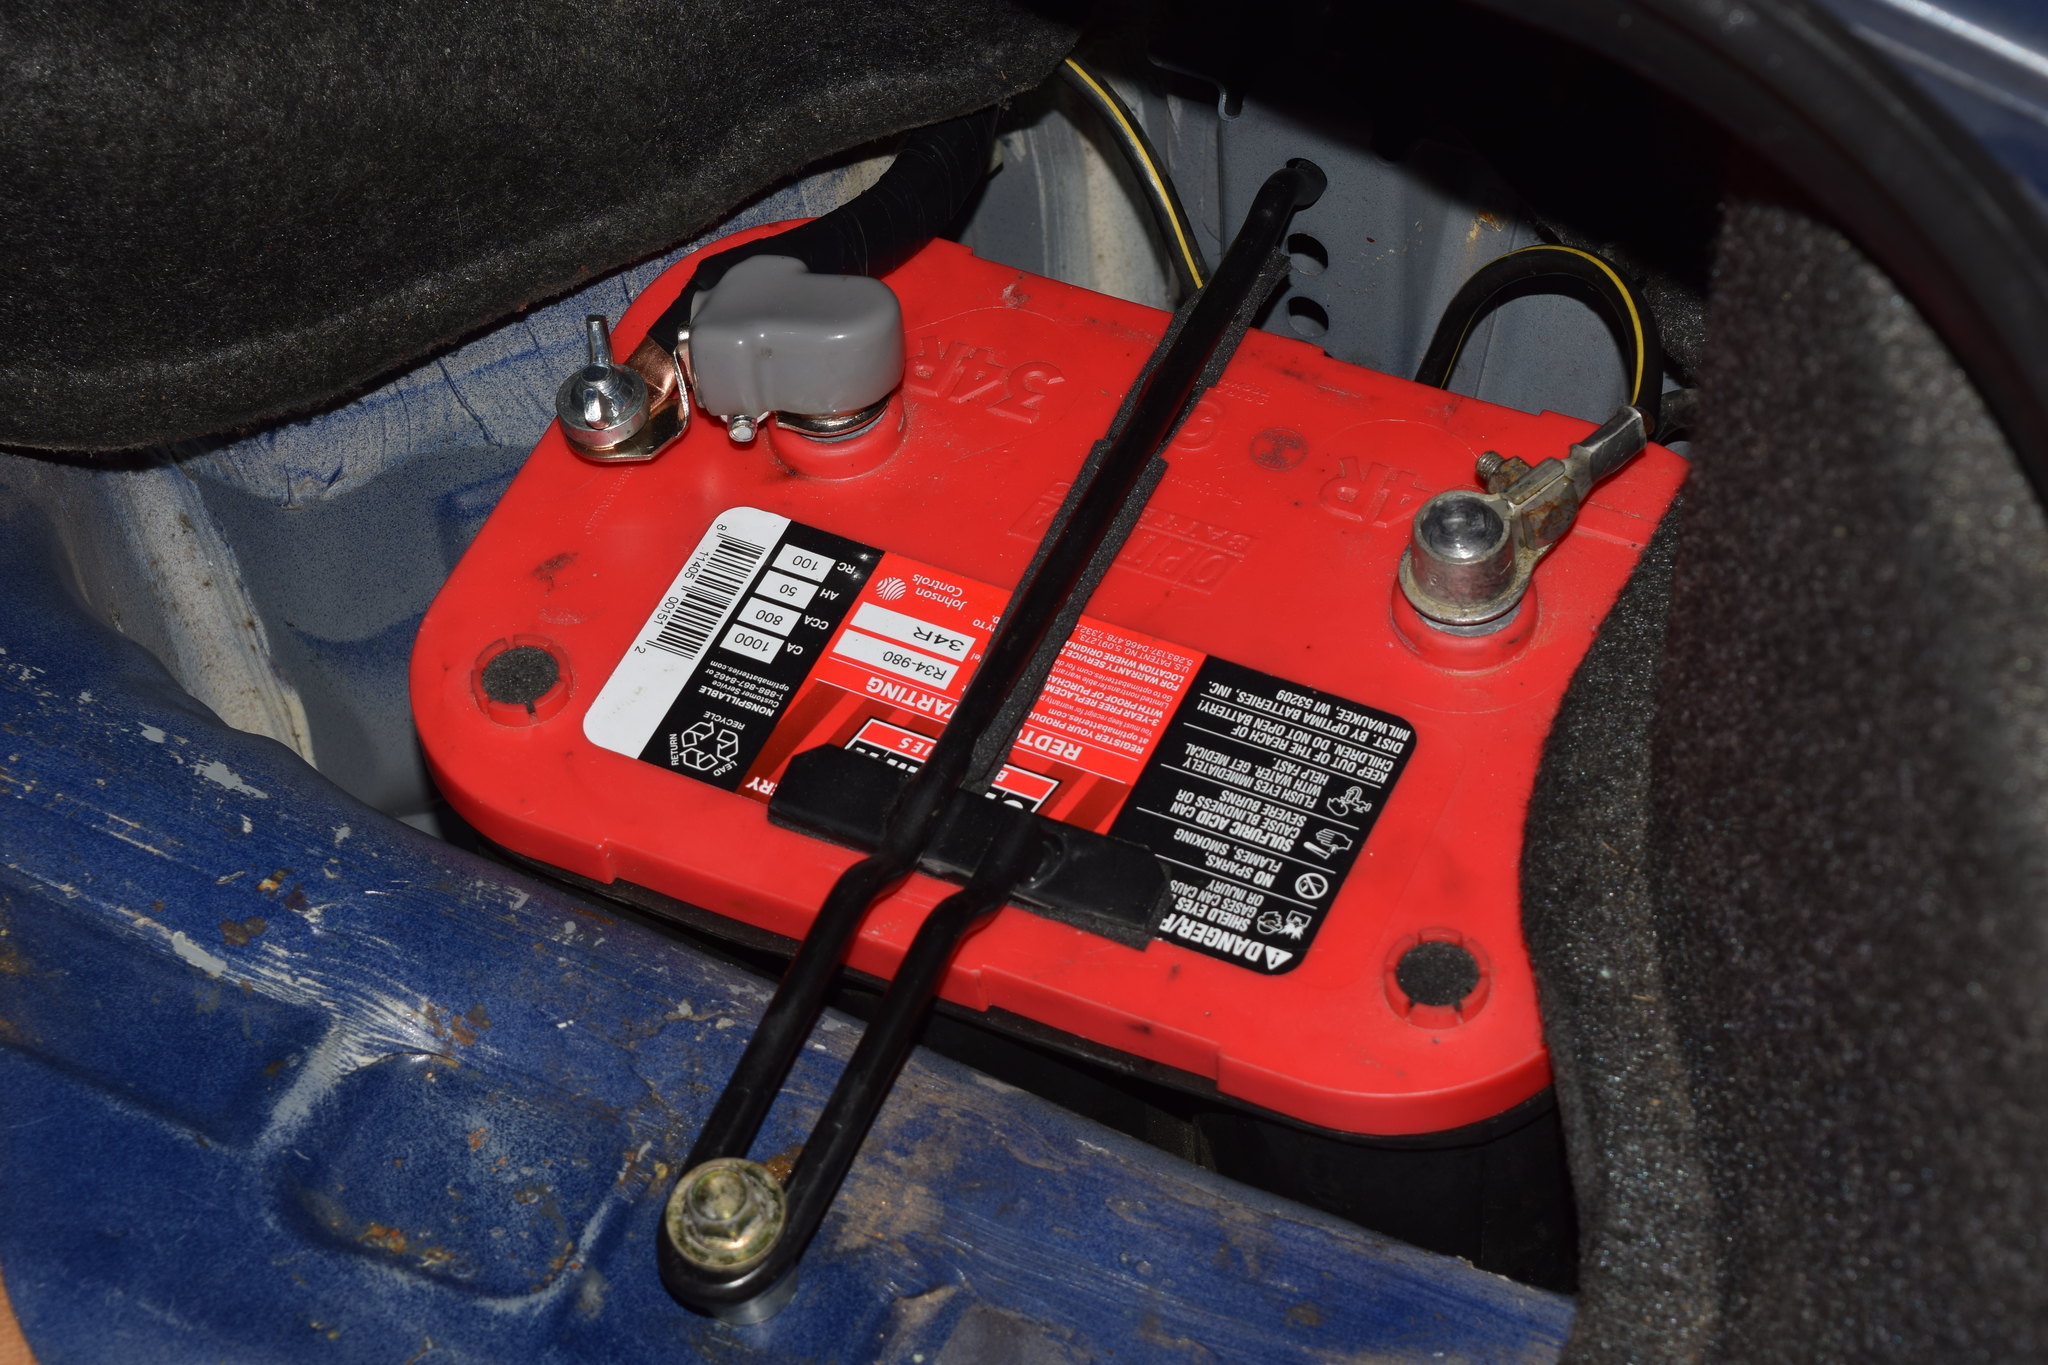
..decided to go ahead and buy the Optima since it was a used battery and could buy it for less than $40 after my employee discount. Of course the positive terminal connector decided to snap in half when i was removing it so had to buy a new one but 15 minutes later the 800CCA Optima was installed in place of the tired 320CCA used battery.
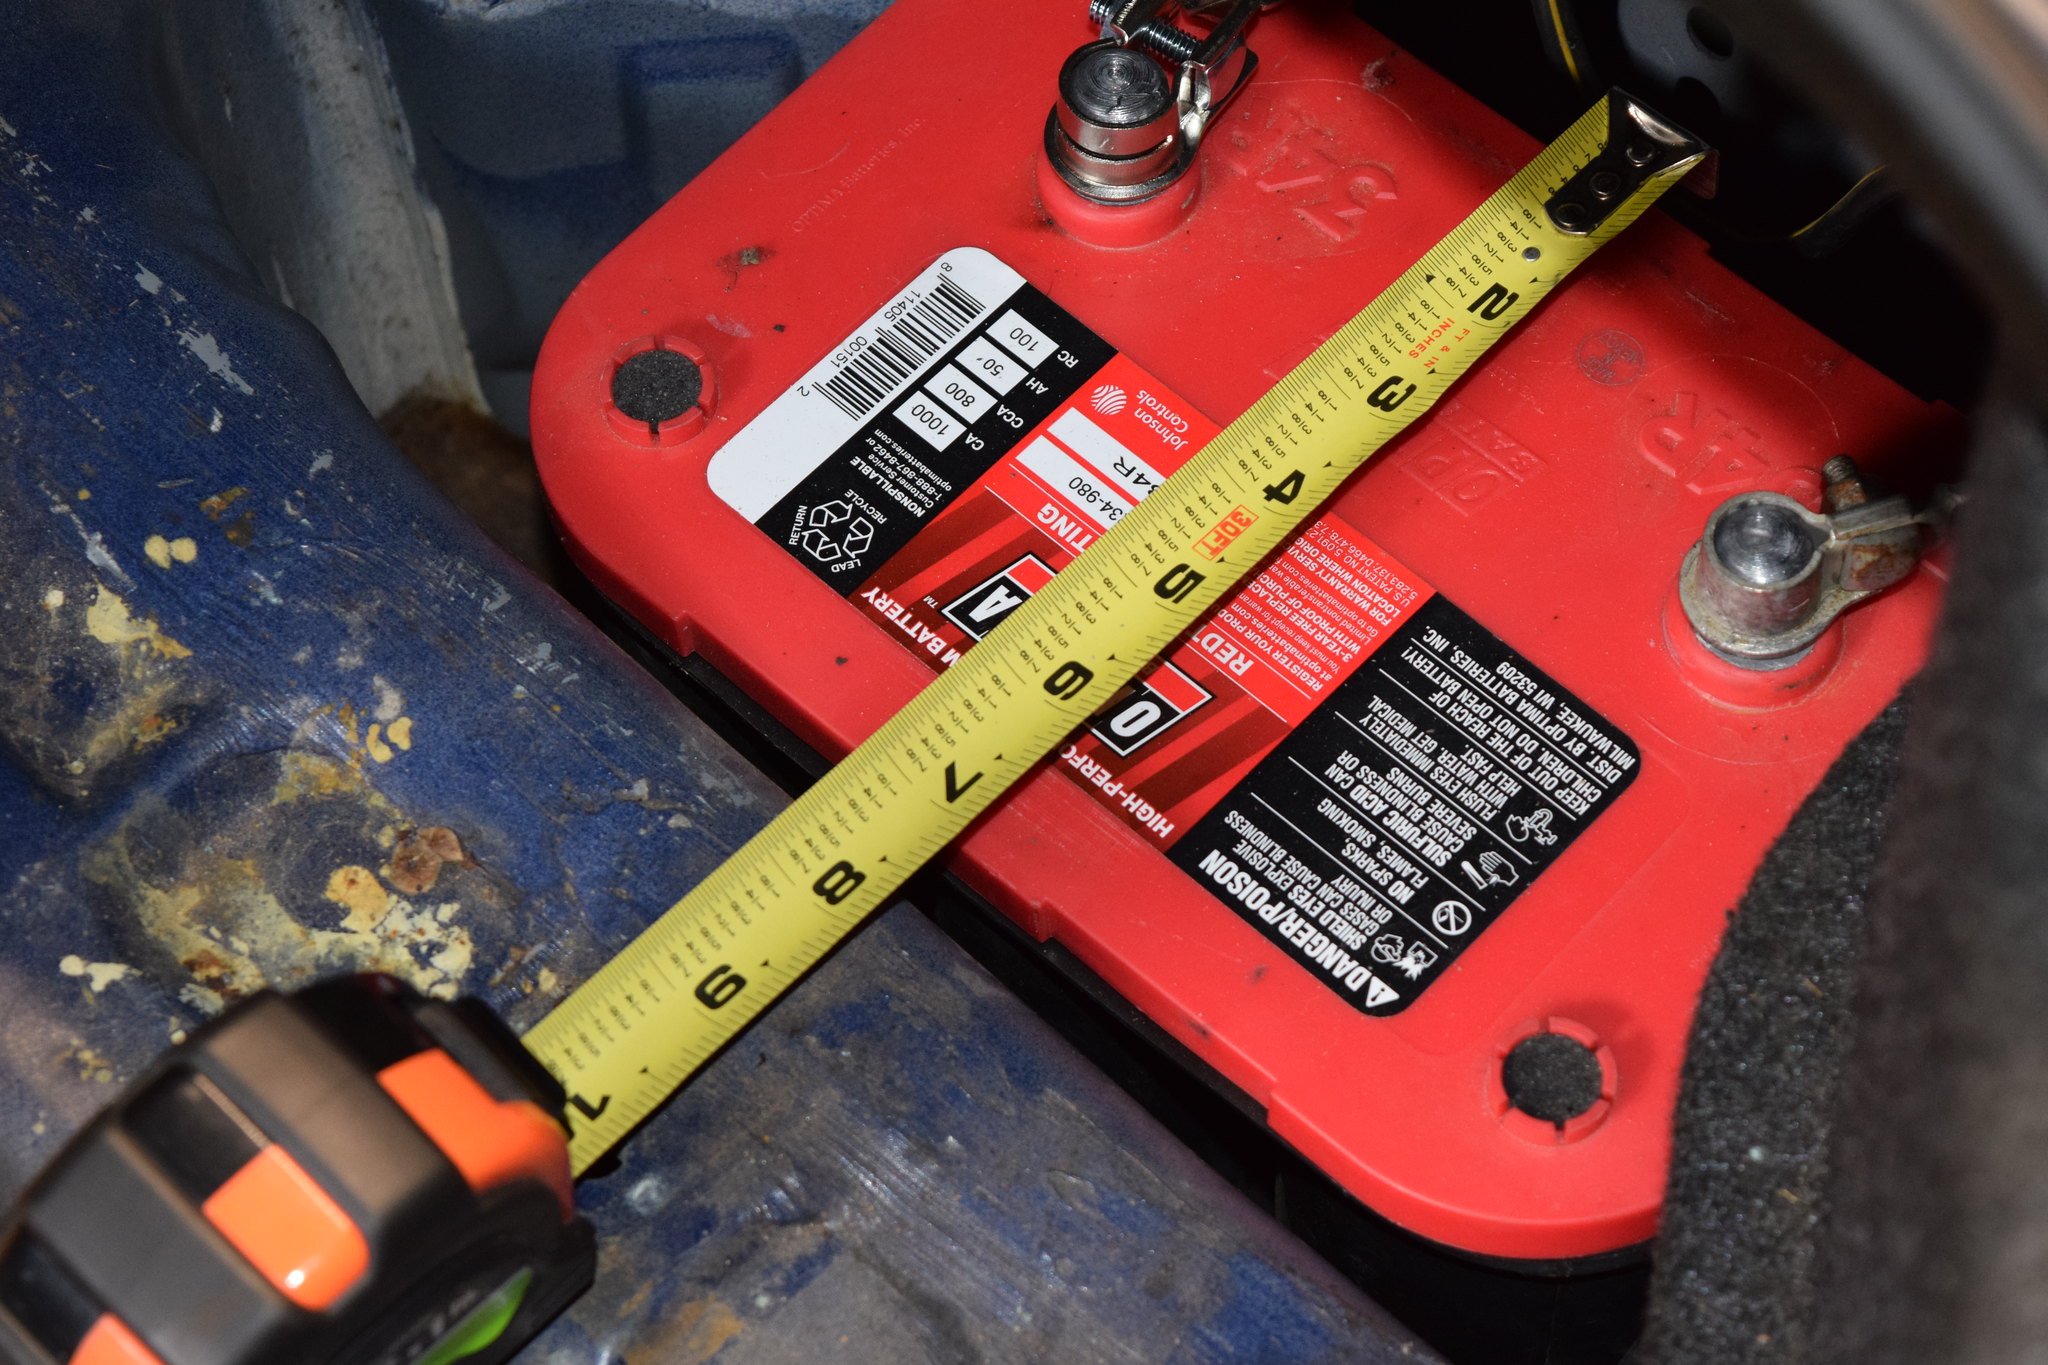
As you can see it is just a little bit wider than the group U1 battery that was in it. Surprisingly both the length and height was very close. Since i installed it at work i didn't have what i needed to make the battery holder fit better so today i tackled that.
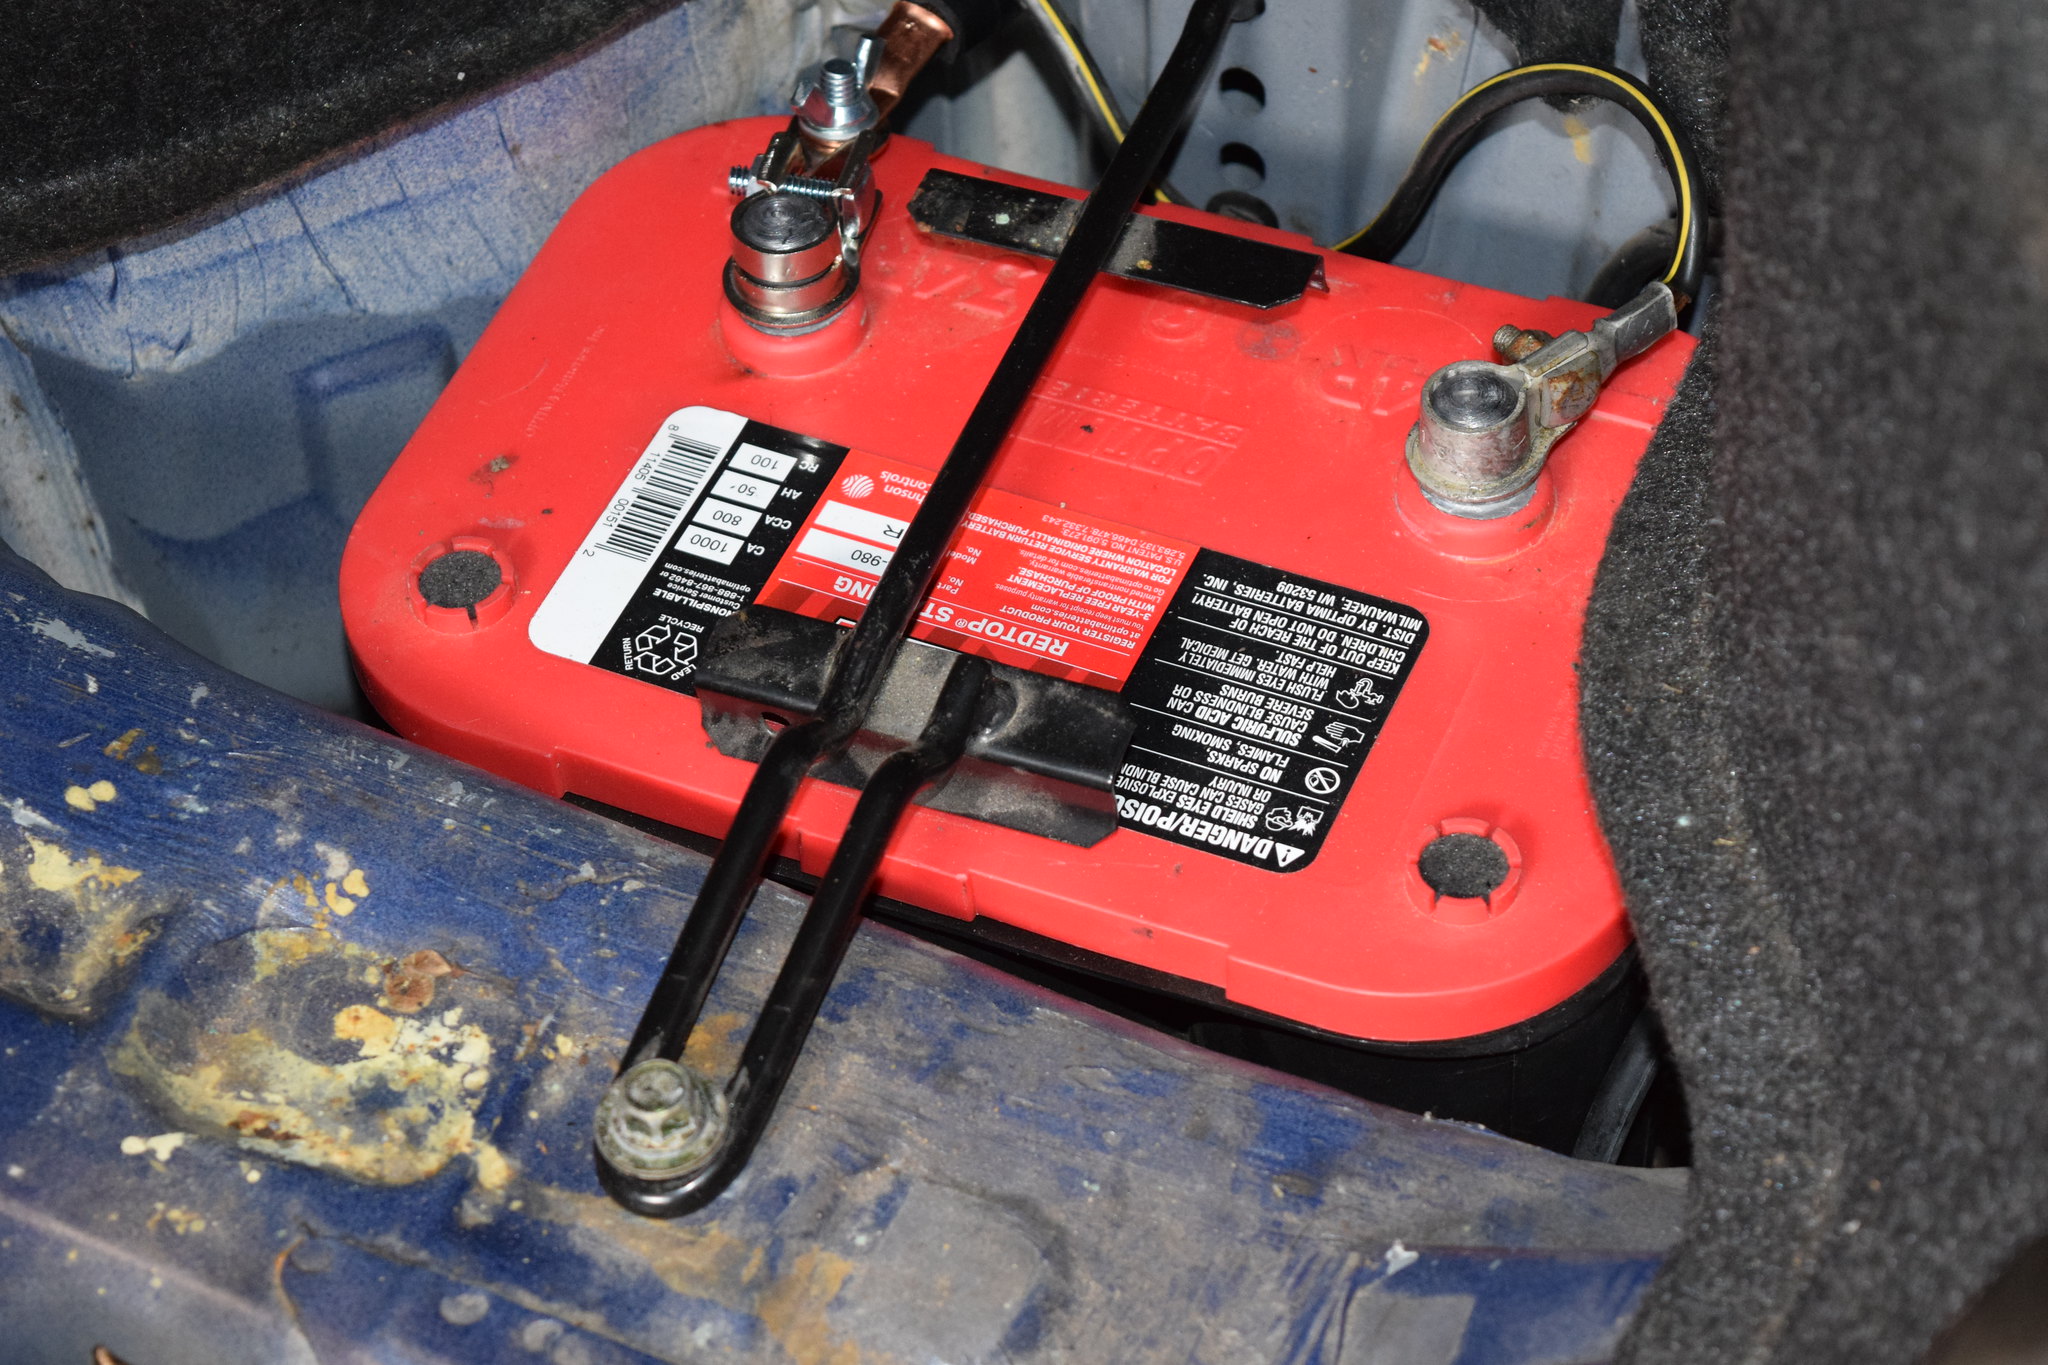
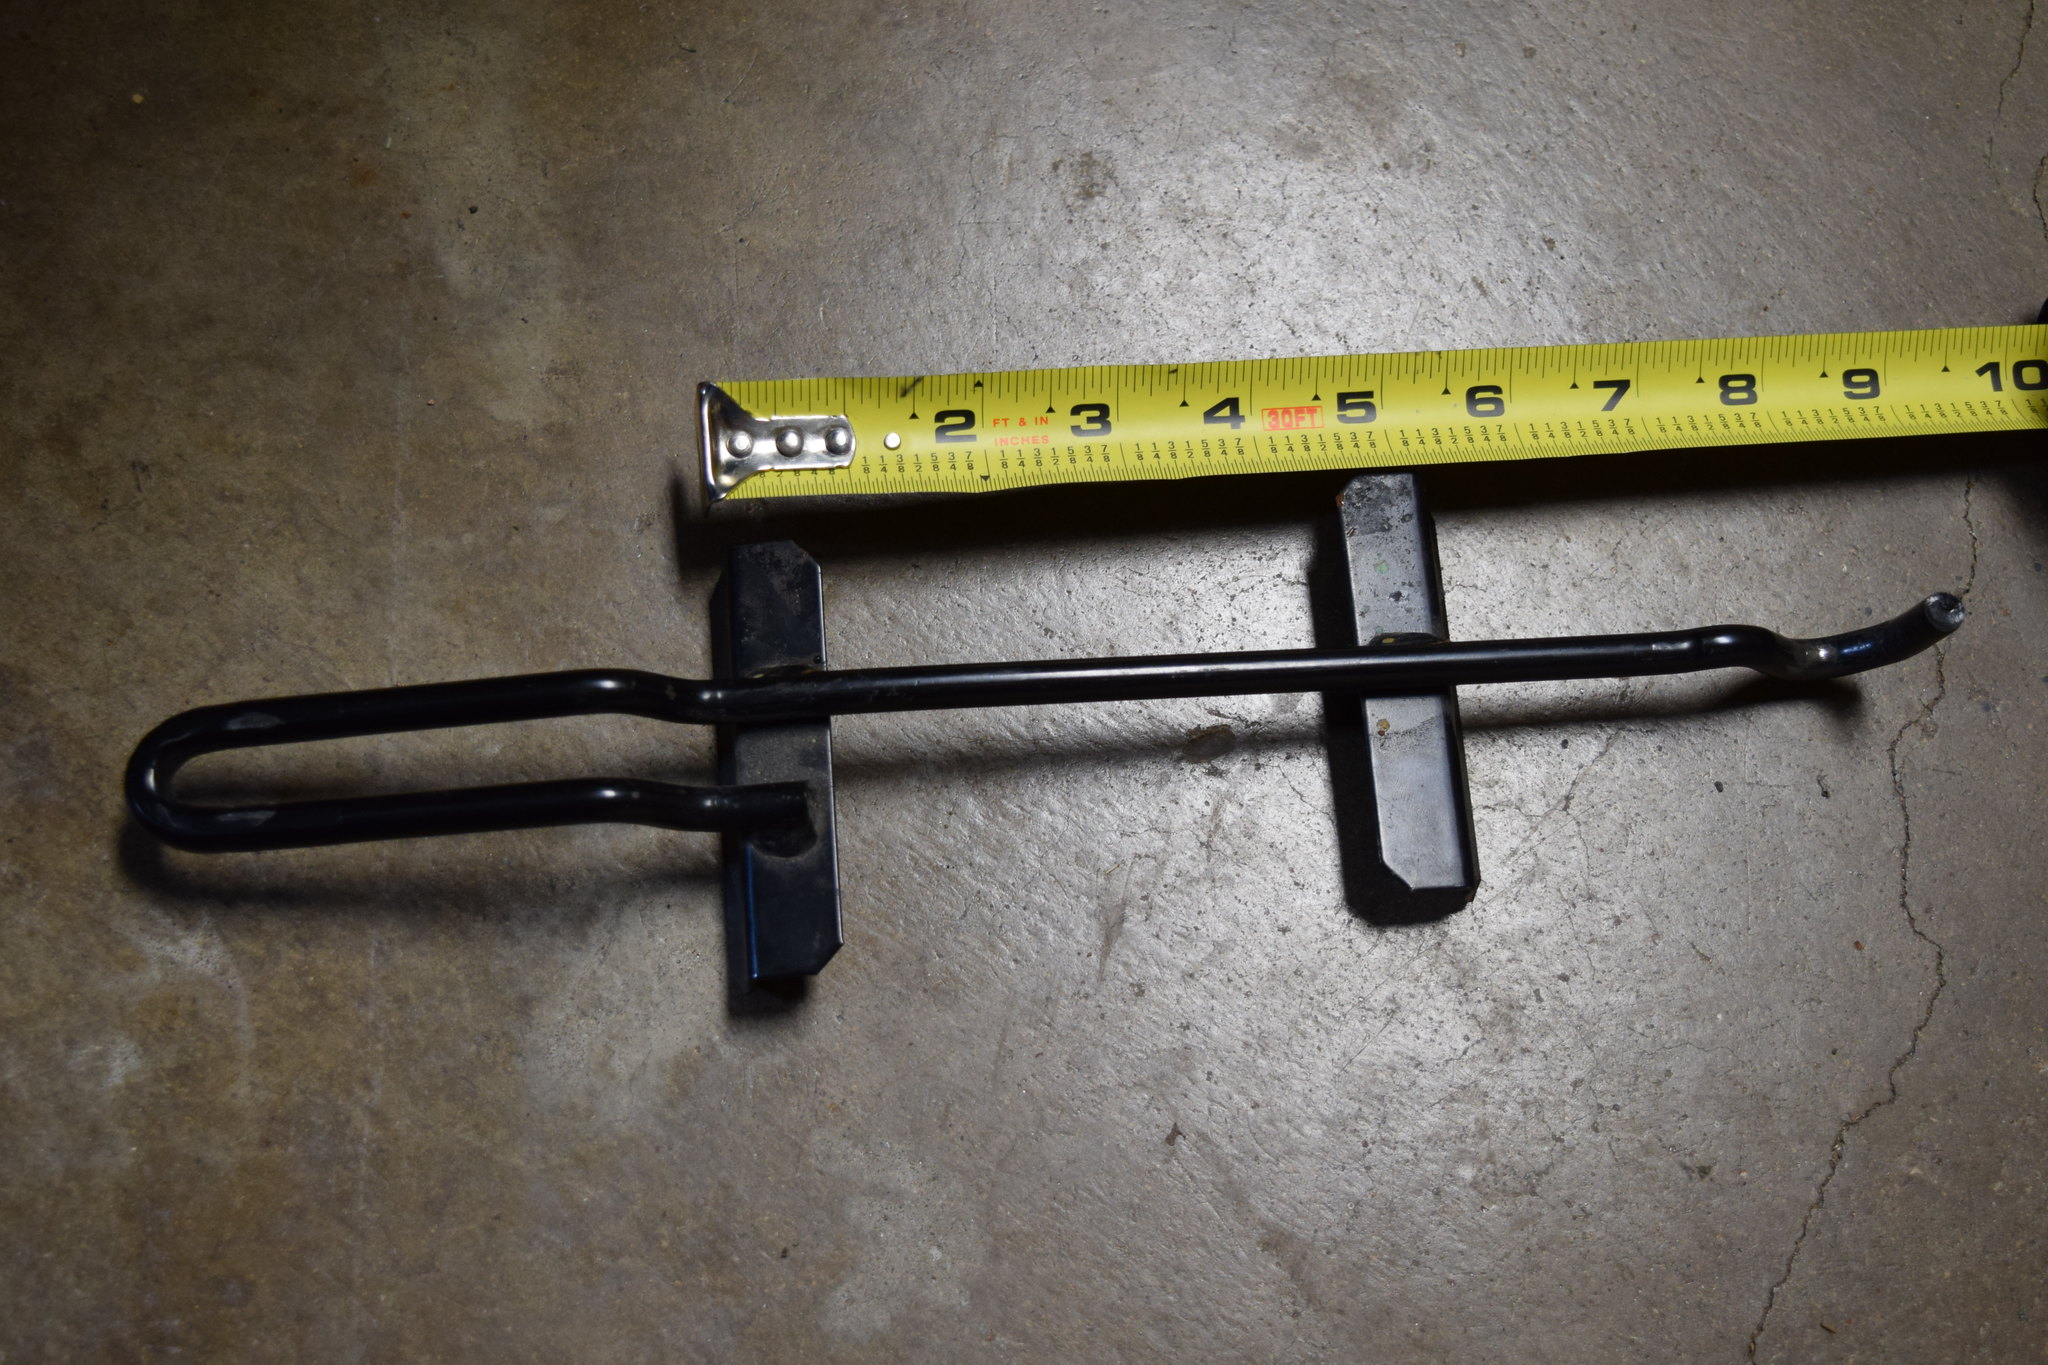
The OEM battery holder is only about 5" wide...
...so obviously the Optima at around....
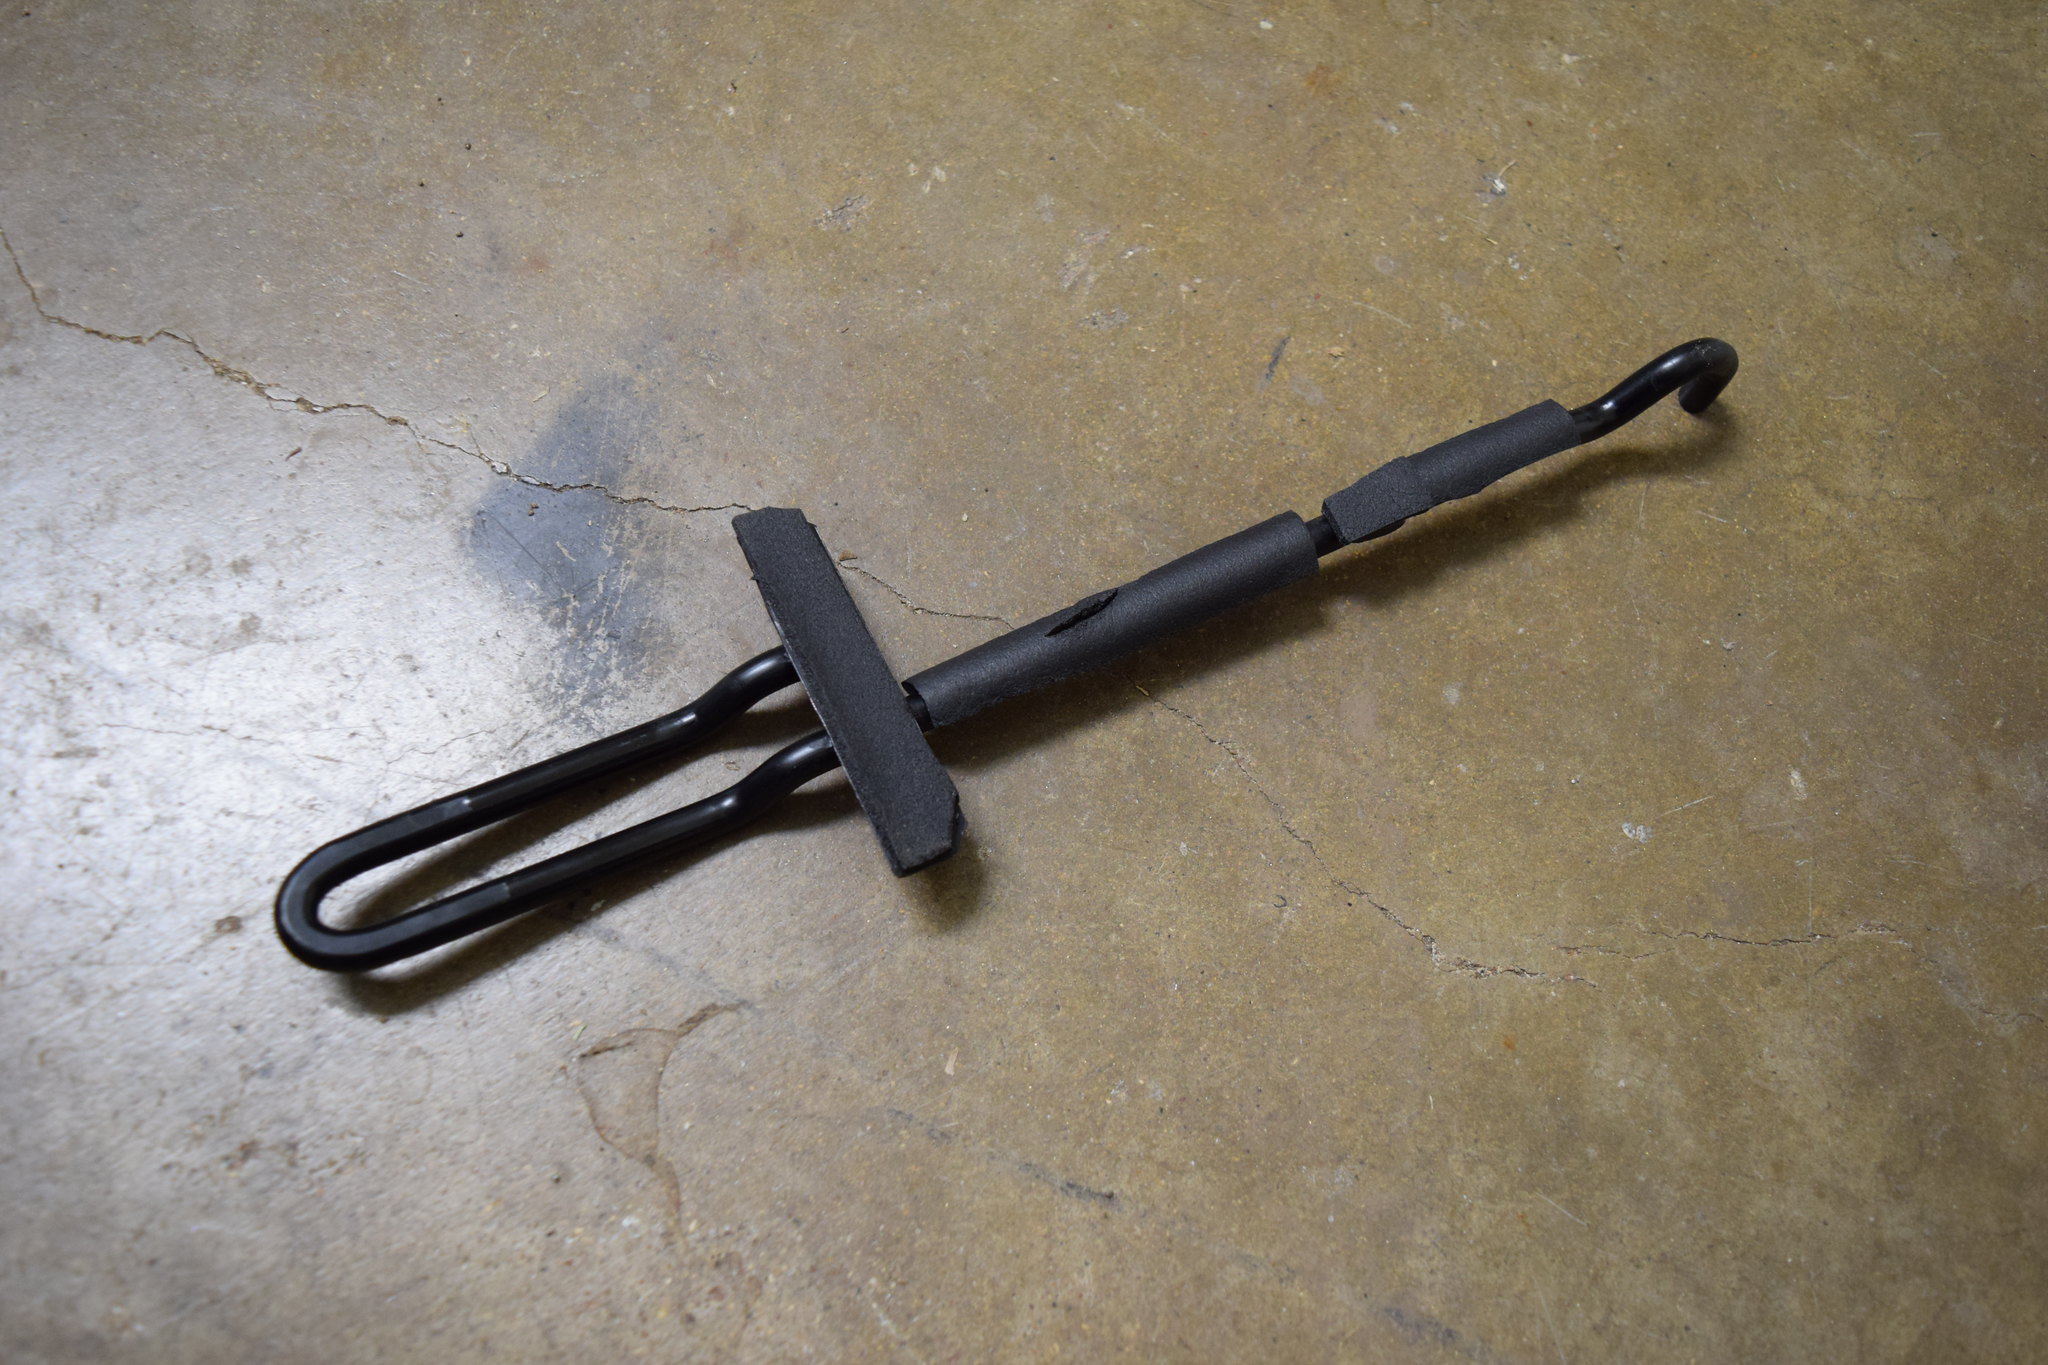
...7" just wasn't going to fit the OEM battery holder properly. I decided the easiest route would be to cut off the 90 degree angles. I did that and then touched it up with some black spray paint and put some foam insulation w/ adhesive backing on the bottom.
Also decided to put the plastic spacer on the bottom of the Optima battery(since it wouldn't fit in the oem tray that was busted anyways) that they come with but this made it sit higher so i used some metal spacers to make up the difference between the body and the OEM battery holder.
I wouldn't buy a Optima new or suggest them to anyone these days but for around $40 for one that tested good then i can't complain if i get a year or so out of it.
'01 NB2 aka MisF1re: http://mazdaroadster.net/showthread....218#post207218
'97 M aka Warbird, gone but not forgotten: http://mazdaroadster.net/showthread....B&goto=newpost
Instagram: @greasemonkey2000
I learned something today... I thought Optima batteries were the best you could get
Return of the Manticore build: http://mazdaroadster.net/showthread....-4-engine-swap
Things change I guess. I'm still on my same yellow top that migrated from my Miata to my 370z to my three different Vettes and C6s are notoriously sensitive to even the slightest drop in voltage. When I need a new battery, I'm going to look for a Braille or off brand equivalent and save 20lbs. I also had the red top in my Miata for several years in the harsh, PNW winters without a problem but I can believe that bean counters have found a way to make them suck now.
No todo que es oro brilla.
My understanding is Optima went down hill after being bought out. Flyin Miata use to sell them but Keith said the failure rate got absurdly high so they stopped carrying them and recommending them.
I have heard similar accounts from people who used to run them. It is a temporary solution that will hopefully last me 6-12 months....hopefully.
'01 NB2 aka MisF1re: http://mazdaroadster.net/showthread....218#post207218
'97 M aka Warbird, gone but not forgotten: http://mazdaroadster.net/showthread....B&goto=newpost
Instagram: @greasemonkey2000
Agent☣Orange (05-14-2018)
06-30-18: I love lights so improving the lights on automobiles is inevitable for me and after having Carbon Miata's LED tail light panel on Warbird I knew I wanted to use the same units for Misfire.
Unfortunately life not always cooperating and not currently having the funds to buy such parts left me looking for alternatives. Obviously buying LED bulbs is the simple PnP route most go with(apparently the NB's have CK sockets so you have to get CK bulbs or move wire for regular LED bulbs to work properly).
So i have been doing research the last few months on alternatives and came across TightShirts YouTube video and then his thread as well:
https://forum.miata.net/vb/showthread.php?t=579725
I really like the idea but as with most 'experiments' the execution wasn't what i was looking for.(i.e. the black silicone solution, didn't want to do the LED arrow which i liked but didn't want with the NB1 tail lights) Then i came across another YouTube video by Boosted Miata:
https://www.youtube.com/watch?v=6JX_7E2m9dM
Of course he just built on what TightShirts did but really liked is execution. I still wanted to improve further which led me to trying to figure out how to better diffuse the LED light. I don't mind the look of individual LED's if all the facing lights are the similar but since i wasn't planning on completely doing away with the incandescent bulbs, at least not right away, I wanted as little of the individuals LED's showing as possible.
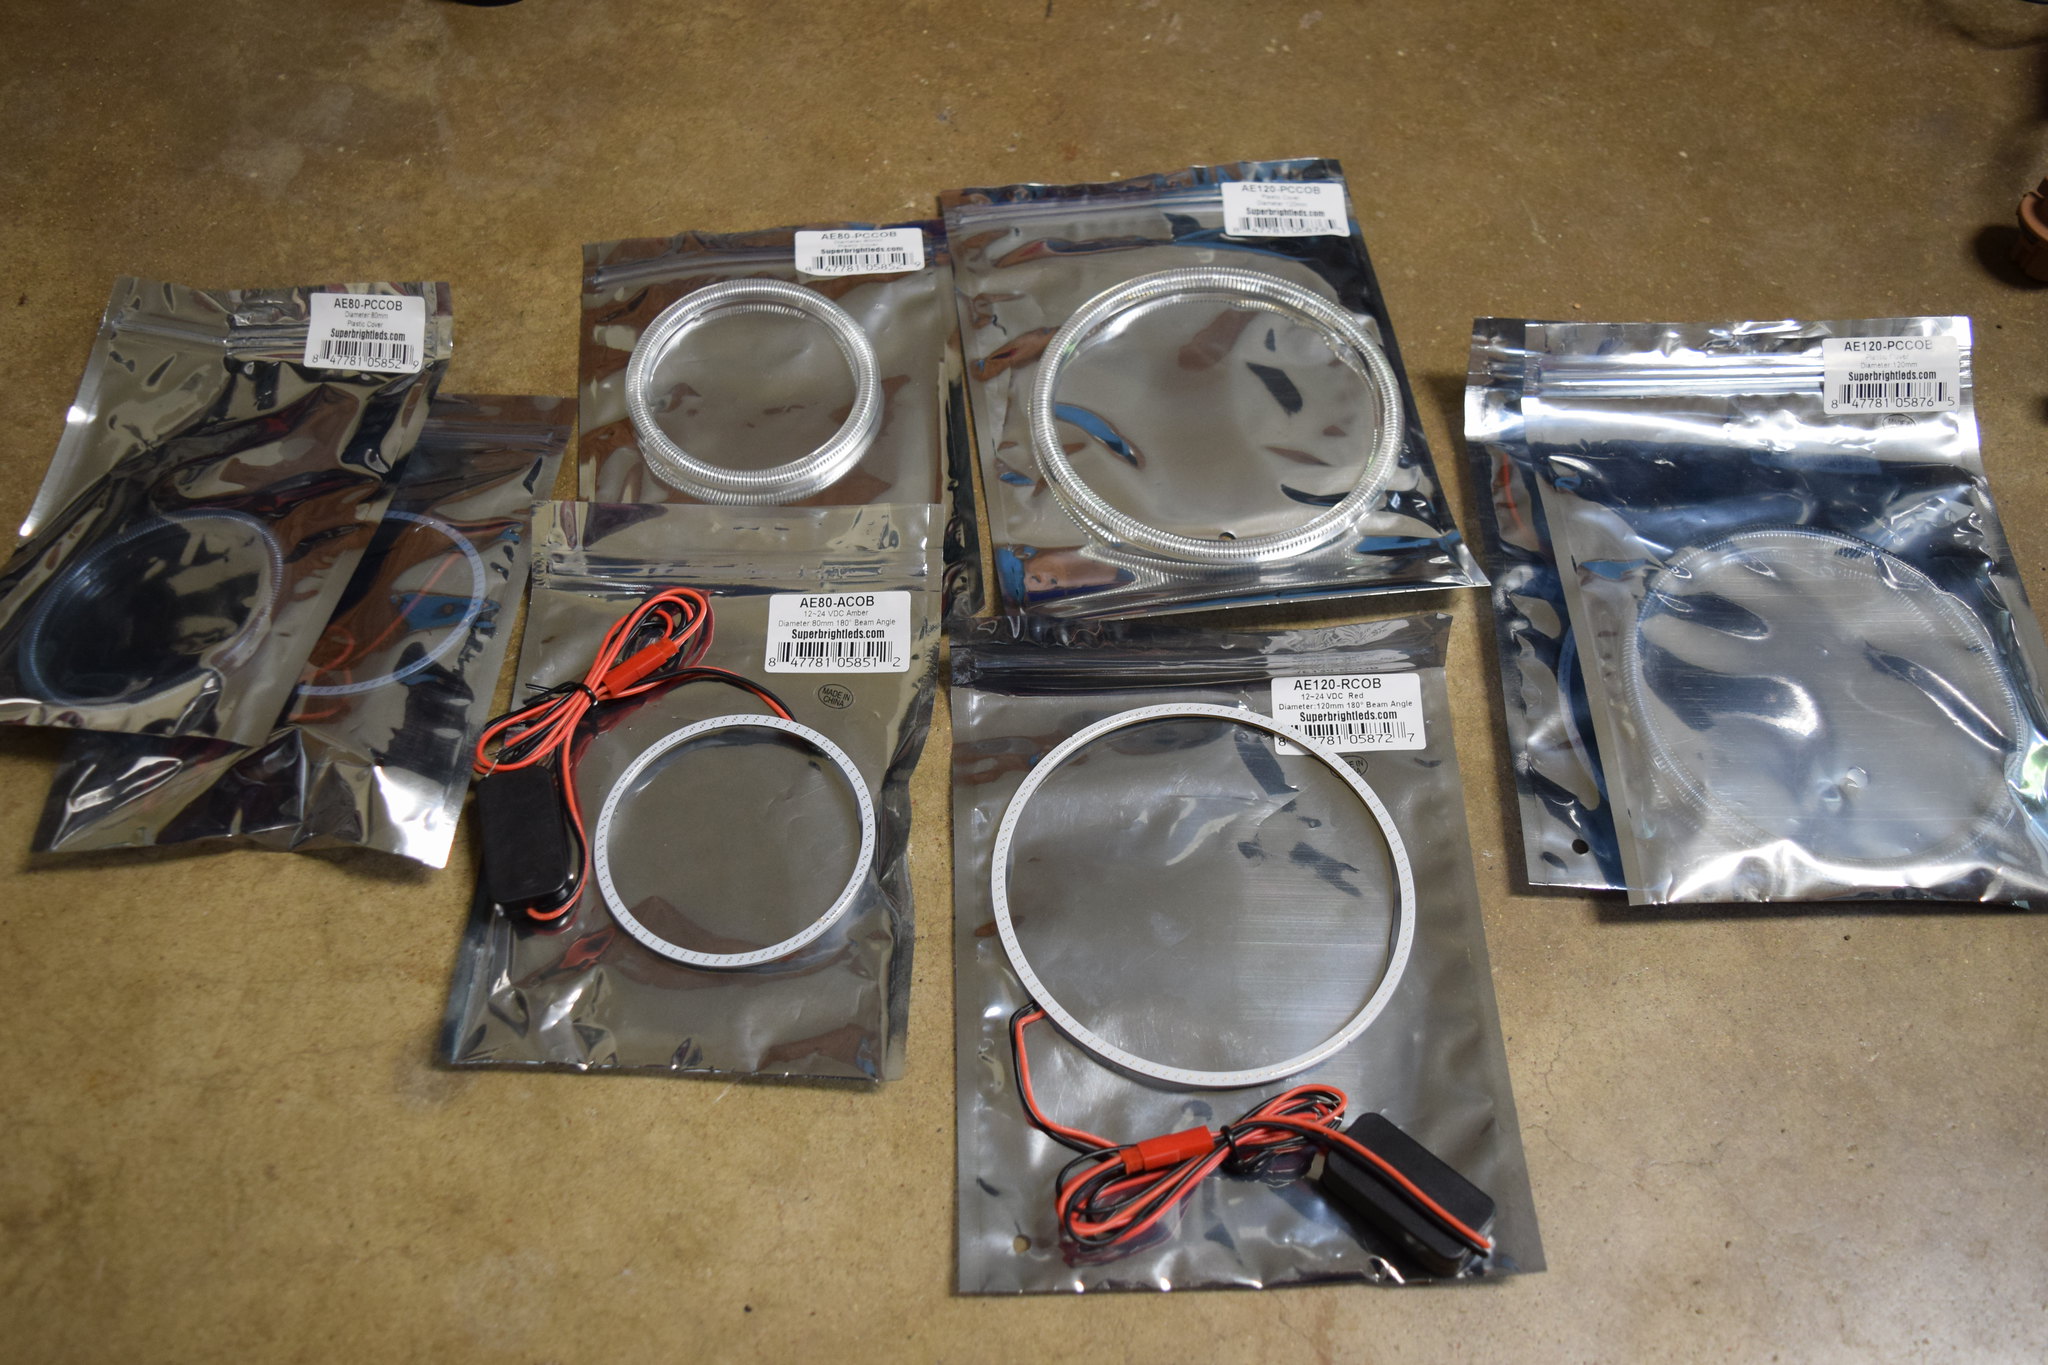
After looking into various diffusers I came across Superbrightleds.com LED halo ring diffusers, problem solved! I ordered the standard 120mm red LED halo rings(x2) with 120mm light diffusers(x2) but minutes later came across their COB(chips on board) LED halo rings which made the issue of individual LED's being apparent nearly non-existent so i figured once combined with the diffuser and the silicone would take care of it completely.
Placed my new order and emailed Superbrightleds.com about cancelling the other order. Thankfully I got the first order cancelled and received the order a few days later. Tested the 120mm red COB LED halo rings and was VERY pleased with that decision. You could barely see the individual LED's and once you put it in the diffuser you couldn't say any individual LED's just a nice even red glow!
I then decided to look into getting COB LED halo rings for the turn signals. Went out to the garage and measured the amber section of Misfire's NB1 taillights and came up with approx. 90mm. I decided to order 80mm COB LED halo rings since I was going to use diffusers and they added a little size and was unsure how much room was actually available INSIDE the lens. Ordered 80mm amber COB LED halo rings(x2) and 80mm diffusers(x2).
Received those a few days later but haven't had the time to install till now. I started by giving Misfire a much deserved bath because who wants to be dirty in pictures! Took some before pictures as usual.
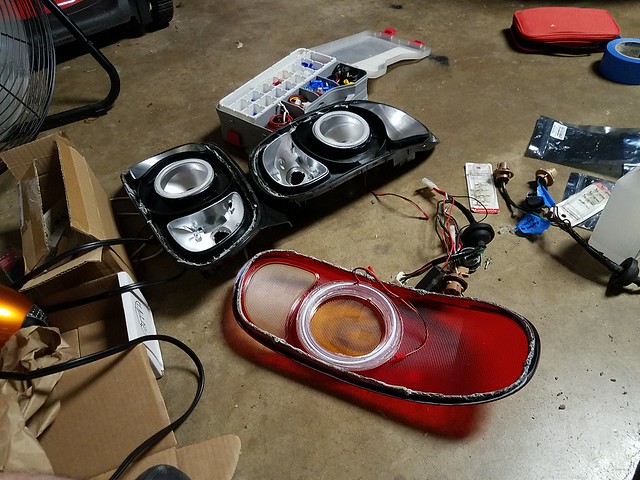
I then tested the light sockets with a multi meter to confirm what wire did what(turn signal hot was the green with black stripe, running light was the white wire), removed the tail lights, pre-heated the oven to 200F, removed the pig tails from the housings, removed the three 7mm torx screws from each tail light and baked each for approx. 15 minutes and separated the lens/housing after such time.
Here are the 120mm red COB LED halo rings(x2), 120mm diffusers(x2), 80mm amber COB LED halo rings(x2) and 80mm diffusers:
The 120mm COB LED halo rings fit/snap into the 120mm diffusers really well and once in you really cant get them back out, a good thing imo, but the 80mm COB LED halo rings didn't fit as nicely in the 80mm diffusers, not a big deal though.
After getting the tail lights apart(per the videos instructions) I decided to first tackle the 120mm halo ring installation. There is a reflector section around the the turn signal that said halo ring fits perfectly into BUT with the diffuser it fit a little bit tighter. I too used silicone to secure it in place, a generous bead, spread as evenly as possible and set it aside.
Then I tackled the 80mm installation....this was 'uncharted territory' so i tried to proceed cautiously. After checking fitment it LOOKS like 90mm could have worked but didn't take an exact measurement to confirm so i cannot make that suggestion and would stick with 80mm personally.
I figured i would try the same method of securing the halo ring. Started putting silicone and looked at it from the outside of the lens and it looked HORRIBLE! I was horrified by how bad it looked. After thinking about it i concluded the main difference was because the 120mm was sitting inside another reflector that helped minimize seeing the silicone thru the lens and reflector.
This was definitely not the way to secure it. So after cleaning it out by letting it cure for a bit and scrapping most of it out by just rubbing it with my finger tips, i used GooGone to get the rest. Unfortunately some of the pieces got in between the lens and reflector ring around the turn signal. So i had to remove the reflector ring which resulted in it coming out but 'broke' some of the edge. It appeared to be secured with some sort of glue from the factory.
After getting it cleaned up, i glued it back and put a towel on top with a 5lb weight while it cured. While that cured i started looking at the other tail light trying to figure out how i was going to secure the 80mm halo ring. I checked the housing and found that it would ALMOST fit into the housing opening for the turn signal and stay in place but the opening was oblong. I figured K.I.S.S.(keep it simple stupid) was the best approach and decided to center it as best as possible to check fitment.
Once i confirmed placement i drilled out a small hole on the bottom rear section of the turn signal area for the 80mm halo ring connector to pass thru. I then put a bead around the areas of the housing the halo ring sat against. Once that was done i went back with some more silicone to get as much contact as possible.
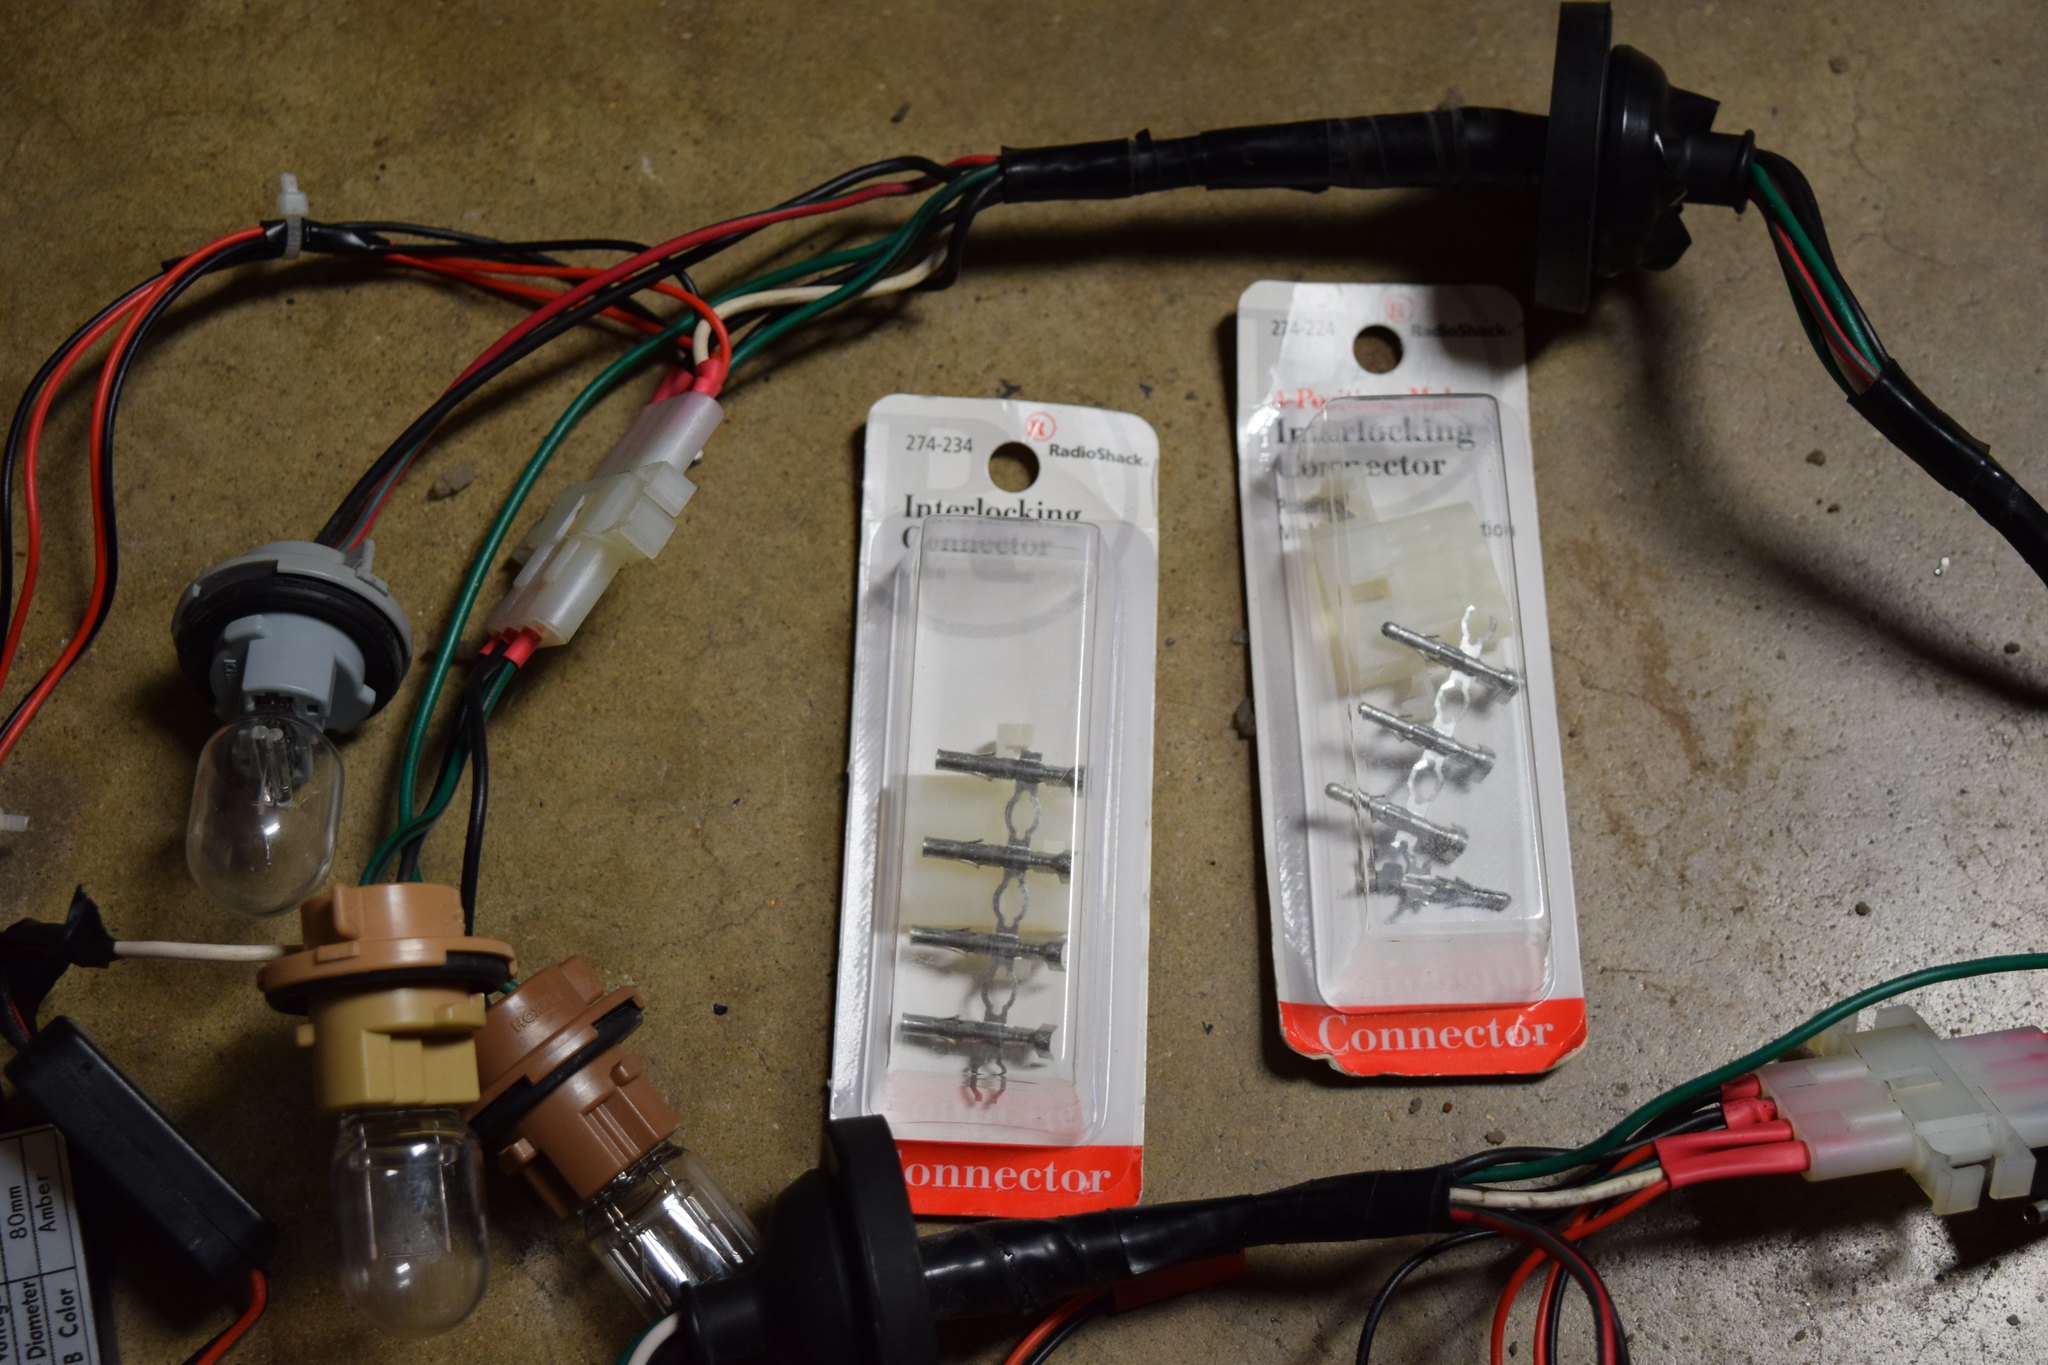
Next I started working on the pig tails this was just as important becuase while i hate electrical projects i want to do it correctly. The other night when lying in bed i recalled i had bought 4 pin connectors to use on Warbird's Carbon Miata LED tail lights but ended up not using them for some reason and found them sitting in my dresser draw! They are male/female 4 pin connectors from Radio Shack that i bought off eBay.
I also reconfirmed the wires needed from Boosted Miata's video since he bench tested with a power source, he did pretty good considering he said he is color blind! Here is the final result of the pig tails and the connectors i used.(i even used heat shrink, i felt like a pro!)
I was very pleased with myself!
I didn't take many pictures since between the two sources most everything is covered EXCEPT for how i secured the 80mm halos and forgot to take a picture with the Nikon but did get a picture with my phone for Instagram so here it is:
You can see the 80mm halo rings are NEARLY a prefect fit for the housing openings which is another reason i wouldn't suggest any bigger.
I tested the first completed harness and thankfully it worked! I have a video but it is on my Instagram, same user name if you want to check a couple videos out.
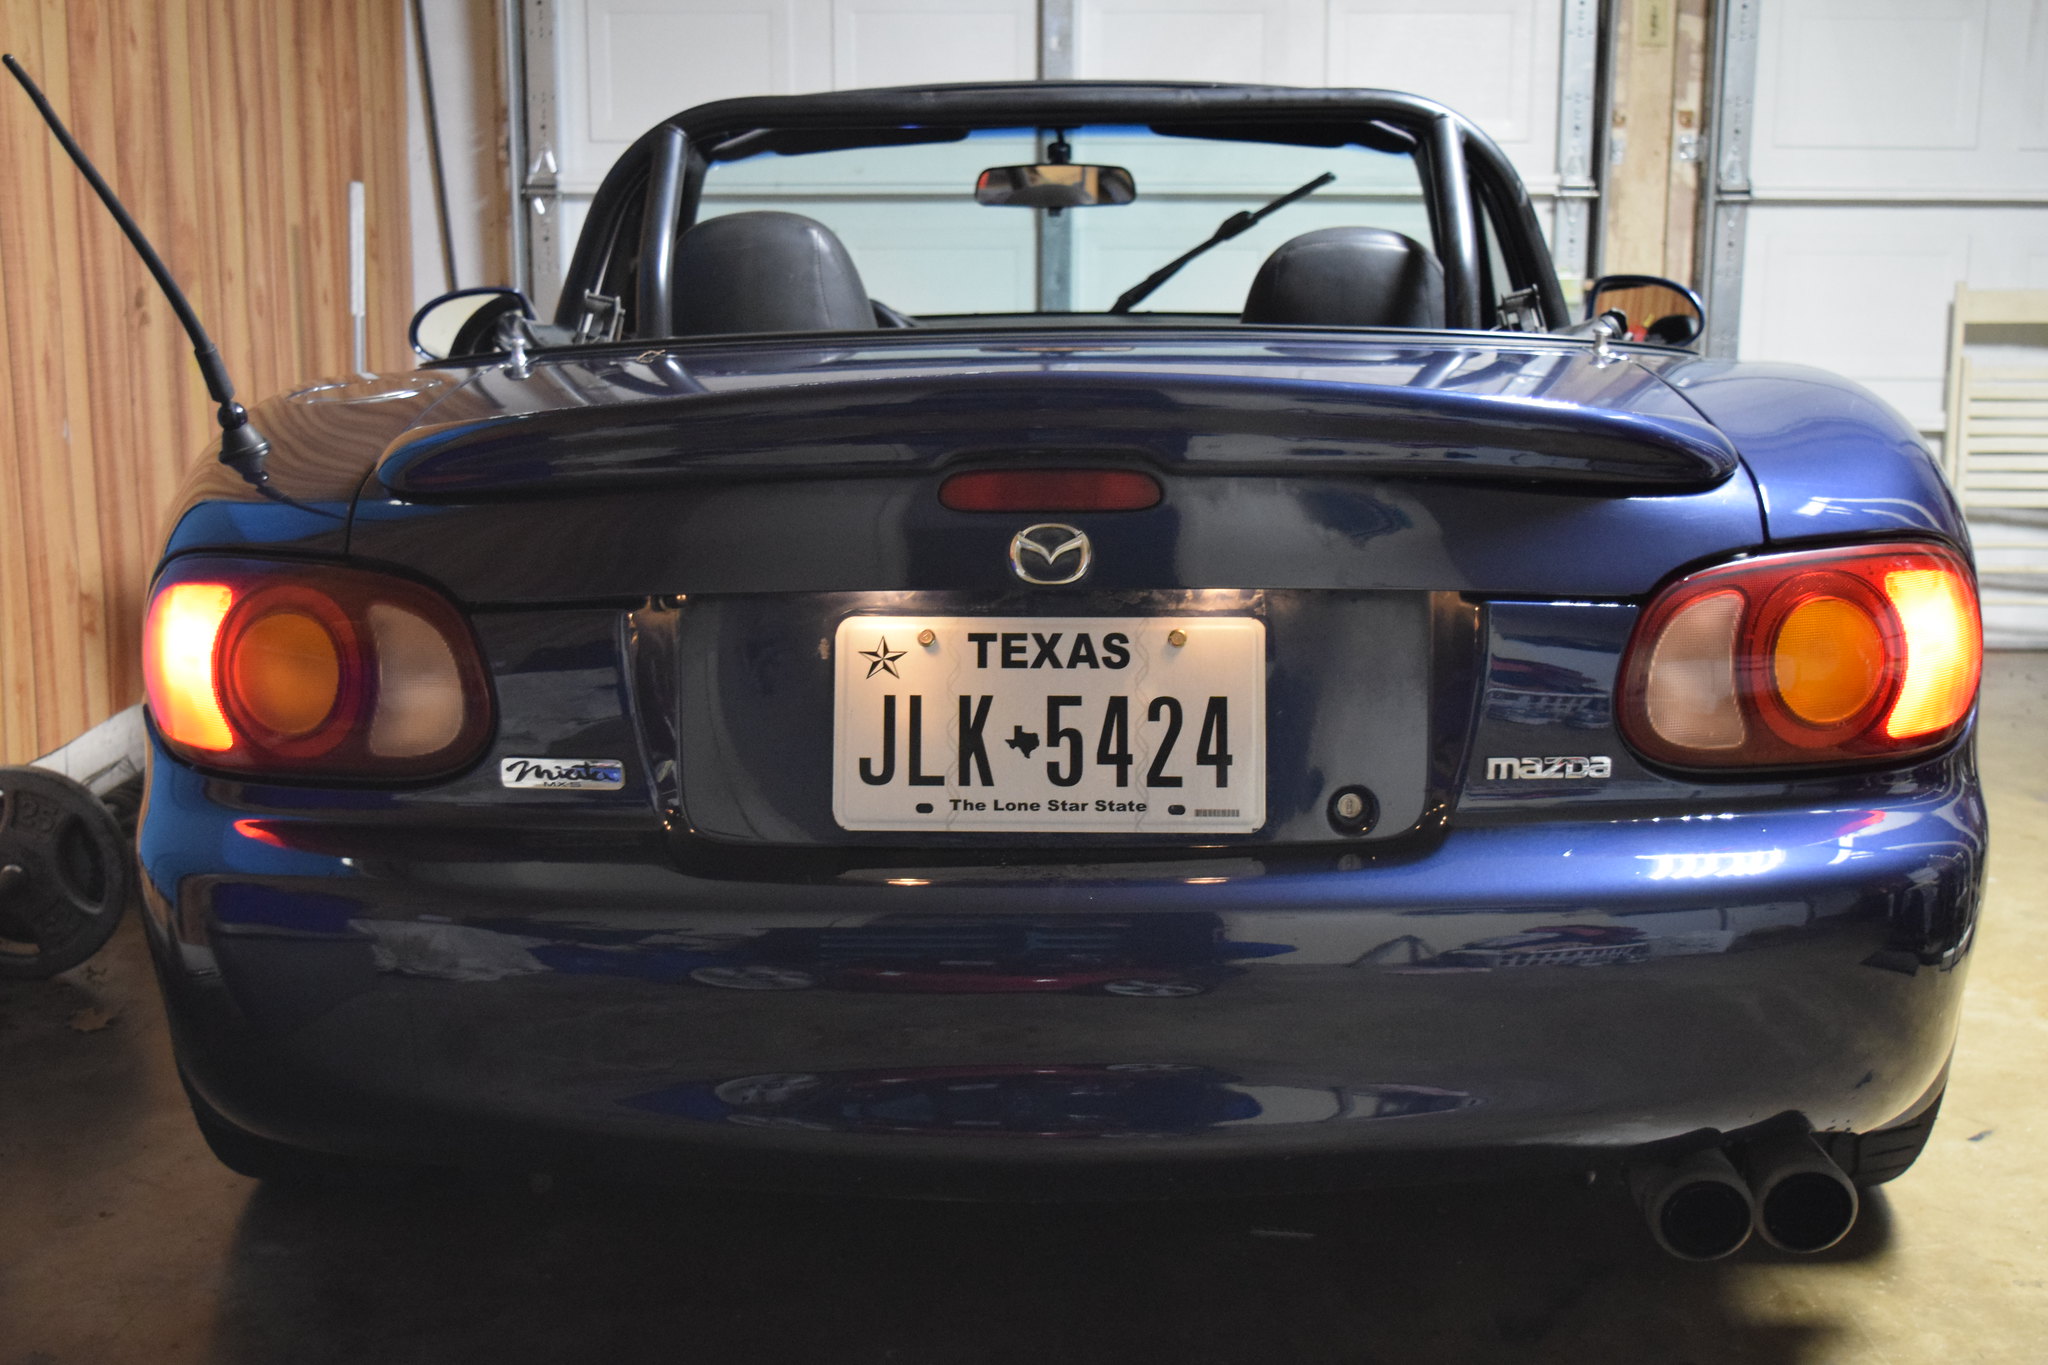
Okay enough talking here is the finished product and let me say the my lousy 'photography' skills, or lack there or, made capturing the results rather difficult but will try to get better pics(some didn't turn out which is why i don't have all the comparison pics).
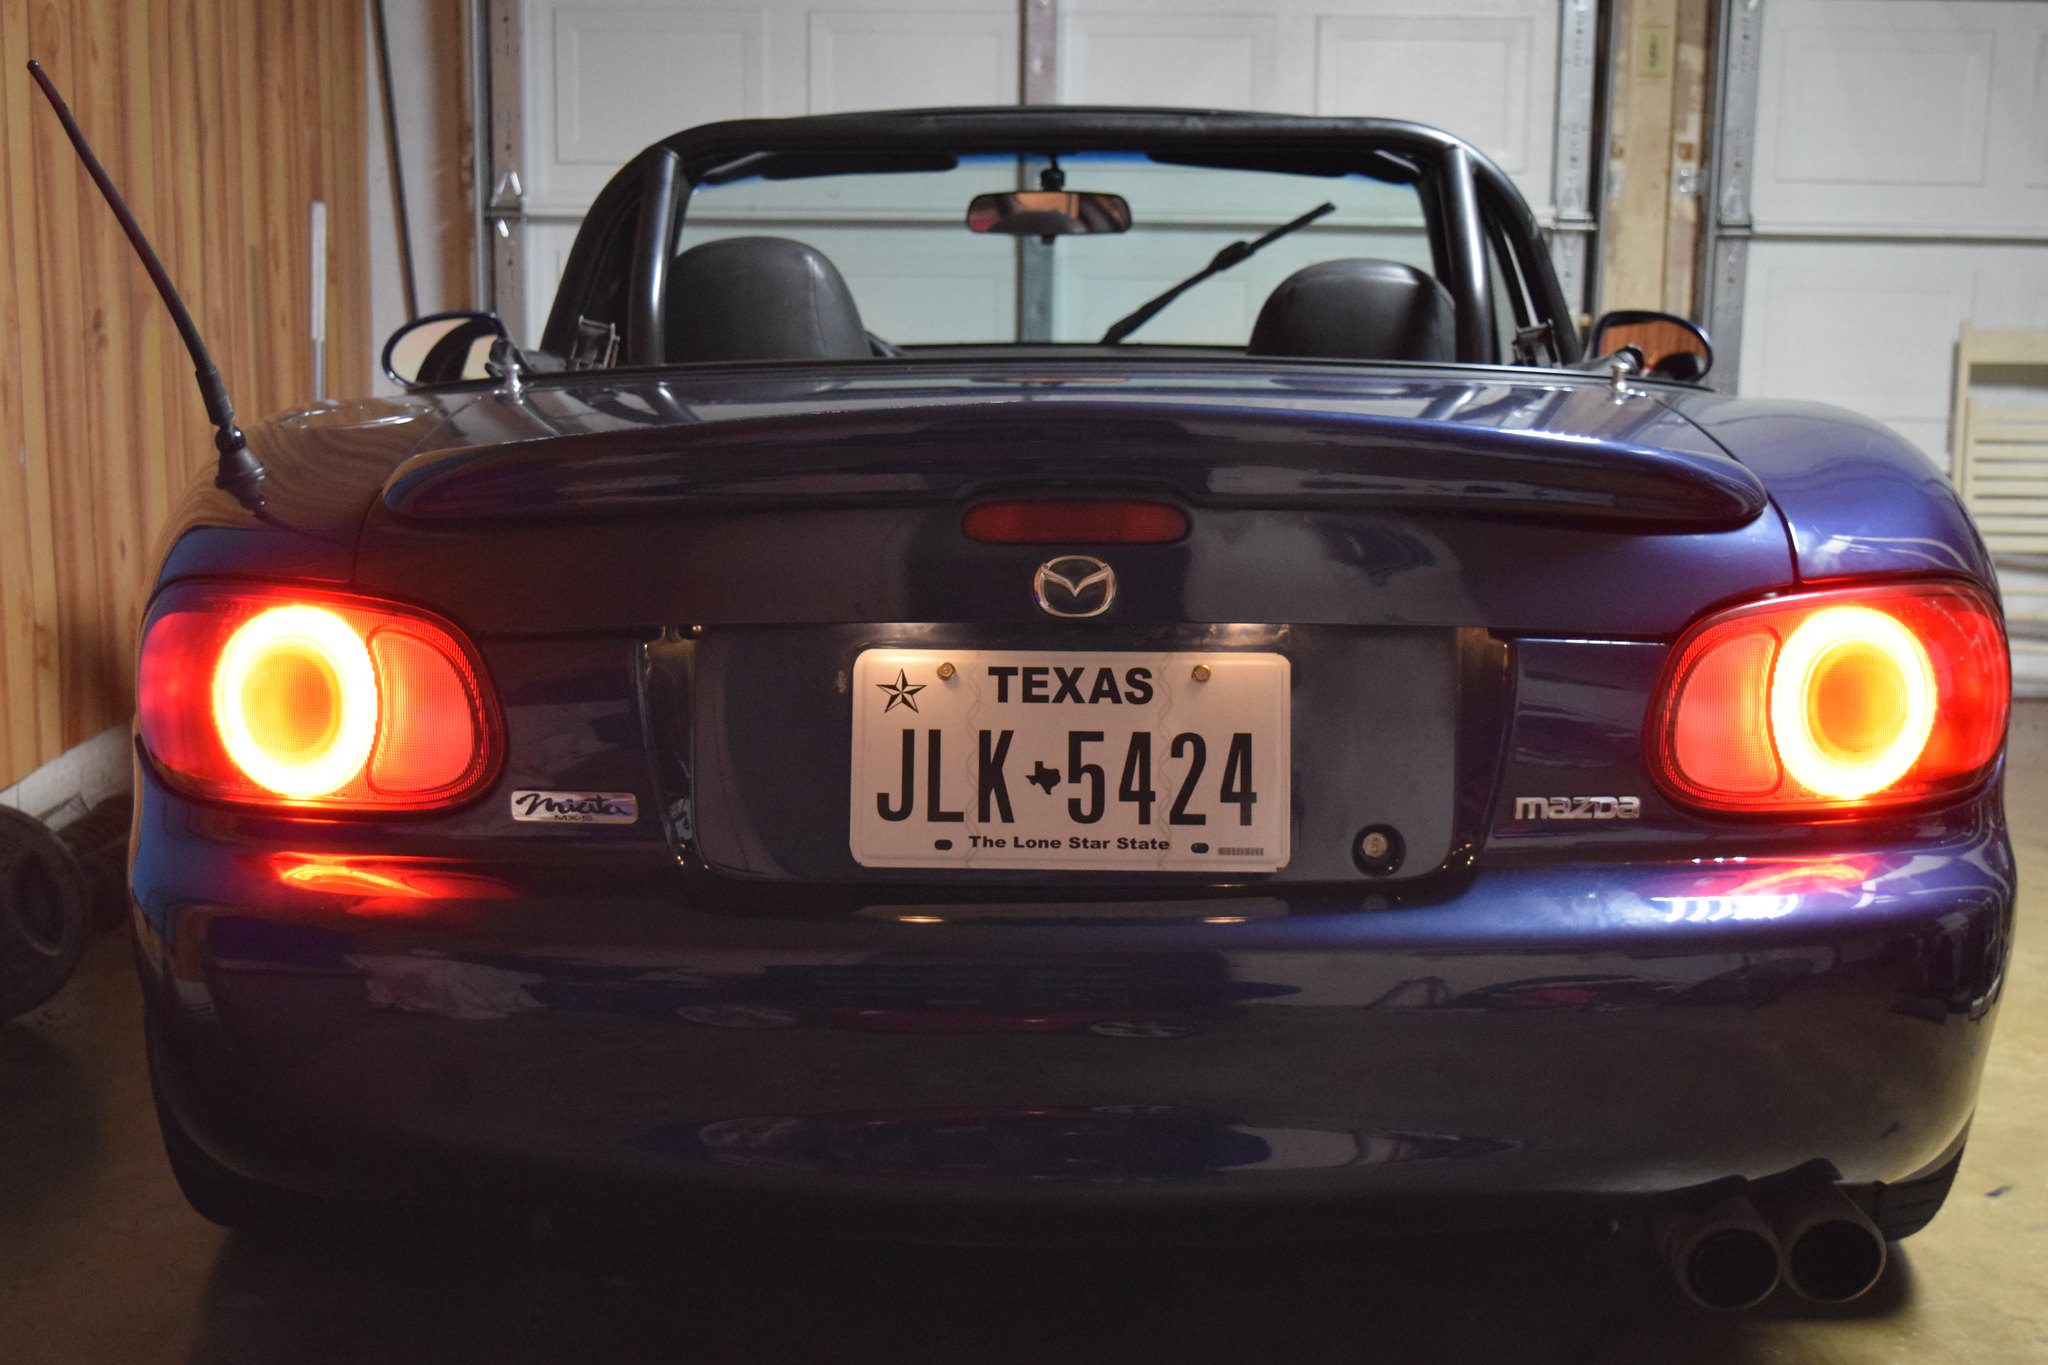
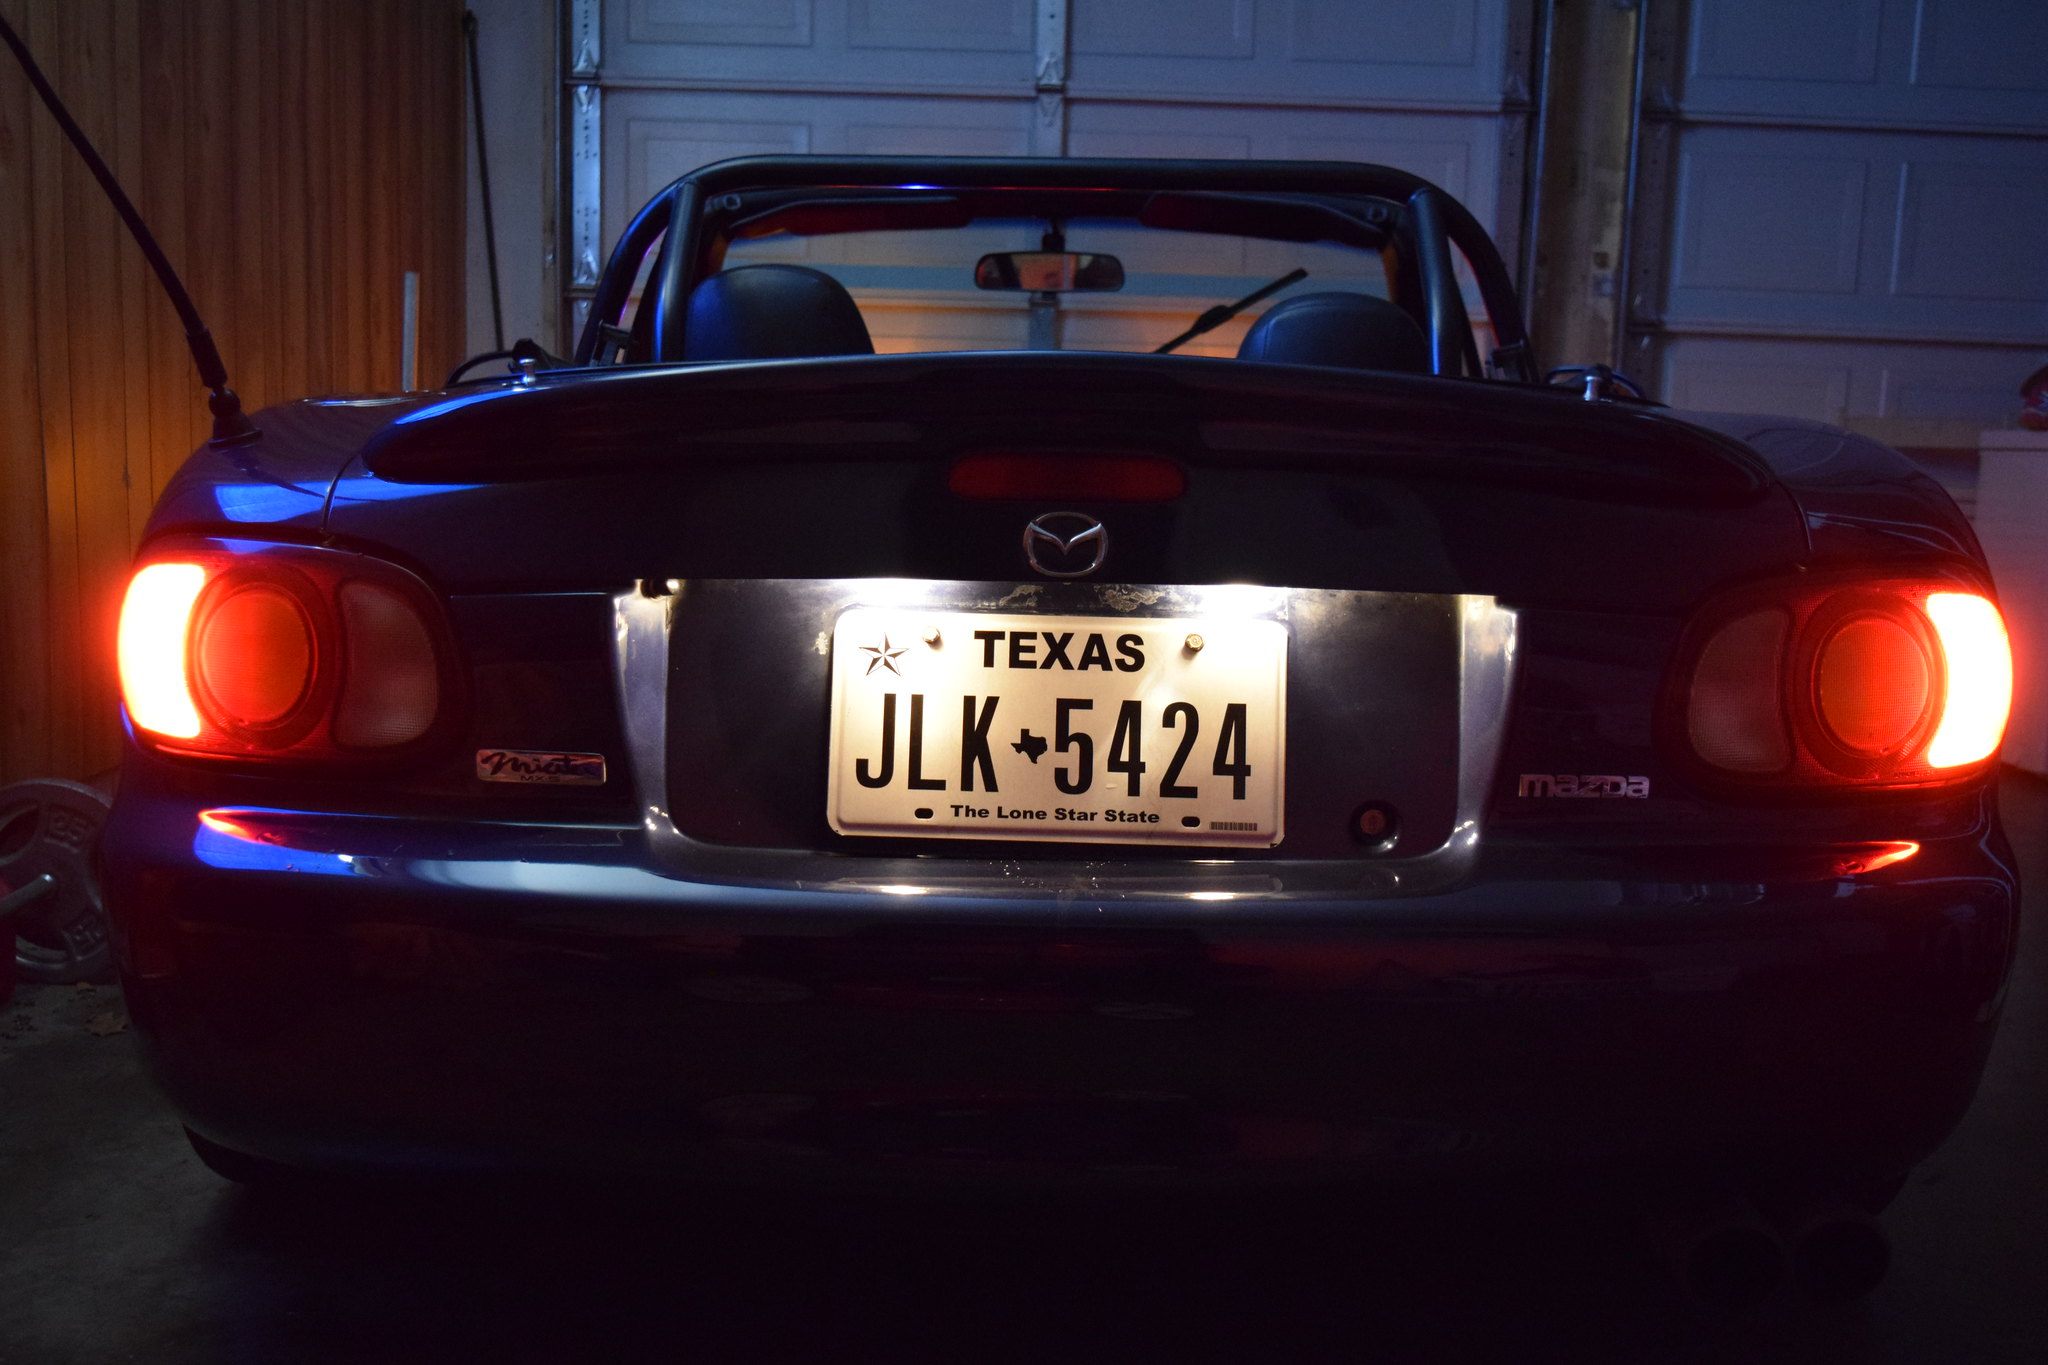
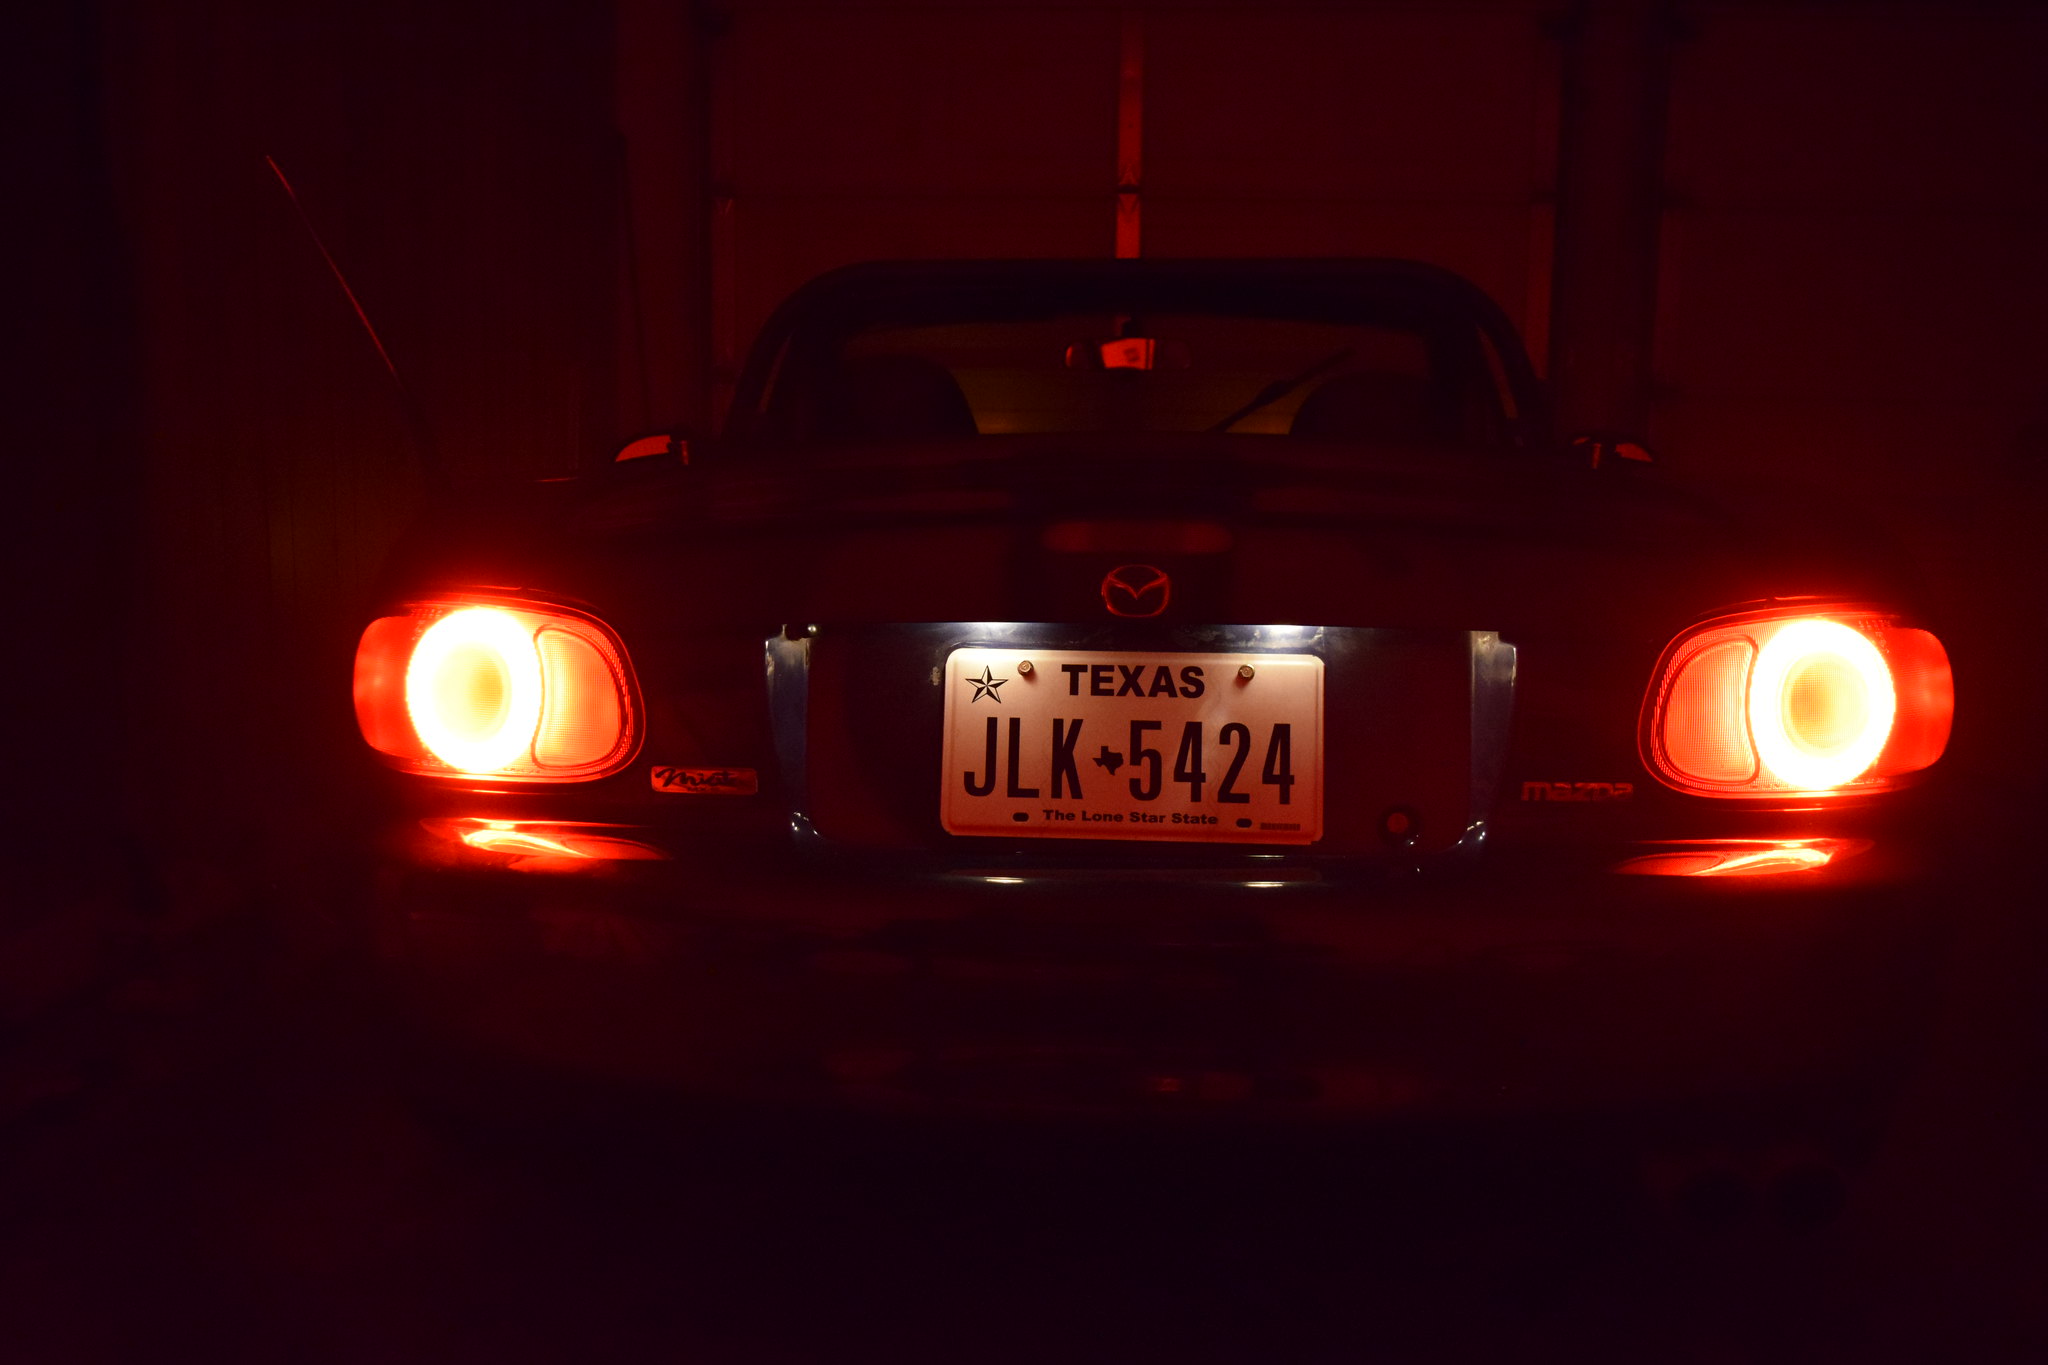
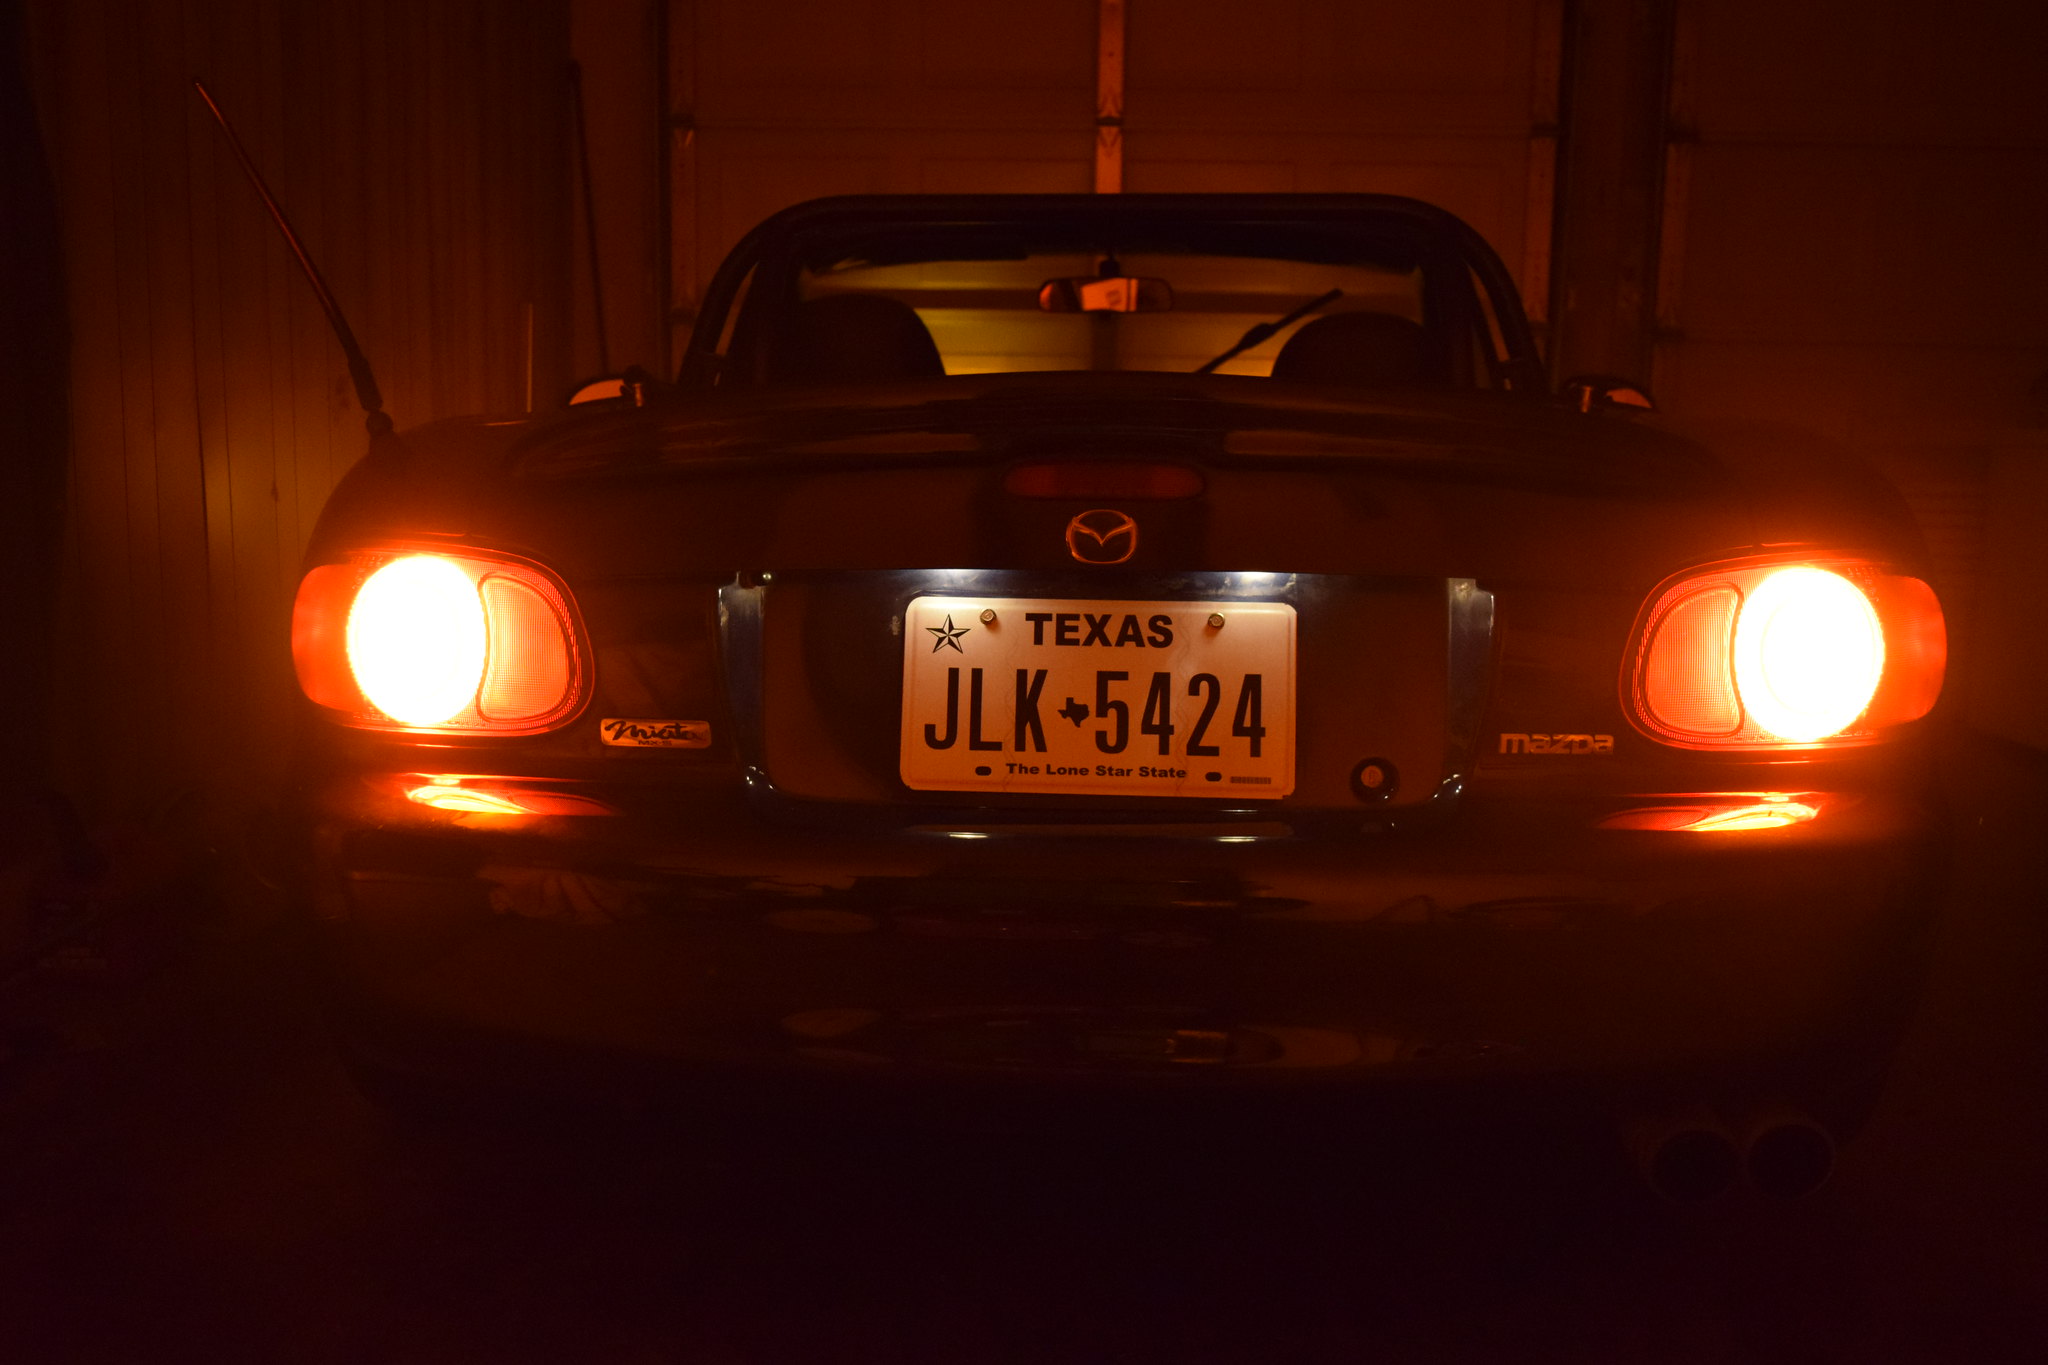
OEM NB1 taillights with running lights on
OEM NB1 taillights with 120mm red COB LED halo ring and oem running light disabled
OEM NB1 taillights with running lights on
OEM NB1 taillights with 120mm red COB LED halo ring and oem running light disabled
OEM NB1 taillights with 120mm red COB LED halo rings and 80mm amber COB LED halo rings with the hazards on
Finally a picture of the taillights with the LED rings installed but the lights off...
..as you can see for yourself you barely see the 80mm rings and really cant see the 120mm rings.
I am very happy with the results especially considering the cost wasn't much more than that of two sets quality LED bulbs for the running lights and turn signals but was rather time consuming and had about 9 hours in this project. Will get some pics in the daytime and try to get better night time pics and see if i can't get a better video and post it here as well.
'01 NB2 aka MisF1re: http://mazdaroadster.net/showthread....218#post207218
'97 M aka Warbird, gone but not forgotten: http://mazdaroadster.net/showthread....B&goto=newpost
Instagram: @greasemonkey2000
91BRG (11-19-2018),Agent☣Orange (07-01-2018),HarryB (07-01-2018),MiataQuest (07-01-2018),RustRat (07-03-2018),tsingson (07-02-2018)

Nice work!
Greasemonkey2000 (07-01-2018)
 Posting Permissions

 Reply With Quote