Page 1 of 3 123 LastLast
Results 1 to 15 of 31

Thread: That stupid BRG

  1. #1
    THAT'S AWESOME, CHEN FooSchnickens's Avatar
    Drives
    1991 BRG
    Location
    Hotlanta GA
    Join Date
    Dec 2011
    Posts
    301
    Thanks Given
    0
    Thanked 14 Times in 7 Posts

    That stupid BRG

    It's finally time to start me one of these threads.

    I have a lot of plans in the near future:


    Along with a sub-project I'll be calling "switchblade." More on that in a second.

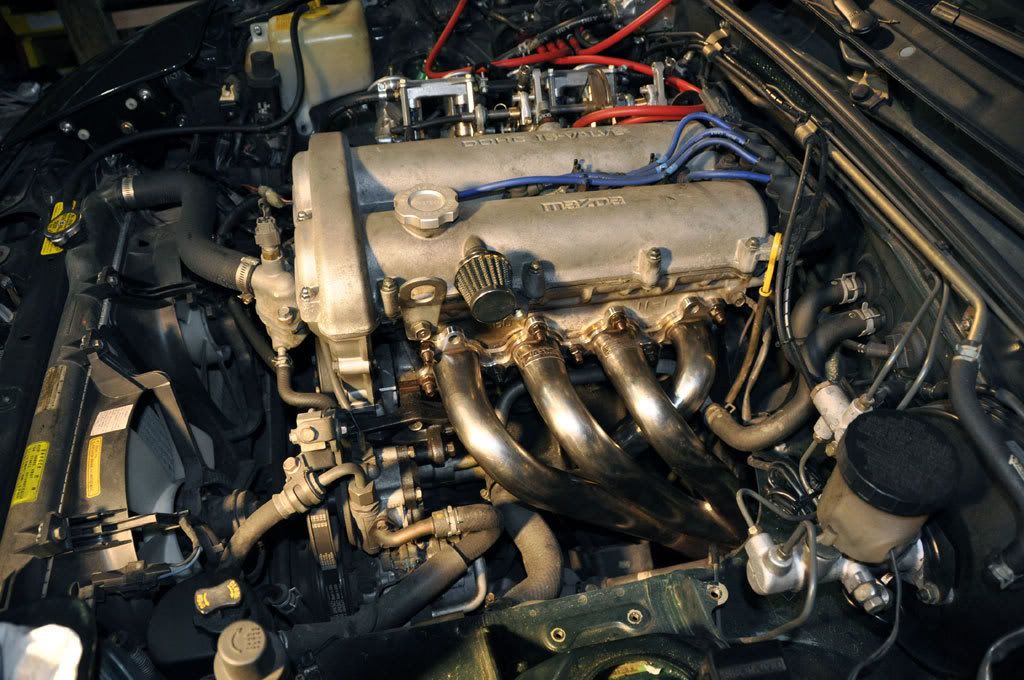
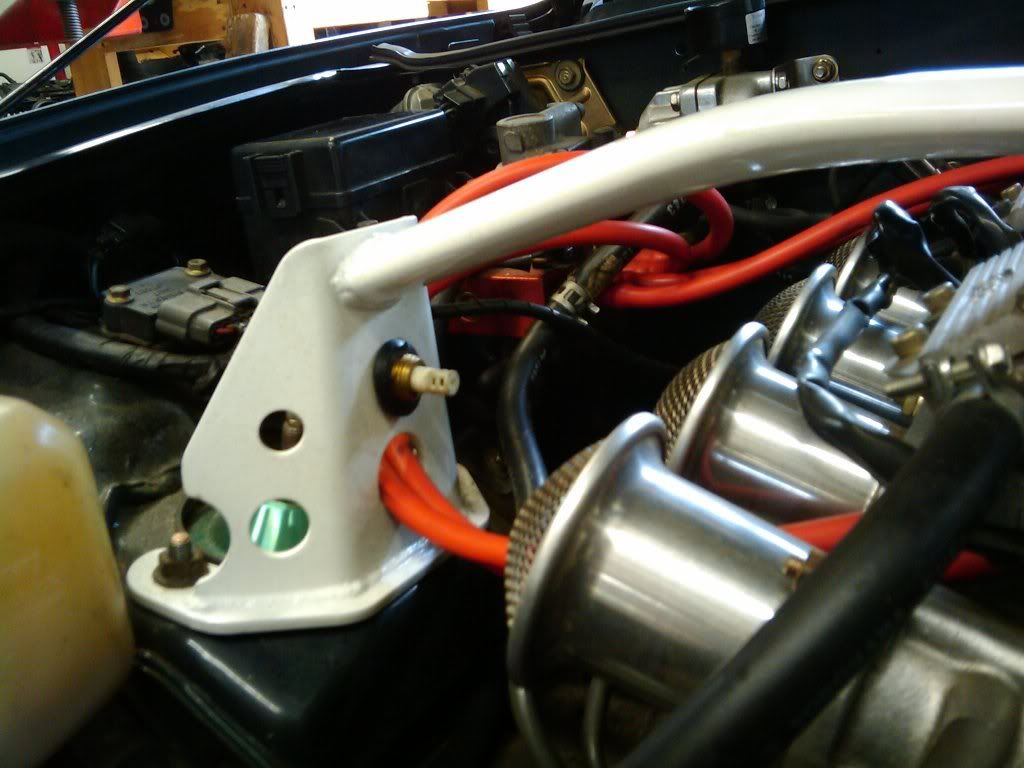
    I installed the air horns Friday morning and they look awesome. I left my camera at work, however, so no pics until tomorrow morning. I'll also put the harness bar in and start measuring out holes for the harness eyebolts as well.

    Next on the list is to start pulling the dash in order to clean it and start stripping the now defunct black paint off the top. I'll be flocking the top portion of the dash along with the meter hood and ZOOM center console. Once all that is done i'll install the gauge faces and headlight/hazard switches along with the dash.

    While the dash is in the process of being prepped I'll install the megasquirt and get it tuned. It's nice having a dyno right in your backyard. 8)

    Now, on to that other project I was talking about. I was holding off on posting this because I wanted to see how easy it would be to implement this design onto the miata. It turned out it was going to be less of a "bolt on" affair than I had hoped, so I scratched the idea of making a kit available to the masses.


    I'm working on adapting BMW front-tilting hood hardware to the miata. I was able to snag all the parts you see above for $7 from a pull-a-part.

    The rear plates fit perfectly inside the tray behind the firewall where the wiper mechanism sits, and will only require a couple studs to be welded on the side. The plates are adjustable once installed so being exact won't be entirely necessary.


    The two guide rollers are almost a perfect fit to the stock studs on the hood, so some quick drilling on hte guides will make easy work of that.


    Lastly, the front hinge. This is where the most modification will be necessary. On the radiator support there are two rubber stoppers. The area under these stoppers are raised. What needs to be done is to have those raised spots shaved down flat so that enough clearance is given to make the hood close flush. Even with those raised portions in place, the hood was only 1/4" off.


    Those bulges account for a good 3/4" of travel, so I plan on grinding them down flat and having a clean sheet of metal welded over the top. instead of trying to fill in the holes with cutouts. The same thing will be done on the hood to attach the hinge to it. Most of the mounting holes can be used, but being able to get inside the structual webbing of the hood in order to get bolts in there isn't going to be easy. So unless I find a way to get them in there I'll most likely be welding the brackets to the hood.

    The stock latch will be retained, though the safety catch will be removed. It won't be necessary anyhow since the rear guides are designed to hold the hood down shuold it pop open while driving.

    The final part of my plans involve polishing the hood. I saw several BRGs in Japan with hoods done up like this and really like the way it looks. I have access to a high speed grinder/polisher so once I get up the nerve to start stripping the paint I'll tackle that project.

    It looks like i've got quite a year ahead of me. I'll probably throw up some pictures tomorrow of the air horns as well as any progress I make on the dash. d('_'d)

    For now, i'm going to bed. Camping is a whole lotta fun but it sure does take a lot of energy out of you. -_-

    Oh yeah, pics:


    Hooray for progress!

    Though there was a sizable step taken backwards because...


    SOME JACKASS STOLE MY DASHBOARD >: |
    f00tography
    Chean Chay: they dont have pho in mexico
    In our minds. In our reality. In our world we are QUEEN DUCHESS TEAPOT HABERDASHERY!! RULER OF ALL!! PARTY OF ONE!!!
    http://i143.photobucket.com/albums/r...9616511700.png

  2. #2
    THAT'S AWESOME, CHEN FooSchnickens's Avatar
    Drives
    1991 BRG
    Location
    Hotlanta GA
    Join Date
    Dec 2011
    Posts
    301
    Thanks Given
    0
    Thanked 14 Times in 7 Posts
    lol jk there it is:


    I went ahead and pulled out my tan dash to start the process of getting it refinished and flocked, so I swapped in a beat up black dash we had laying around at the shop.

    I also went ahead and installed the new RS Products gauges and switches since I had everything taken apart. They both look awesome and now I only need a KG Works panel to set it all off.


    Marty's opinion:


    Ahh who cares about Marty anyhow...

    A few more pics of everything back together:


    What a day... TGIF!!!!!!!!!!!!!!!!!!!!!!!!!!

    Had a few spare minutes at work so I decided to spiff up the emblem a bit since it came in the mail.

    After being polished and painted in I set it in front of hte heater to dry quick (don't worry, the blobs just scrape off):


    And a few shots of hte finished product on the car:


    Just waiting on the clear coat to dry now and it'll be ready to install. d('_'d)

    Me go FAST!!


    Well decided to bite the bullet and finish this little project i've been working on for the past few, uhh.... a while.

    The first iteration turned out kinda crappy, but this time I got it right.

    Parts used:

    Polished wall plate from home depot
    Two-way momentary toggle switches
    Machine screws and nuts from home depot

    It's really pretty simple. Buy a couple of the plates if you're not familiar with working with the metal. Sometimes the ones you'll find are a pewter-like material, other times it will actually be stainless steel. Just depends on where you look.

    Take some thick paper and trace out the area where the switchplate will rest. Once you have a pattern you're happy with get to tracing and cutting! I used a small cutoff wheel on my dremel to do all the cutting on mine. Once you have the piece cut out, LIGHTLY grind down the edges with a bench grinder or dremel attachment. No need to cut yourself ;)

    Now that you have your blanking plate, pop out the switches from your center console. Trace the area that the switches used to be onto your blanking plate. This will help you center the switches in the right place. My switches were 15/32" in diameter, but yours may be different. I used a unibit to step up to the right size. Before you start drilling be sure to tape off the front of the plate with some heavy duty tape. You don't want to scratch that nice shiny finish!

    Once the switch holes are done you need to make two more holes. These will let you mount the plate to the center console. I used simple 1/8" machine screws with a allen head for a clean look. Find a good place on the console that you can screw into and have planty of strength and make your holes. Then put your plate in place and trace the location of the holes onto the plate. Drill the holes into your plate for the mounting screws and you can finally pull off the tape!

    Now simply attach your switches and tighten everything down.

    For wiring.... I'm still working on that part. I think I have a solution that will work but I want to test it out before I go frying something

    Here's the finished pictures. I didn't have my camera with me last night to take pics of the progress.


    Don't mind the crescents on the plate, they're just reflections from the flash going off.
    f00tography
    Chean Chay: they dont have pho in mexico
    In our minds. In our reality. In our world we are QUEEN DUCHESS TEAPOT HABERDASHERY!! RULER OF ALL!! PARTY OF ONE!!!
    http://i143.photobucket.com/albums/r...9616511700.png

  3. #3
    THAT'S AWESOME, CHEN FooSchnickens's Avatar
    Drives
    1991 BRG
    Location
    Hotlanta GA
    Join Date
    Dec 2011
    Posts
    301
    Thanks Given
    0
    Thanked 14 Times in 7 Posts
    It's dusty in here....

    Time to play catch up!!

    Shortly after solidifying plans for going to Japan, I sourced a St May Shotgun and put it on post haste!


    I grew tired of the daisies (as most people do) and had these guys plop in my lap at the shop. Customer bought some Chaps and didn't care what happened to his old wheels. Score.


    They weren't on for long because I got some new tires in and put them on my newly acquired Bridgestone Super RAPs:


    Big thanks to Makoto over in Japan for selling me these. He's the man. d('_'d)

    Shortly after getting the new wheels on, I received my new top hats from danscreations so I could FINALLY re-install my Teins.


    The finished product is undoubtedly awesome:


    Moving back inside the car, I installed a new wheel and removed most of the airbag system at the same time. When I finish redoing the stock dash I pull the rest of the stuff out and also start the tuck in the engine bay.


    I also took the free time I had to relocate the IAT sensor for the megasquirt. It had been on the hot side of the engine for the sake of getting everything together and running. I made a hole in the fuse box bracket and now have it pointing at the air horns. Made a small difference it the temps the sensor saw, so the engine will probably be a bit more efficient now.

    Next up is to make a shroud similar to this:


    It'll keep the hot air coming through the radiator down below the air horns and I'll also make a little vent to being in fresh air from the headlight lid, or do like he did in the pic and just use some dryer vent tubing. I'll be doing this in tandem with the wire tuck so that I can utilize as much of the open space as possible.

    I'm also going to relocate the IAC setup to a less prominent location. Probably on the firewall side of the fuse box bracket. Getting rid of all the random coolant hosiery will help out too. After a bit of research I'll only have one "extra" hose and it will hardly even be visible.

    Hopefully all of this will be done in time for CR@TG, I think it's a doable timeframe.

    JEEZY CREEZY

    New strut tower bar:


    Thanks to paperchasin for selling it, and all the dimbulbs who lowballed/backed out of buying it so I could t('_'t)


    As a result of the STB, I had to rearrange the idle controls which I had been meaning to do for the longest time. The red hosing will NOT be staying, it's just what I had on hand at the time.


    All that remains to be done prior to the gap is to attempt to finish refinishing my dash and make the shroud for the intake side of the bay. I doubt either will get done since i'm going to be in NM the week prior to CR@TG. Oh well, I think I did rather well in spite of myself. :3
    f00tography
    Chean Chay: they dont have pho in mexico
    In our minds. In our reality. In our world we are QUEEN DUCHESS TEAPOT HABERDASHERY!! RULER OF ALL!! PARTY OF ONE!!!
    http://i143.photobucket.com/albums/r...9616511700.png

  4. #4
    THAT'S AWESOME, CHEN FooSchnickens's Avatar
    Drives
    1991 BRG
    Location
    Hotlanta GA
    Join Date
    Dec 2011
    Posts
    301
    Thanks Given
    0
    Thanked 14 Times in 7 Posts
    Woo header.


    JDM from stem to stern 8)


    K, watch for the glowing header too:


    Here are a couple pics of the new seats. Also installed is some new carpet, it's awesome. Super lush and a nice heavy backing for good heat and sound absorption. The roll bar went back in today, just need to trim the rear carpet to make it all fit nicely back there. I'll take a couple more pics once that's done.

    For now, enjoy!


    One thing at a time. Like sensor placement!


    I don't know why I didn't notice that the IAT fits PERFECTLY in there earlier.
    f00tography
    Chean Chay: they dont have pho in mexico
    In our minds. In our reality. In our world we are QUEEN DUCHESS TEAPOT HABERDASHERY!! RULER OF ALL!! PARTY OF ONE!!!
    http://i143.photobucket.com/albums/r...9616511700.png

  5. #5
    Idling - Listen to it purr...
    Join Date
    Dec 2011
    Posts
    16
    Thanks Given
    0
    Thanked 3 Times in 2 Posts
    Glad to see you documenting one of my favorite builds. I'd even go so far as to say "important" builds. Here in Atlanta, we have some pretty strong naturally aspirated Miatas, some strong supercharged both M45 and MP62 Miatas, and some of the best turbo cars as well (one local has a monster turbo car running 405 horsepower from a 1.8 with a 99 head). we also have a guy running the full driveline from a Cadillac CTS-V, it started at 405, and then it went to school, now it runs around the track on R6 slicks 275 mm wide!

    But I think that this car is more important than any of them. Why? Because Foo has taken the 1.6 engine, added a stand alone ecu, a set of Fuji ITBs and some really exotic header and exhaust, to create a high revving beast, with instantaneous throttle response, and an intake noise just short of Gabriel's horn calling up the rapture. It may only be putting down 110-115 whp on any given day (still a he'll of an improvement over the initial figures, closer to 85 whp), but they are real horses, he doesn't cheat and switch out to a more friendly dyne to pump up his numbers. Foo's been at this game a while, gaining horses a few here and there, over the past half decade or so. The knowledge that he gains towards what makes power inan engine running soley on atmospheric pressure, that will surely benefit us all, whether we choose to go big displacement, or small, turbo or sc. Foo's on a mission...and it matters.

  6. #6
    1,000 rpm - releasing the clutch Kolbotn's Avatar
    Drives
    1992 Silverstone
    Location
    Oslo, Norway
    Join Date
    Dec 2011
    Posts
    73
    Thanks Given
    0
    Thanked 7 Times in 3 Posts
    That looks really nice! The lotus seats look awesome with The square stitching and the super Raps complete The classic look!

  7. #7
    2,000 rpm - light wheelspin, no bog here! oldcafe's Avatar
    Drives
    1991 BRG
    Location
    Italy
    Join Date
    Dec 2011
    Posts
    218
    Thanks Given
    39
    Thanked 312 Times in 71 Posts
    Wow, there is another set of super rare Bridgestone RAP in magnesium, here in Italy


    Spaghetti Garage Italian Taste

  8. #8
    THAT'S AWESOME, CHEN FooSchnickens's Avatar
    Drives
    1991 BRG
    Location
    Hotlanta GA
    Join Date
    Dec 2011
    Posts
    301
    Thanks Given
    0
    Thanked 14 Times in 7 Posts
    jeeeeeeeeesssssuuuuuuusssssssss O_O
    f00tography
    Chean Chay: they dont have pho in mexico
    In our minds. In our reality. In our world we are QUEEN DUCHESS TEAPOT HABERDASHERY!! RULER OF ALL!! PARTY OF ONE!!!
    http://i143.photobucket.com/albums/r...9616511700.png

  9. #9
    Idling - Listen to it purr...
    Join Date
    Dec 2011
    Posts
    16
    Thanks Given
    0
    Thanked 3 Times in 2 Posts
    Quote Originally Posted by FooSchnickens View Post
    jeeeeeeeeesssssuuuuuuusssssssss O_O
    +1
    that's badass alright.

  10. #10
    THAT'S AWESOME, CHEN FooSchnickens's Avatar
    Drives
    1991 BRG
    Location
    Hotlanta GA
    Join Date
    Dec 2011
    Posts
    301
    Thanks Given
    0
    Thanked 14 Times in 7 Posts
    I never even knew they made mag versions of them. Maybe that's why that one set I saw on YAJ several years back were nearly $2k. I can only imagine what they weigh. If my alu rims weigh in at just over 10lbs per wheel, those mag wheels can't weigh much more than 7lbs.
    f00tography
    Chean Chay: they dont have pho in mexico
    In our minds. In our reality. In our world we are QUEEN DUCHESS TEAPOT HABERDASHERY!! RULER OF ALL!! PARTY OF ONE!!!
    http://i143.photobucket.com/albums/r...9616511700.png

  11. #11
    1,000 rpm - releasing the clutch miatasaint's Avatar
    Location
    Lanta Jawja
    Join Date
    Dec 2011
    Posts
    82
    Thanks Given
    0
    Thanked 0 Times in 0 Posts
    I love your car foo. Badass thread too! Thanks for the info!

  12. #12
    THAT'S AWESOME, CHEN FooSchnickens's Avatar
    Drives
    1991 BRG
    Location
    Hotlanta GA
    Join Date
    Dec 2011
    Posts
    301
    Thanks Given
    0
    Thanked 14 Times in 7 Posts
    Hopefully I'll be able to start adding to this thread again soon now that I'm back on my feet.
    f00tography
    Chean Chay: they dont have pho in mexico
    In our minds. In our reality. In our world we are QUEEN DUCHESS TEAPOT HABERDASHERY!! RULER OF ALL!! PARTY OF ONE!!!
    http://i143.photobucket.com/albums/r...9616511700.png

  13. #13
    2,000 rpm - light wheelspin, no bog here! LostSoulMiata's Avatar
    Drives
    Your mom
    Location
    North Port, FL
    Join Date
    Dec 2011
    Posts
    151
    Thanks Given
    0
    Thanked 1 Time in 1 Post
    Yay!!
    Andrew - The JDM Redneck
    1993 NA - "Ankle Biter" 1.8 swap, added lightness, basics for now....
    1978 Honda CB750F SOHC - "Lucky 13" Cafe Fighter
    2007 CRF50 - 108cc Stroker, street tires, BMX bar setup

  14. #14
    Ninja Messiah kung fu jesus's Avatar
    Drives
    1999 White
    Location
    Atlanta, GA
    Join Date
    Dec 2011
    Posts
    15,852
    Thanks Given
    2,791
    Thanked 7,202 Times in 3,433 Posts
    Quote Originally Posted by FooSchnickens View Post
    jeeeeeeeeesssssuuuuuuusssssssss O_O
    this.

  15. #15
    THAT'S AWESOME, CHEN FooSchnickens's Avatar
    Drives
    1991 BRG
    Location
    Hotlanta GA
    Join Date
    Dec 2011
    Posts
    301
    Thanks Given
    0
    Thanked 14 Times in 7 Posts
    Quote Originally Posted by LostSoulMiata View Post
    Yay!!
    Yup. Paid off the last of my unemployment debt last night so from here on out I'm in the black.

    Quote Originally Posted by kung fu jesus View Post
    this.
    You.
    f00tography
    Chean Chay: they dont have pho in mexico
    In our minds. In our reality. In our world we are QUEEN DUCHESS TEAPOT HABERDASHERY!! RULER OF ALL!! PARTY OF ONE!!!
    http://i143.photobucket.com/albums/r...9616511700.png

Page 1 of 3 123 LastLast

Posting Permissions

  • You may not post new threads
  • You may not post replies
  • You may not post attachments
  • You may not edit your posts
  •