You sir, work miracles. If I ever travel to the UK, it'd be a pleasure to meet you and shake your hand.Cheers!


You sir, work miracles. If I ever travel to the UK, it'd be a pleasure to meet you and shake your hand.

That is probably the nicest thing anyone, anywhere has said to me. Period. Thankyou.Originally Posted by speedypenguin

WASABI (12-01-2013)
Just finished reading your build. You are truly gifted! I enjoyed reading your build so much I think I'm going to re-read it again right now!
Thankyou very much
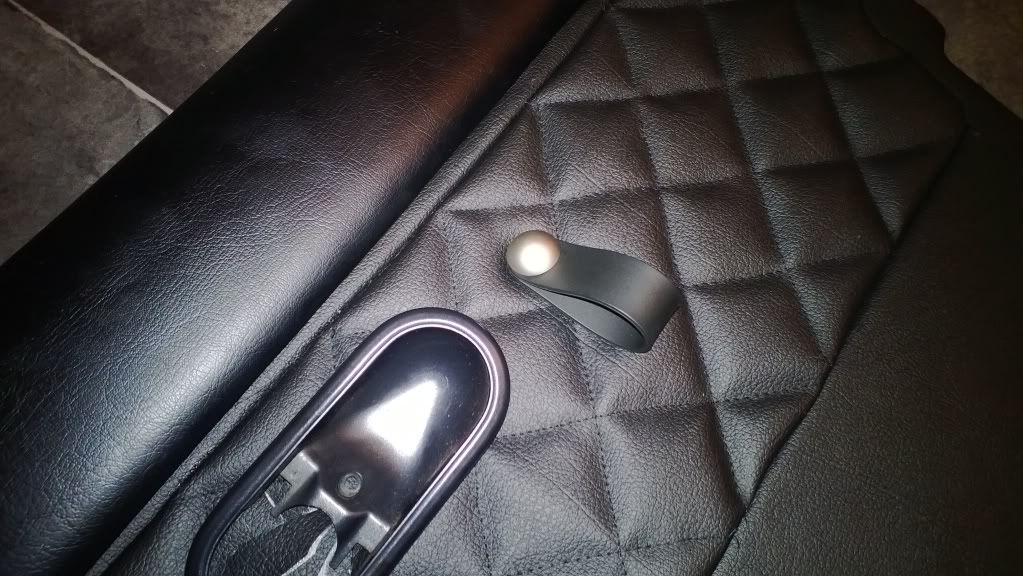
Made door cards with my new bargain vintage door pulls.
The quilted bit is velcro'd in - means I can make several differnet inserts...so far making the squares below, same in red leather, diamond stitch in black and grey suede
Thankyou.
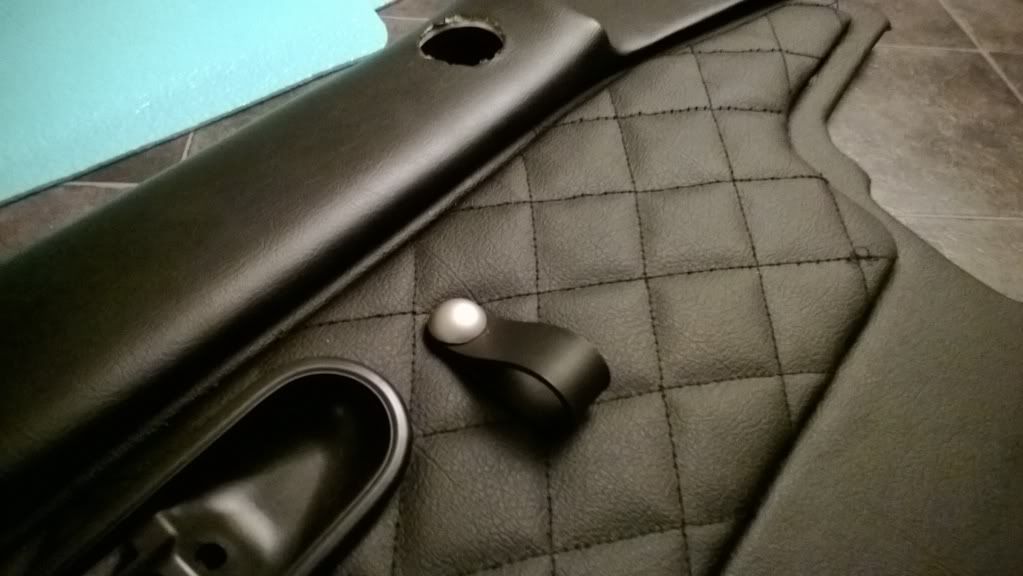
Right then...that previous attempt above... not at all happy with it as the edges were just not straight enough and it didn't sit right... but easy enough to take off and do a new panel. Trial and error I guess...would rather show my cack handedness than not... so that insert is going in the bin
So changed the technique of manufacture and now I am happy, so all the other inserts will be done that same way now. This time, I sewed the leather with just wadding backing...in a diamond pattern this time and this was then all glued to a 2mm polycarb panel (lexan) in the same shape. So it is nice and stiff. Velcro on the back and because it is stiff, I don't need as much....
SO marked out where the velcro goes on a template and can now make all the other panels ready to chuck on
Much prefer diamond pattern...I also used a thinker stronger thread.
Finished piece... lines are very neat now and I am actually quite pleased with them sitting a little proud.
Time for a beer I think
Hmm.. a little pulled thread...will sort that.

Oh dear. This thread has me thinking about building things again.... Good work, sir! I have no clue how you did most of this. Can you PLEASE create some "dummies" threads? (Including the tools... for example how to make the KG works style panel, with even more detail - and how its wired up?)
2012: Purchased Miata, Laid off 3 days later. 4th place overall (default!), NWOR SCCA (RTR)
2013: Budget RTR build, massive increase in participation, 3rd place overall, NWOR SCCA (RTR)
2014: Suspension and more active competition in STS. 3rd place overall, NWOR SCCA
2015: Time for some "form" and vintage styling (while still racing NWOR, of course).
Check out my Miata Journal: http://mazdaroadster.net/showthread....-miata-journal
Hammy (11-30-2013)
Hi and thankyou. Sure, I need to update this thread anyway....
Here's a how to I put on Nutz tonight to help some folk out with wiring...on the KG ala cluster:
Hi,
I've been asked a few times about clusters and wiring them. So here is a how to...
This is intended for those that are not quite confident when it comes to wiring. This is simple and requires no special skillz, just some patience and method
Get yourself suitable work area - man cave is best. Beer and music optional.
For this demo here's some bits we gonna use...
^ The led's for the kg cluster are from fleabay - just search LED pilot lights....they cost about £1.50 each (if that). We are going to use single core cable - or bell cable - I use colour coded, just cos I like it that way..so negative is always white and positive is a colour. You don't have to - but as LED's are diodes they are polarity sensitive. I usually mark the positive terminal on the pilot lights with a mark (as you can see above) - I find the positive by using a common or garden 1.5v battery or power supply.
The four centre warning lights are T5 type and there are four. The twp outer amber warning lights are also T5. The main beam and indicators are T10.
We are going to use sacrificial led bulbs - the T10 (bigger) and T5 type (smaller) - I use these as they are 10-a-penny from fleabay - the parts I am interested in are the plastic holders. I have accumulated loads over the years:
We are going to replace these bulbs in the cluster. No special eletrickery skillz are required to do this...
And the back - you can see the bulb holders - large and small: The warning light holders are black and normal illumination bulbs ahve green holders:
Demo.
Cut some wire - approx 10cm:
Get one of the sacrificial led's:
Bend the wires on each side back:
Pull the led out of the holder:
(keep the led - it might come in handy for some future project
Pair the wires and strip one end - approx 20mm:
Push the two wires through the holder:
Bend back opposite sides - just like the led you took out:
Twist the wires together:
Strip the other ends of the wire pairs, and fix to the pilot light terminals (remember which is positive) and solder in place:
Take the bulbs out of back of cluster:
Take the bulbs out... now you can see how it fits together:
Feed led's though the holes in the panel (also remember that the bigger T10 holders will not fit through the holes so tak the holder back off:
Feed through the cluster:
This is why we cut the wires to 10cm - to give you enough room to plug them into the bulb holders:
Push in and twist the caps back in place:
[img]http://i1295.photobucket.com/albums/b624/ian_j_cowan/temporary_zps6f44990f.jpgv]
Now don't worry at this stage if you have got positive or negative the right way round cos we gonna test.
Testing the lights:
Either use a batter or a power supply with up to 3v output...
Locate the common negative track on the printed circuit board on the back (it's just above the main beam light):
Unscrew the screw a little and attach wire behind and screw back in place - this wire will go to negative on either the power supply or battery:
Locate all the positive connections for the lights on the top left:
Now with a wire connected to positive on either battery or power supply, touch the light you want to test... if it lights up (you can just see red reflection in picture) you have the light in the right way:
If the light does not light, unscrew the bulb holder on back of cluster, turn 180 degrees and twist back in place.. test again, it should now light...
Now do the same with the remainder and job done
I'll post more details...err, in more details if it helps anyone
Last edited by Hammy; 11-30-2013 at 07:12 PM. Reason: Bad spelling :)
There is a thread here: http://www.mx5nutz.com/forum/index.php?showtopic=136568
Which is something that I am working on..just started and testing at the moment. I have about a dozen designs on the go at the moment and will get them all finished up in the next week or so...all this 3d method. This one below is a test to try things out and hone the method. I will put full how-to's up at some point also.
SO did a test tonight. Learned some things along the way changing techniques.
So here is a test shark's mouth, need to finish the eye and the tongue. Not good enough for me, but it was a test so I wasn't aiming for perfection.


too cool!! loving all the great info in here!! Thanks Given!
Hammy (11-30-2013)
Thankyou, that is very kind of you to say Sir

I love those door panels!!!!
Hammy (12-01-2013)

This build is so d@mn cool. You are one creative guy. Now I finally have something to replace Breaking Bad. I guess I have an addition problem.
You'll have to excuse me as it's time for my medication DSC_0229.jpg
Hammy (12-01-2013)
VERY much appreciated. 2 questions - and forgive me, but this is "for dummies," after all...
On the black gauge piece - what is this made out of? How do you get the larger holes perfect? And - lastly, how does it attach? It almost looks as if its wood or particle board?
2012: Purchased Miata, Laid off 3 days later. 4th place overall (default!), NWOR SCCA (RTR)
2013: Budget RTR build, massive increase in participation, 3rd place overall, NWOR SCCA (RTR)
2014: Suspension and more active competition in STS. 3rd place overall, NWOR SCCA
2015: Time for some "form" and vintage styling (while still racing NWOR, of course).
Check out my Miata Journal: http://mazdaroadster.net/showthread....-miata-journal
Hammy (12-01-2013)
You're welcome.
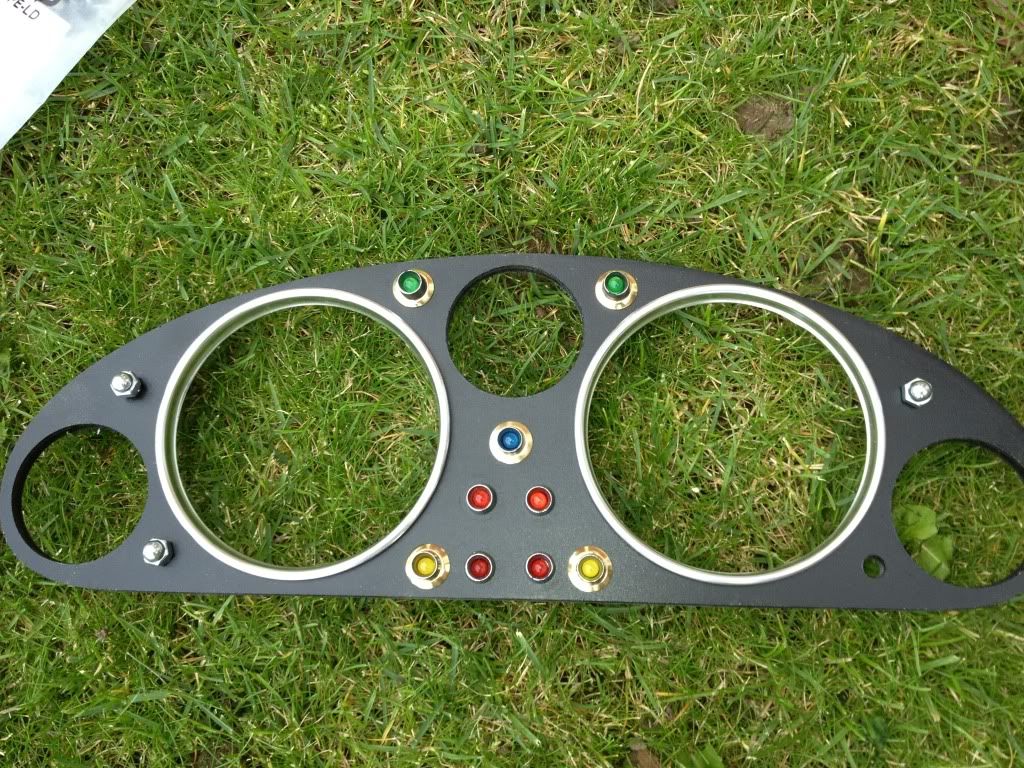
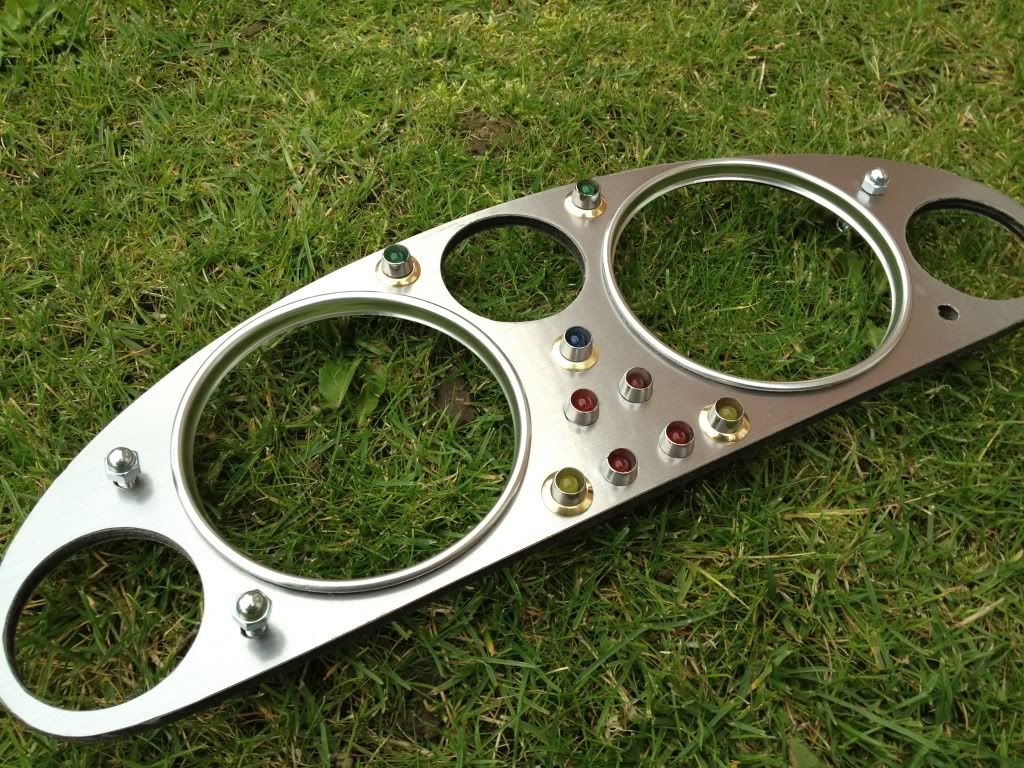
I made a few of them out of laminate flooring because it is a very stable material. Also, as I am not exactly flush with cash, you have to get get creative and use what is available - thrifty, not stingy is my forced motto
I have made several out of different types of material, but found using a strip of laminate flooring I can get several out of, it is good material to work with, forgiving and gives a fantastic surface which aids a good finish.
I make the clear lenses out of plastic.
I cut the holes with a circular cutter. I don't have the exact size cutters (91mm and 45mm) - so I use 42mm and 88mm and I smooth it out with a rotary sanding bit. They don't have to be absolutely perfect if you are going to use gauge rings. IN the pics below I made the larger gauge rings myself...and I am busy making the smaller ones too.
Dandy (12-01-2013),theothersawyer (12-01-2013)

Your DIY skills are top notch, Hammy. Well done, sir.
Link to the most lack-luster build in MR history
Hammy (12-01-2013)
 Posting Permissions

 Reply With Quote